
What's new: Changelog
See the changelog here.
1) Setting up your web app/website/HTML files
Option A) Use a URL for accessing your web application (= store files online)
Create a mobile-optimized website, for example, using jQuery Mobile and upload your site to your webserver/webspace. WebViewGold supports all kinds of web apps/websites (including HTML, PHP, WordPress, Progressive Web Apps, HTML 5 Games, WiX, apprat.io, bubble.io, …). By default, WebViewGold for Android permits both HTTPS content and HTTP content. However, if you prefer to enhance app security by enabling only HTTPS content, there's an option to modify this setting (and/or consider 'BLOCK_SELF_SIGNED_AND_FAULTY_SSL_CERTS' option). Please make sure to optimize your website to feel like an app. In any case, please consider a professional User Experience/UX Review on UXreviewer.io or similar services for best Play Store approval results. Such a UX review also helps you to achieve better customer retention in general for your product with suggestions for improvement.
Option B) Use a local HTML folder for accessing your web application (= store files within the app)
WebViewGold supports web apps based on local HTML folders, too: Copy your HTML/CSS/JavaScript files to the Android Studio project and set USE_LOCAL_HTML_FOLDER to true (see next step). Please consider a professional User Experience/UX Review on UXreviewer.io or similar services for best Play Store approval results. Such a UX review also helps you to achieve better customer retention in general for your product with suggestions for improvement.
Option C) Use an HTML folder if the user is offline, and use a remote URL if the user is online (= store files online + store backup/fallback files within the app)
Copy your HTML/CSS/JavaScript files to the Android Studio project, set USE_LOCAL_HTML_FOLDER to false (see next step) and set FALLBACK_USE_LOCAL_HTML_FOLDER_IF_OFFLINE to true (see next step). Please consider a professional User Experience/UX Review on UXreviewer.io or similar services for best Play Store approval results. Such a UX review also helps you to achieve better customer retention in general for your product with suggestions for improvement.
2) Setting up WebViewGold for Android
Download the WebViewGold app template for Android Studio here.
Want to build without installing Android Studio? The WebViewGold Cloud Builder (paid add-on) lets you configure, build, and upload your app to the Play Store directly from your browser.
Download Android Studio if you did not install Android Studio already.
Afterward, open Android Studio:
Choose Open: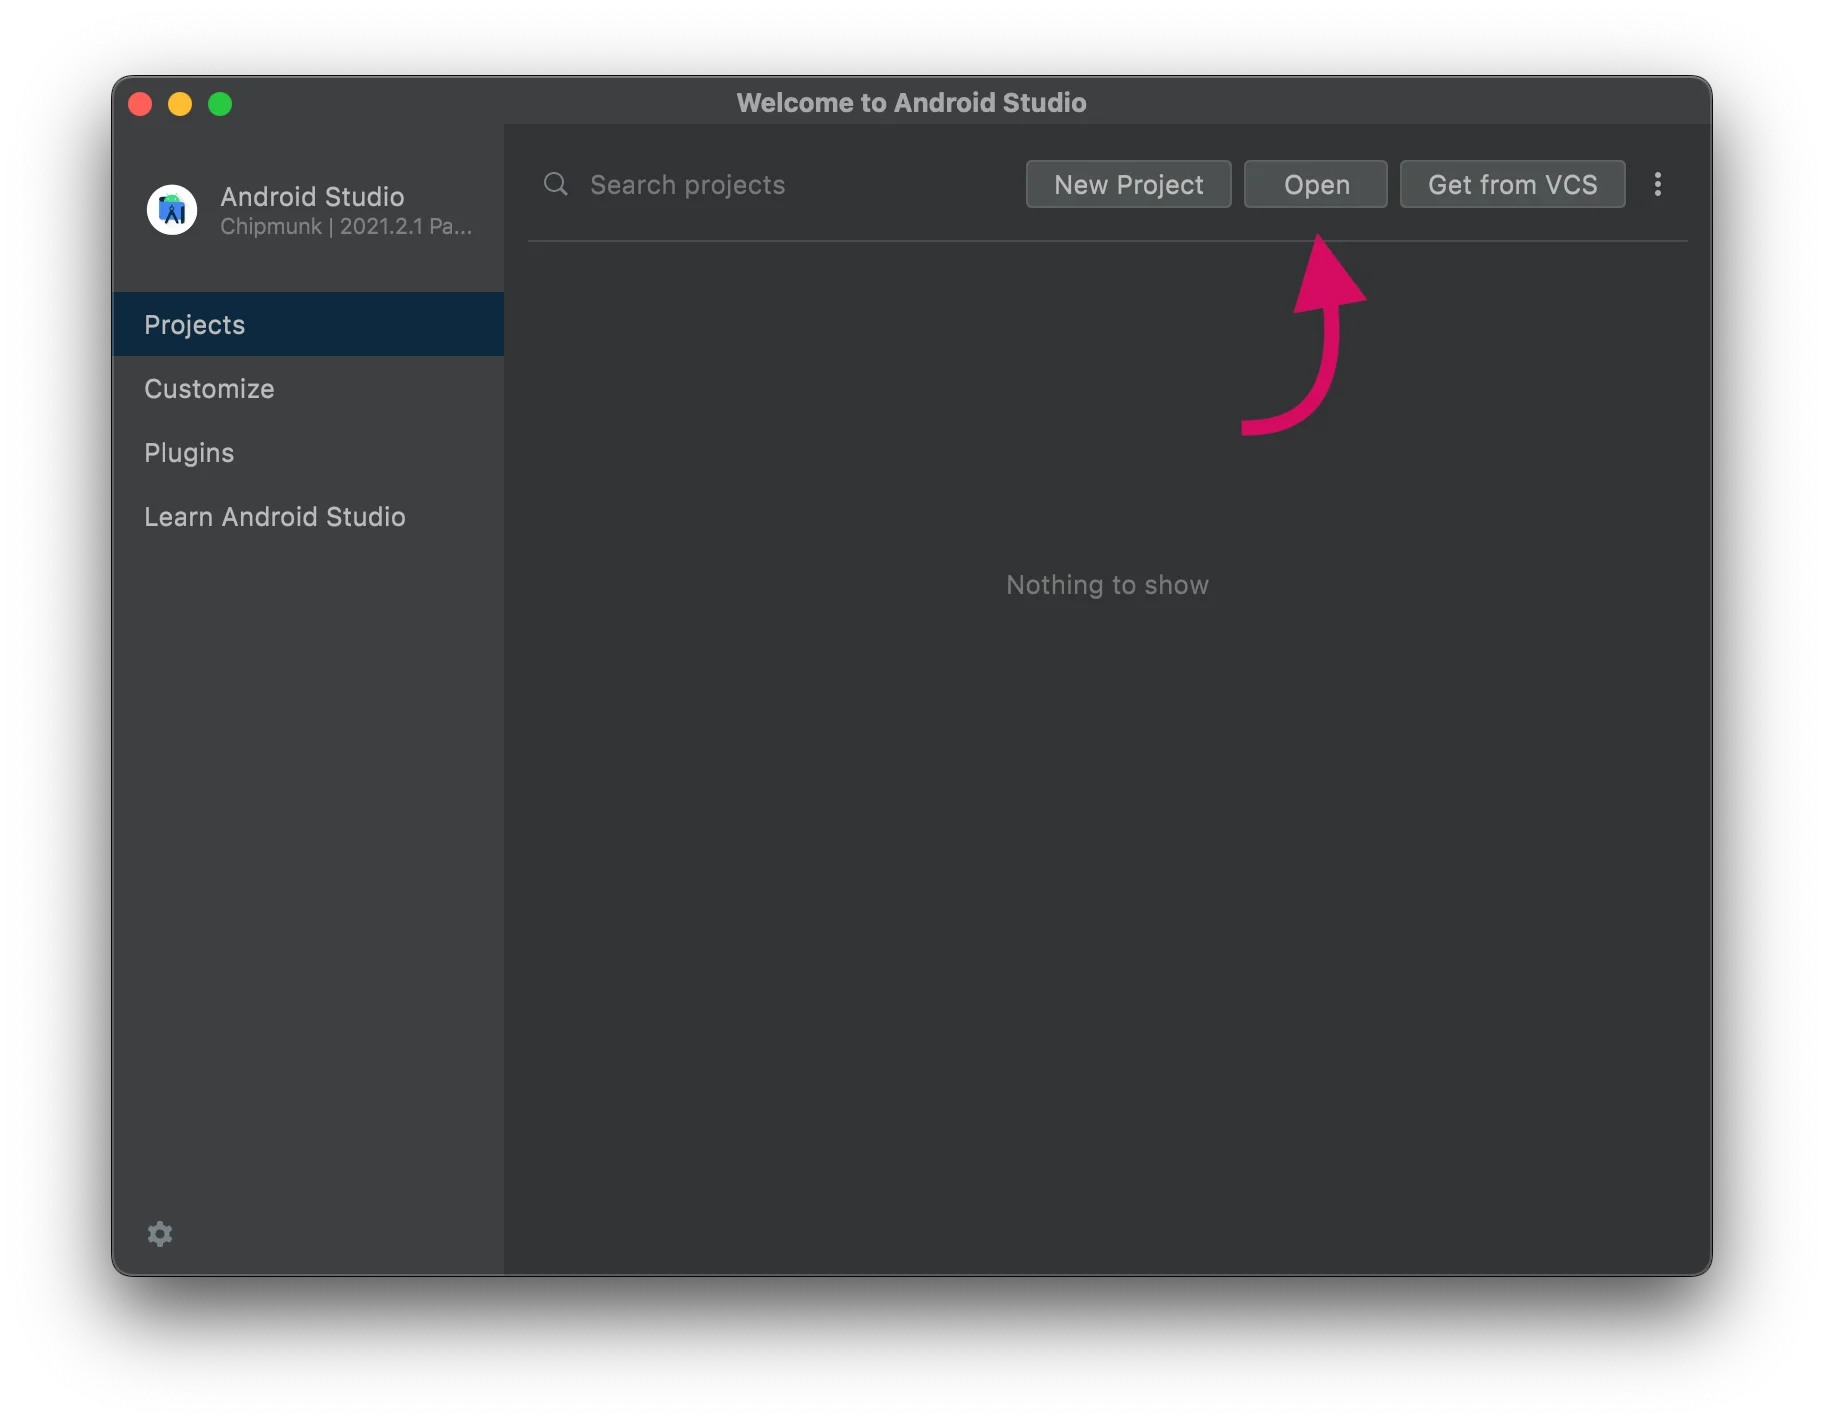
Select your AndroidStudioSource folder and wait until the project loaded completely:

Afterward, open Config.java file to edit main configuration details (URL, URL Handling, UserAgent, dialogs). Please take a look at our YouTube channel for specific setup tutorials. Please don't forget to add your Envato/CodeCanyon Purchase Code in the PURCHASECODE field for each app published by you. One license per each customized end product is required. Please take a look for license info of your CodeCanyon purchase: https://codecanyon.net/licenses/standard
The main configuration document Config.java looks like this: 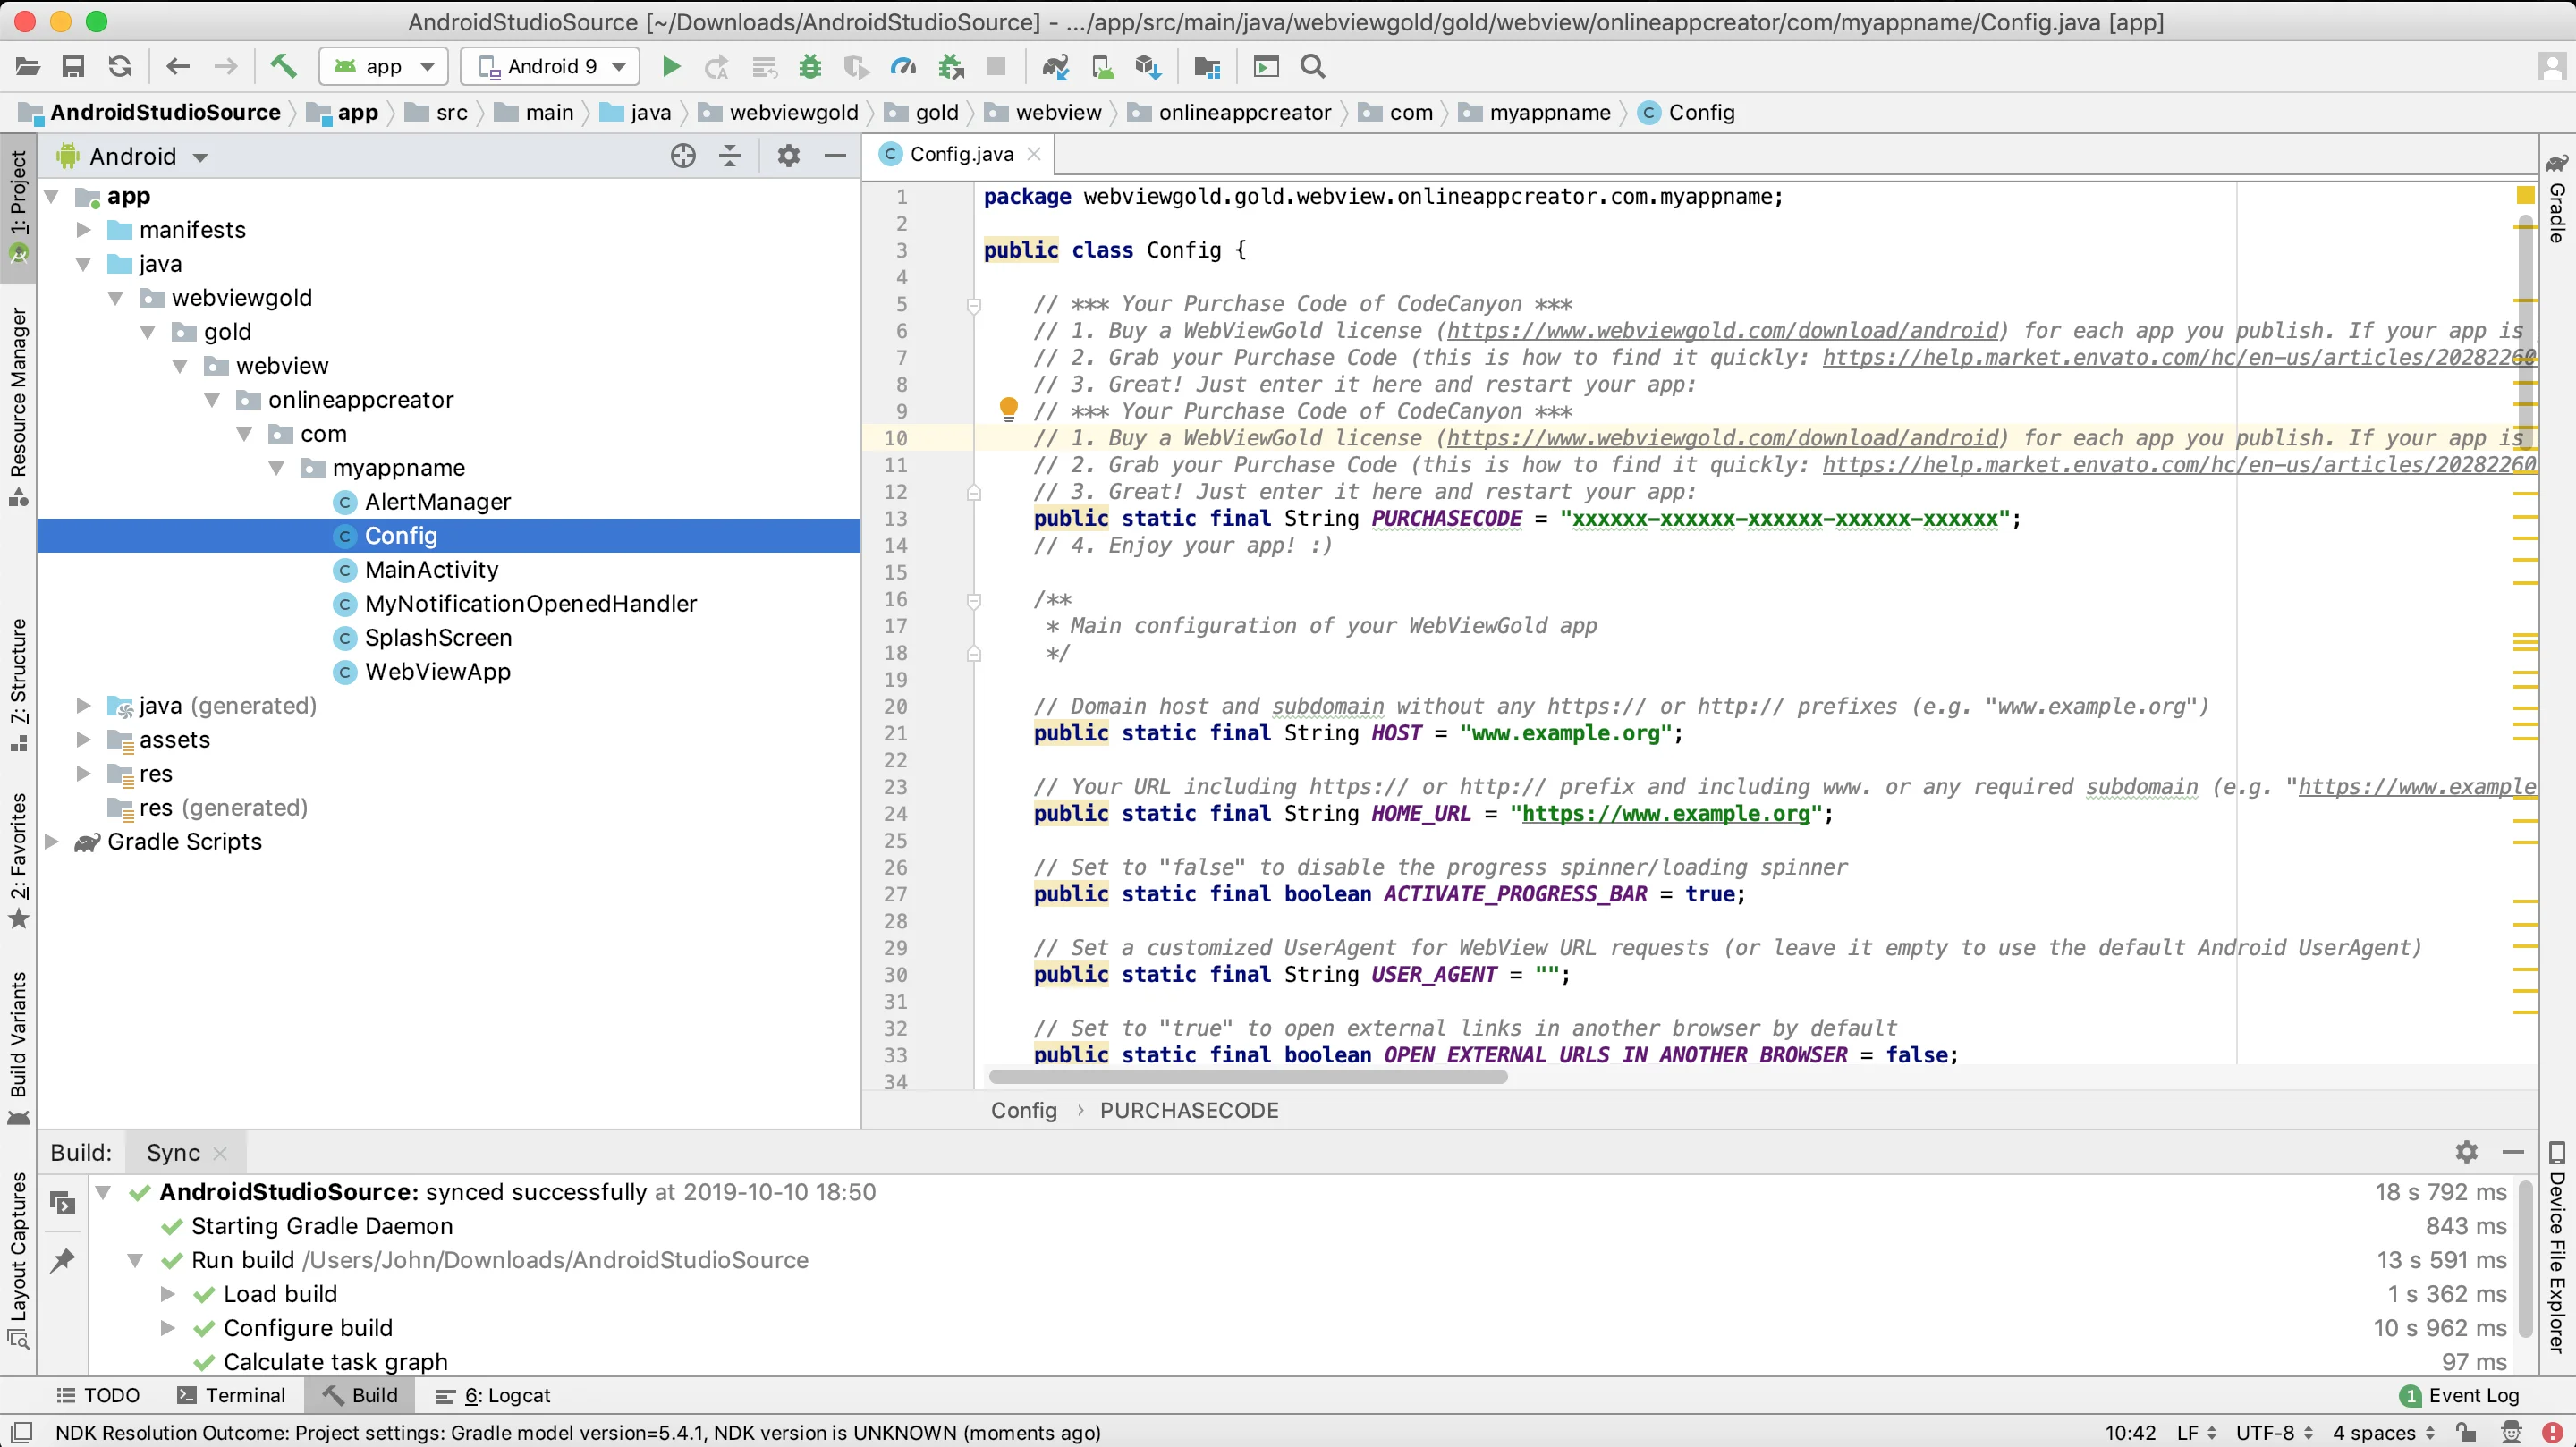
Setting up apps with WebViewGold is very easy and does not require any coding knowledge. Please take a look at this overview of the built-in configuration options in Config.java file:
webviewgold://enablepulltorefresh:// or disablepulltorefresh:// from your website to activate or deactivate pull-to-refresh dynamically.Note: Small = 85, Default = 100, Large = 115, Largest = 130
onScreenCaptureAttempt() will be called for handling (e.g, showing an individual modal) in web app.android.permission.FOREGROUND_SERVICE_LOCATION and .GPSService
blocks in AndroidManifest.xml (search for these terms within). This setting is only effective if requireLocation is also set to true.
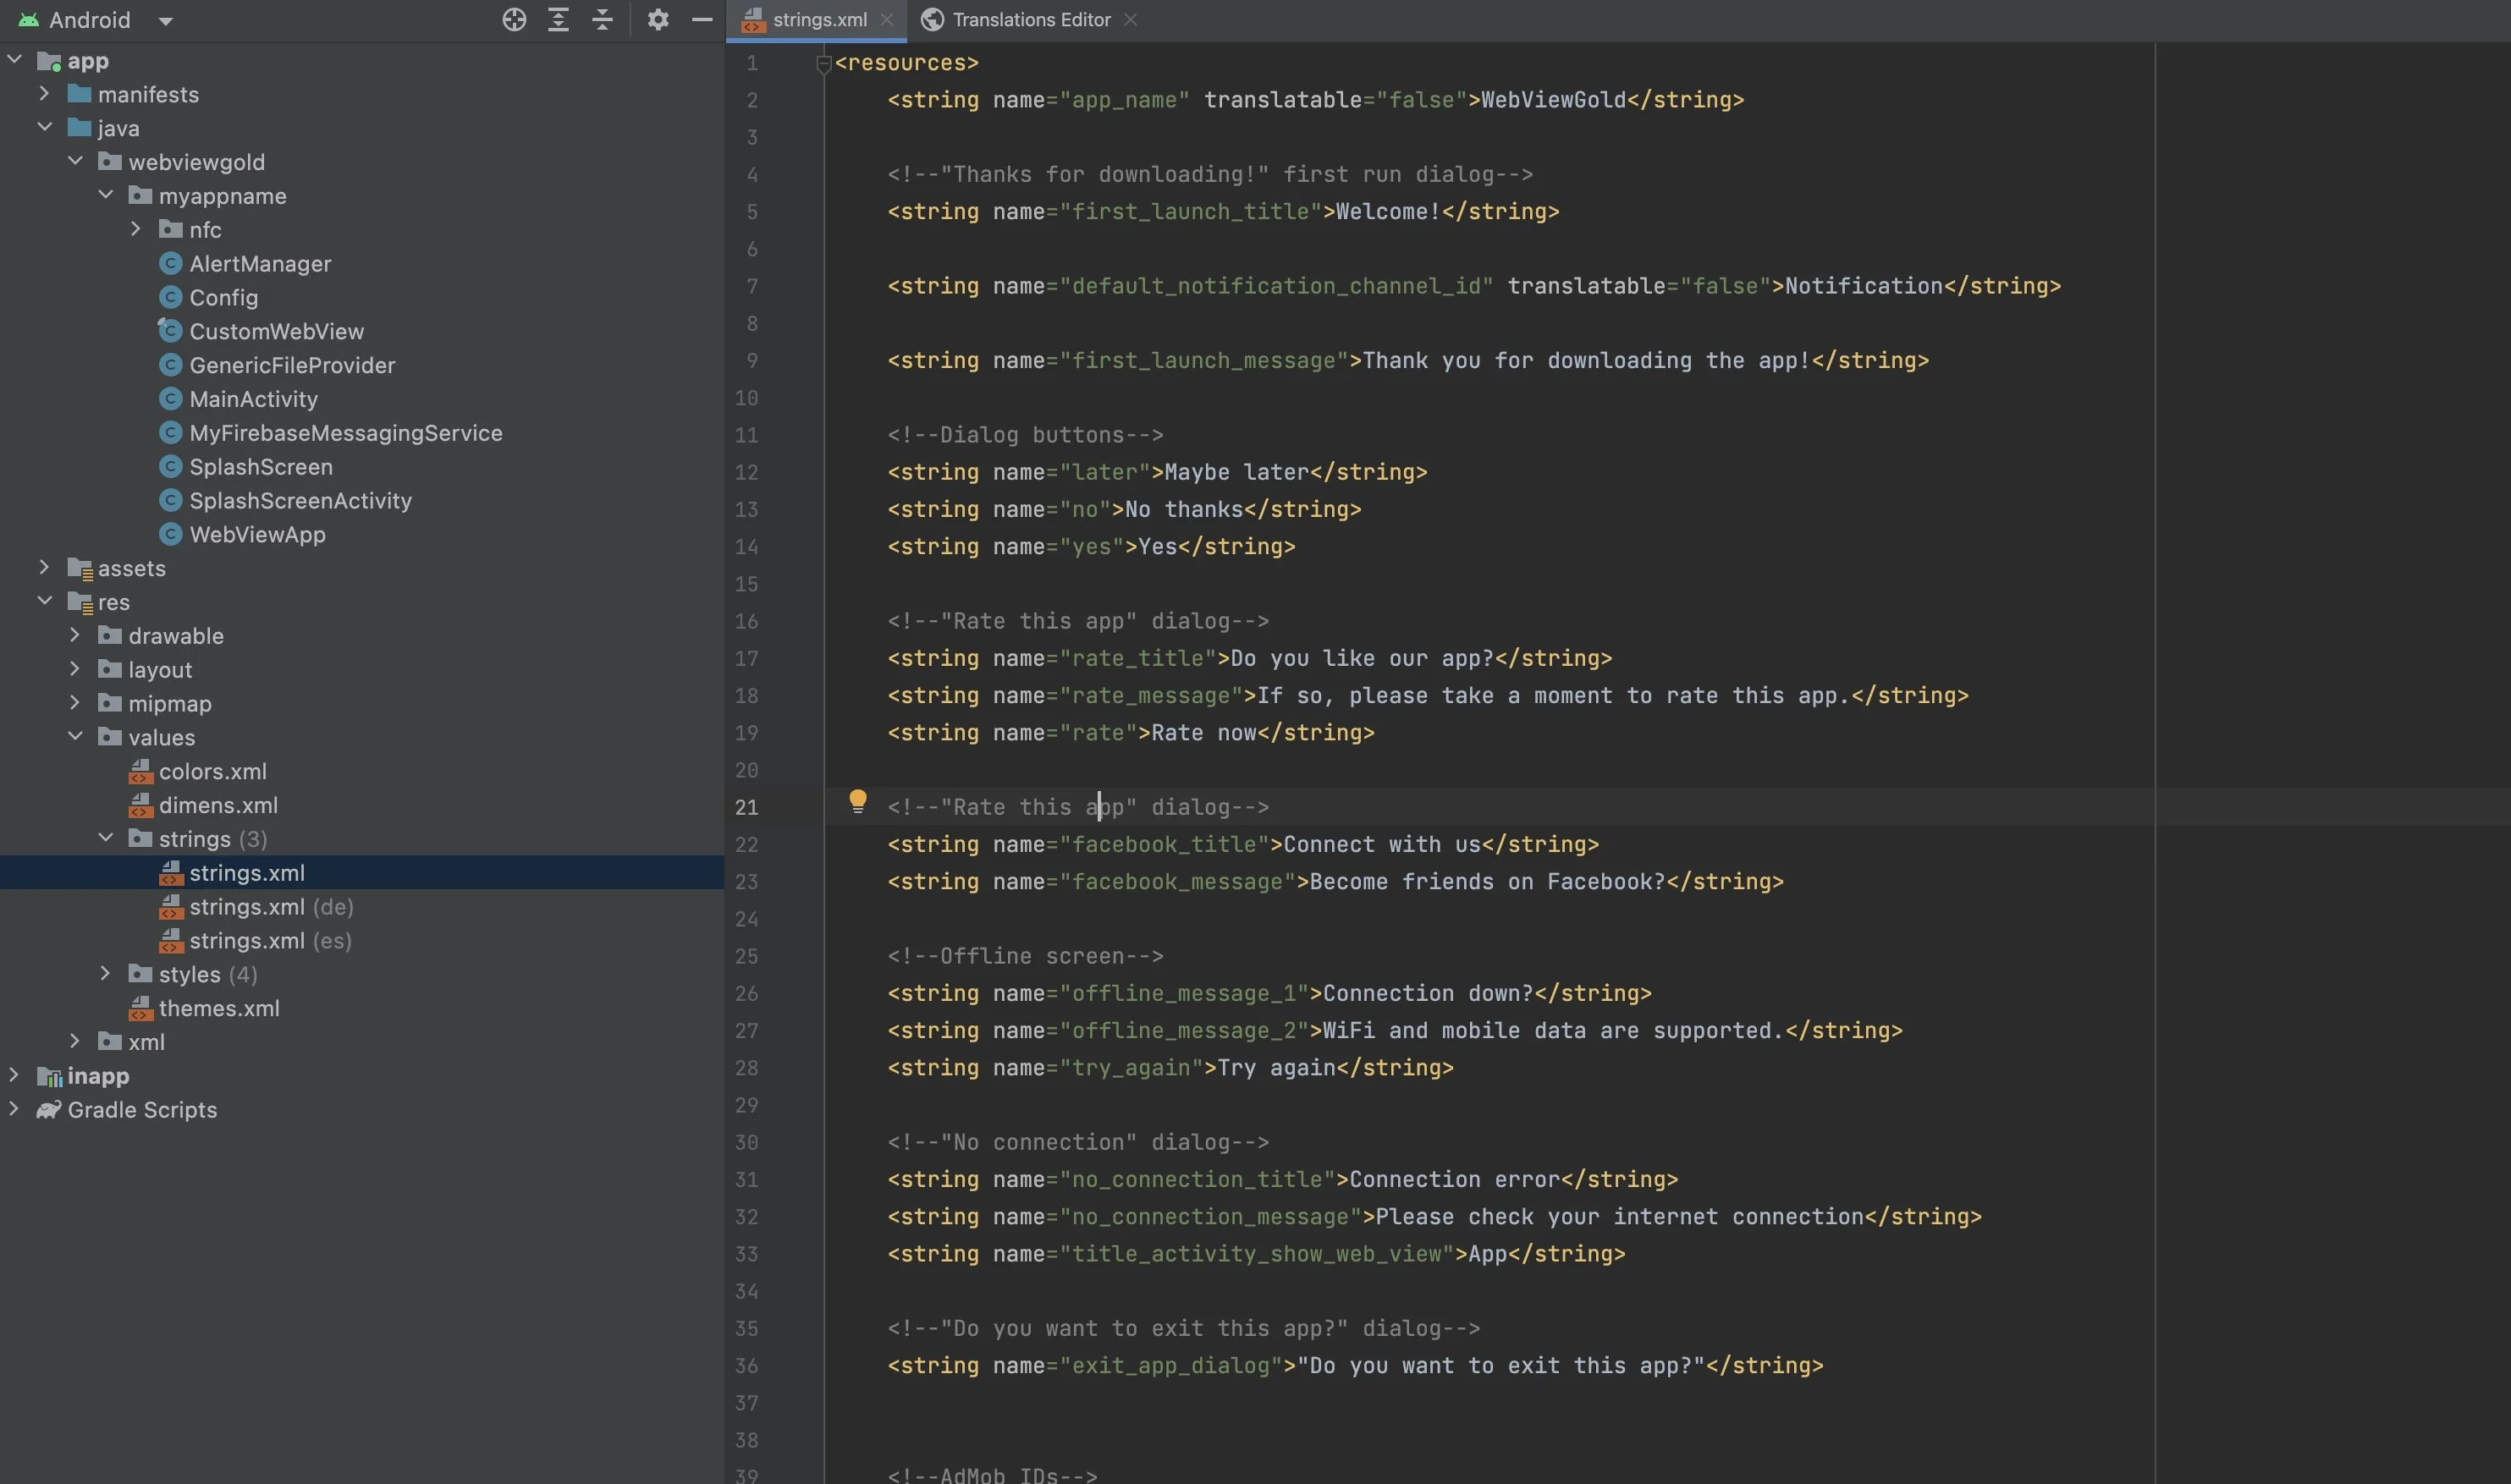
Open strings.xml file to edit app name & text strings:
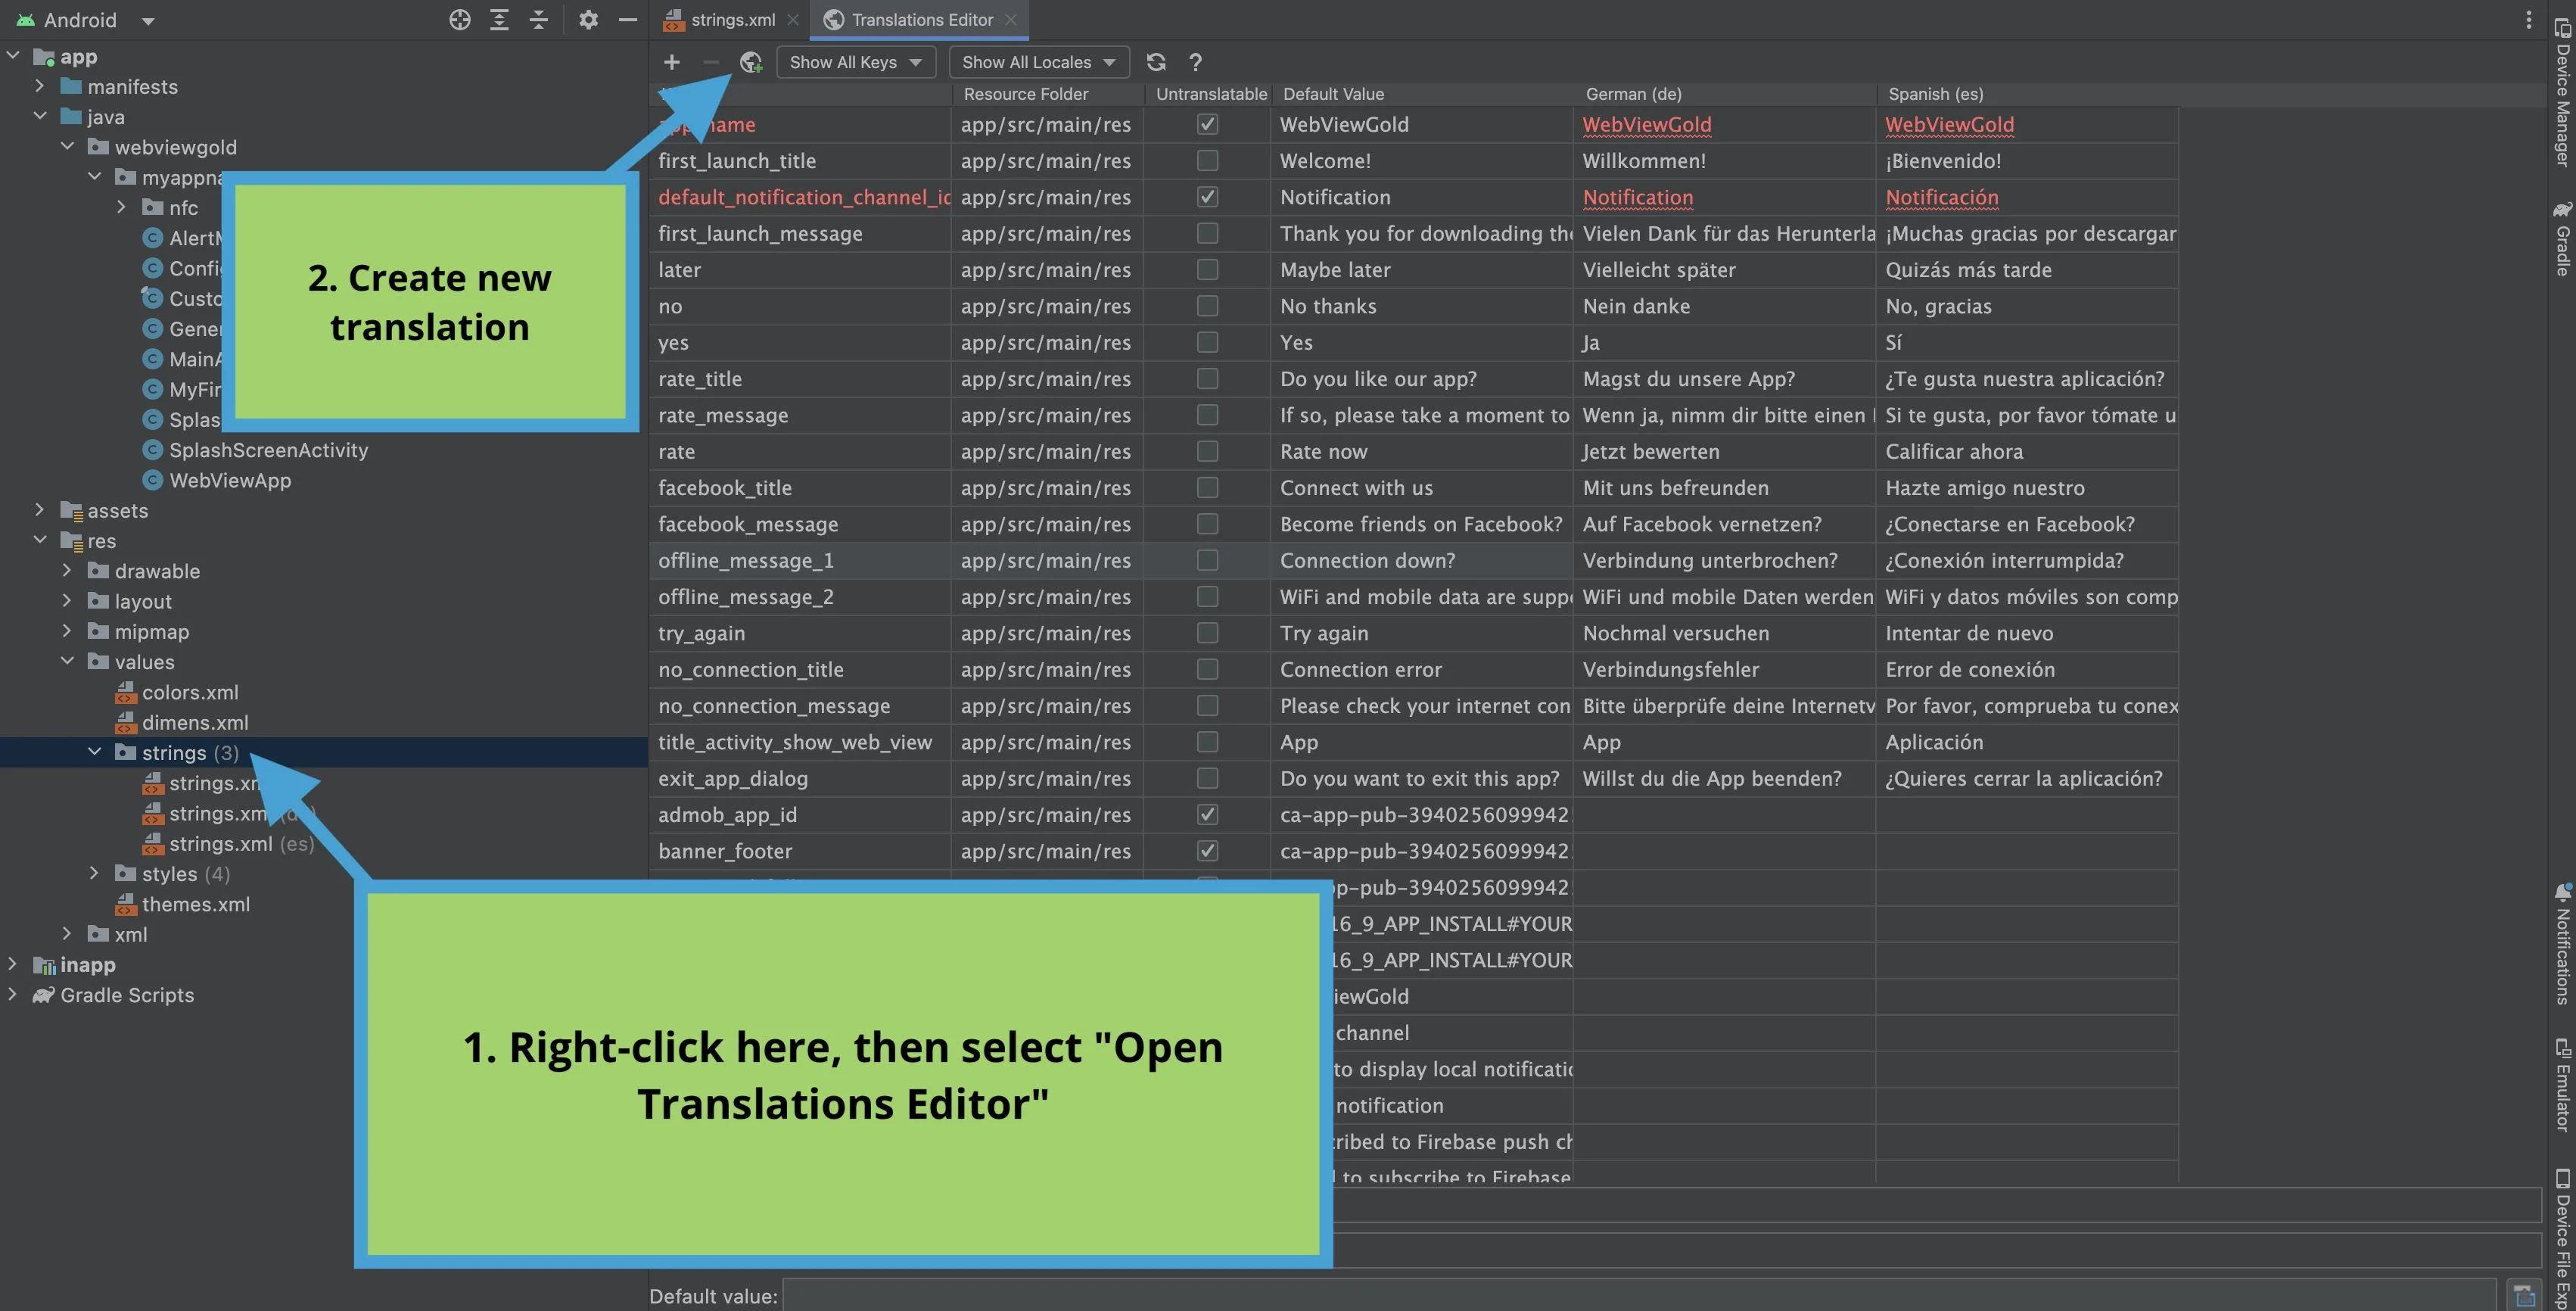
Multi-language apps: To edit translations – including the default German and Spanish ones – or to create new, additional translations for these strings, right-click on the "strings" folder in Android Studio and select "Open Translations Editor":
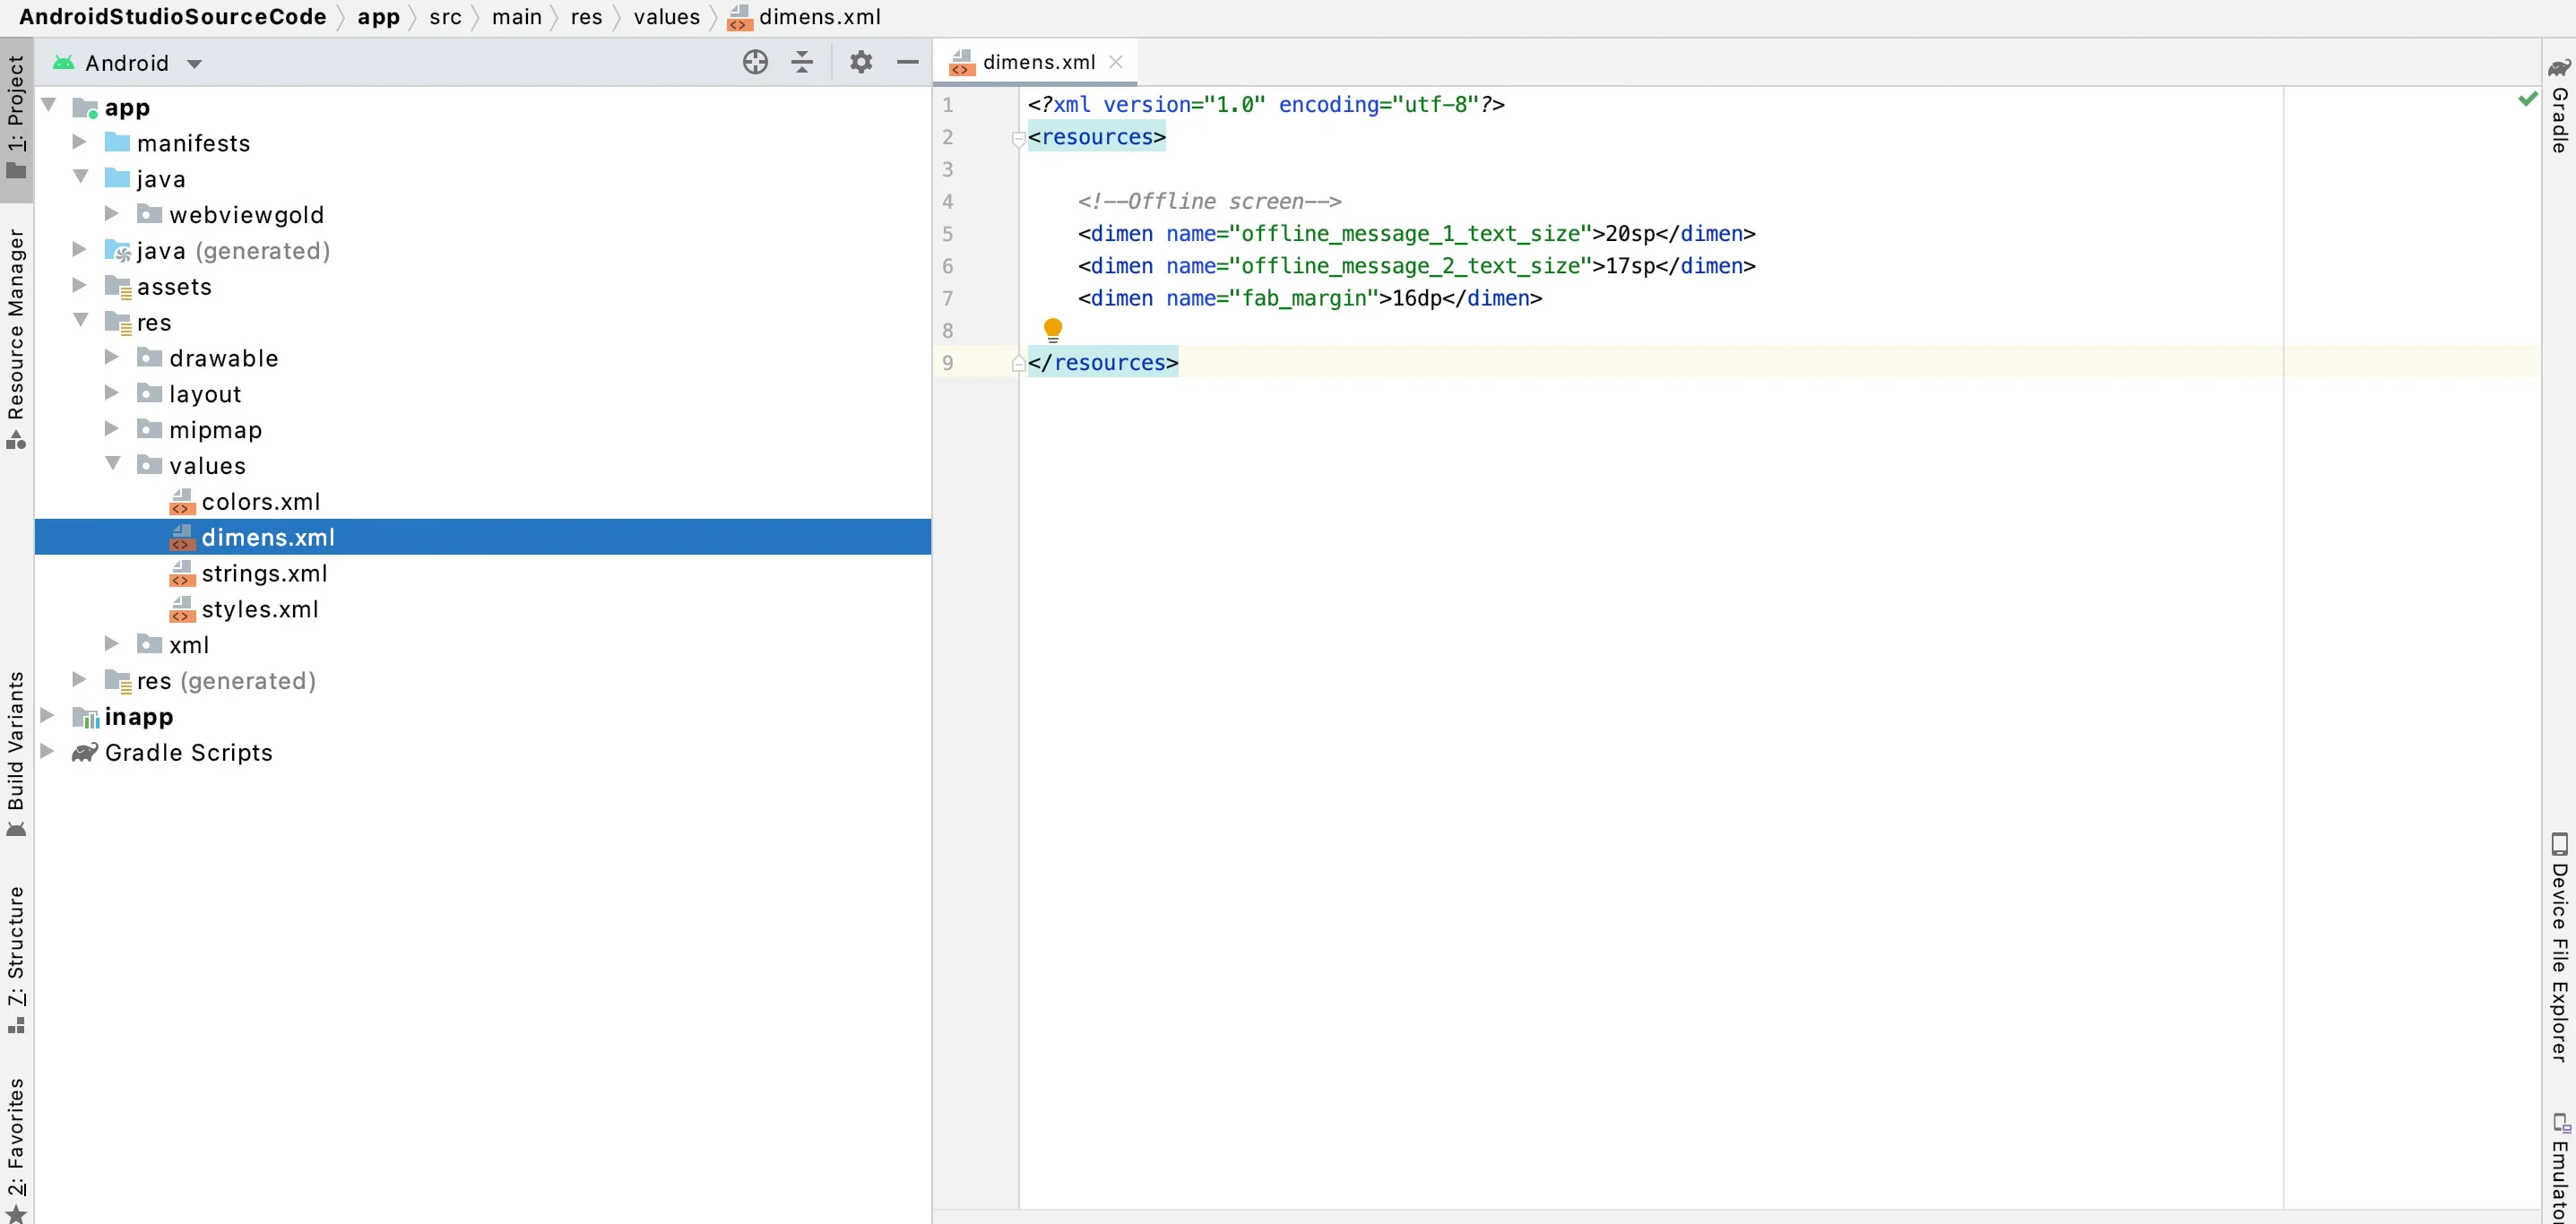
Open dimens.xml file to modify text formatting:
Optional App Disclosure for your Privacy Policy / Terms & Conditions
If you offer (WebViewGold-based) mobile apps to your users, you may optionally include the following statement in your Privacy Policy or Terms & Conditions (this note is provided for informational purposes only and does not constitute legal advice. We assume no liability for how this text is used. Please consult a legal professional for individual guidance):
    Our mobile apps (iOS/Android) are developed using WebViewGold by jocapps GmbH (Germany). These apps display the content of our website using a WebView framework and enrich it with selected native features to improve usability and performance. Accordingly, the same privacy policy and terms of service that apply to our website also apply to our mobile apps. For more information, please visit
    https://www.webviewgold.com/#convert-website-to-app-privacy, or contact us directly.
3) Adding a Custom App Icon
![]()
Here’s how to add a custom app icon to your WebView-based Android app:
1. Locate Existing App Icons
To begin, find the existing app icon files:
- Right-click on each 'ic_launcher.png' file in your project (sizes from hdpi to xxxhdpi).
- Select Reveal in Finder (Mac) or Reveal in Explorer (Windows).
2. Replace with Your Icon
Replace each ic_launcher.png file with your new icon file, ensuring the new icons meet the following requirements:
- Include icons for each resolution: hdpi, xhdpi, xxhdpi, and xxxhdpi.
- Use a high-quality image (preferably in PNG format).
Tip: You may also use the Launcher Icon Generator (note: WebViewGold is not affiliated with the tool’s developer).
Different devices will display square or round icons. Therefore, you must include:
- 'ic_launcher.png': Used on devices with square icons.
- 'ic_launcher_round.png' and 'ic_launcher_foreground.png': Used on devices with round icons.
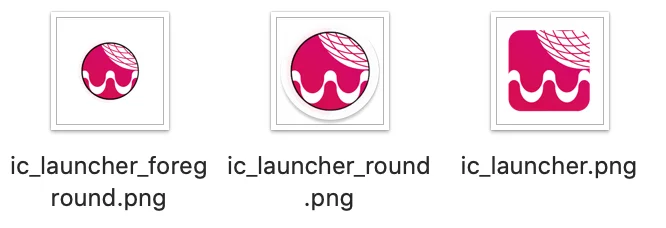
Place all three files in the respective mipmap folders for each resolution (mipmap-hdpi, mipmap-xhdpi, mipmap-xxhdpi, and mipmap-xxxhdpi).
The video explains in detail the process to change the icon of your new App, and some recommendations to create it.
4) Adding a Custom Splash Screen
Customize the splash screen behavior by configuring the following variables in Config.java:
SPLASH_TIMEOUT)REMAIN_SPLASH_OPTION is true; ignored if the actual load time exceeds this value
Replacing the Splash Screen Image
- Replace
splash.gifin your assets with your own square GIF (e.g., 128×128, 512×512, or 1024×1024 px) - Ensure the image dimensions are equal (width = height) for optimal display
- Set the background color in
colors.xml
The steps to add a custom splash screen to your android app are shown in the video below:
Customizing URL Handling
To improve user experience, it's often beneficial to customize how your app handles different types of web links. For example, social media buttons can be configured to open in the system browser or respective app, rather than within your app. WebViewGold provides flexible settings to customize URL handling for your WebView-based Android app:
Types of Links:
- External Links: Links that lead to a different domain from your app's primary domain.
- Example: If your app's domain is mydomain.com, an external link would be google.com.
- Internal Links: Links that stay within the same domain as your app.
- Example: If your app's domain is mydomain.com, an internal link would be mydomain.com/purchase.
- Special Links: Links that include special attributes, such as target="_blank" or links ending with #.
Link Handling Options:
You can configure link behavior by modifying settings in the Config.java file as shown below.
External Link Handling:
- Default Option (0): To open external links in the main WebView (the same as internal links), set
EXTERNAL_LINK_HANDLING_OPTIONSto0. - Option 1: To open external links in a new in-app tab, set
EXTERNAL_LINK_HANDLING_OPTIONSto1. - Option 2: To open external links in the device's default system browser (e.g. Chrome, Safari), set
EXTERNAL_LINK_HANDLING_OPTIONSto2.
Special Link Handling:
- Option 0: To open special links in the app's main WebView, set
SPECIAL_LINK_HANDLING_OPTIONSto0. - Option 1: To open special links in a new in-app tab, set
SPECIAL_LINK_HANDLING_OPTIONSto1. - Option 2: To open special links in the device's default system browser (e.g. Chrome, Safari), set
SPECIAL_LINK_HANDLING_OPTIONSto2.
Note: This setting with override EXTERNAL_LINK_HANDLING_OPTIONS for links that are both external and special.
Customizing Link Access: Whitelist and Blacklist
To create exceptions for specific sites or pages, open Config.java and add the domain to one of the following arrays:
- BROWSER_WHITELIST: Lists specific domains to open within the app's WebView.
- BROWSER_BLACKLIST: Lists specific domains to open in the external browser.
For detailed guidance on link configuration for your Android app, watch the video tutorial provided below:
URL Handling – Using the In-App Browser for Specific Links
Some links, like a Terms and Conditions page, may not be significant enough to open in an external system browser yet too specific for your app's primary WebView. WebViewGold provides a creative solution for handling these links: an in-app browser tab that opens over the main WebView, providing a hybrid app and browser experience. Here's what it will look like:
Key Features of the In-App Browser Tab:
- The in-app browser tab includes an address bar and navigation buttons, offering a more browser-like experience than the primary WebView.
- Ideal for content that requires easy navigation, such as tutorials, knowledge bases, or pages with specific information.
How to Use the In-App Browser Tab in Your WebView-Based Android App:
To open a link in the in-app browser tab, format the URL in your HTML as follows:
<a href='#' onClick="top.location.href='https://www.example.com';">Open Example Page</a>
Example: To open Google, use:
<a href='#' onClick="top.location.href='https://www.google.com';">Open Google</a>
Testing Link Behavior:
To see how your app will handle different types of links, use the following URL as the WebView URL during testing:
Test Link: https://www.webviewgold.com/demo/testlinks.php
Note: You can also open the same domain in your desktop browser to view the source code and copy the format for your links.
Using Custom CSS and JavaScript API
WebViewGold allows you to customize your app’s appearance and functionality using Custom CSS and Custom JavaScript without modifying the app’s native code. Here’s how to use these features to tailor your app to your brand and user experience preferences.
How to Style your WebView-based Android app with Custom CSS:
The Custom CSS feature enables you to adjust the look and feel of your app effortlessly:
- Add your custom CSS code to the custom.css file.
- Save the file to apply these styles across all web pages loaded by your WebViewGold app.
Examples of Customization with CSS:
- Update colors to match your branding.
- Incorporate animations.
- Style text, buttons, and other elements.
How to Enhance your App's Behavior with Custom JavaScript:
With Custom JavaScript, you can personalize your app’s functionality for users without altering the original web app’s remote code:
- Add your custom JavaScript code to the custom.js file.
- Save the file to apply these scripts across all pages loaded by your app.
Examples of Customization with JavaScript
- Create alerts or notifications.
- Add interactive elements or event-driven actions.
- Tailor user interactions and page behavior.
For a guided walkthrough, refer to the video tutorial below that demonstrates how to use custom CSS and JavaScript to transform your Android app's aesthetics and interactivity.
HTML5 Geolocation and Background Location Tracking
The HTML5 Geolocation API enables users to share their location with your app, enhancing features like location-based content. In WebViewGold, the Geolocation API is supported by default once integrated into your web content. Here is how to implement Geolocation tracking into your WebView-based Android app:
Setting up HTML5 Geolocation:
For basic Geolocation setup, refer to Mozilla's Geolocation Guide for details on how to implement this feature into your website or web app.
For a demonstration, visit this W3Schools Geolocation Demo.
Enabling Background Location Tracking (Android Only):
To enable background location tracking for your WebView-based Android app, follow these steps:
- Set permissions in Config.java:
- Set
requireBackgroundLocationtotrueif background location tracking is needed. - Make sure
requireLocationis also set totrueto activate any location services.
- Set
- Adjust permissions in AndroidManifest.xml:
- Uncomment the permission blocks for
android.permission.FOREGROUND_SERVICE_LOCATIONandGPSService. - Search for these terms within the file to ensure the correct permissions are set.
- Uncomment the permission blocks for
Toggling Background Location Tracking with URL Schemes:
Use the following URL schemes to turn background location tracking on or off within your WebView-based Android app:
To turn on background location tracking, redirect the user to the following URL:
<script>window.location.href = "backgroundlocationon://"; </script>
To turn off background location tracking, redirect the user to the following URL:
<script>window.location.href = "backgroundlocationoff://"; </script>
Note: These URL schemes are specific to WebViewGold for Android and may not work in standard web browsers. To ensure these redirects are only applied for Android app users, consider detecting the User-Agent.
Push Notifications API via Pushwoosh, OneSignal, Firebase, and JavaScript
Push notifications are notifications that appear on your smartphone without opening the app. These types of messages allow fantastic interaction with customers and users of the app. Your app does not have to be open. This way, your customers do not miss any important news or messages. Push Notifications are suitable for many cases, e.g., for updates to orders, live tickers, or social media community. There must be an internet connection to allow app users to receive push messages. WebViewGold supports multiple ways of reaching your users via push notifications.
Option 1: Use Local Push Notification JavaScript API
You can insert a piece of code (JavaScript) in your website, to define a push notification, which can be shown after your app was closed (while scheduling it during the app is open). This works without OneSignal configuration at all.
  <script>
  var title = "Your cart is waiting!"; //notification title
  var message = "You have left a cart full of dreams and deals behind. Dont leave it feeling abandoned"; //notification message
  var seconds = 120; //seconds from now on
  var url = "https://myshop.org/cart.php"; //deep-linking URL

  window.location.href = "sendlocalpushmsg://push.send?s="+ seconds +"=msg!"+ message +"&!#"+ title +"&!#"+ url +"";
  </script>
It could be used for different situations (countdowns, happy hours (like in the example code), reminders, ...).
To cancel all scheduled local push notifications run:
<script>
window.location.href = "sendlocalpushmsg://push.send.cancel";
</script>
Option 2: Use Pushwoosh Remote Push Notifications
WebViewGold users are eligible for two free months of Pushwoosh!
To claim this offer, please email your WebViewGold License to [email protected] and you will get a personal reply soon.
If you want to use Pushwoosh (good choice!) for push notifications in your app, just activate the options in Config.java by setting PUSHWOOSH_ENABLED to true and ensure to also update the Pushwoosh IDs in the string.xml & AndroidManifest.xml files with your own Pushwoosh IDs:


Congratulations, your setup is already completed. You're now ready to send push notifications:

Want to get each individual user's device ID for personalized push notifications or further processing? Simply set WONDERPUSH_ENHANCE_WEBVIEW_URL to true in Config.java to append ?pushwoosh_id=XYZ to your WebView URL:
For example, if your WebView URL is https://www.example.org, WebViewGold will call https://www.example.org?pushwoosh_id=XYZ instead. Remember, only the initial URL request will receive this GET variable, so please save it in a session or a cookie for later use within your linked pages. Alternatively or additionally, you can retrieve & process this information on any page using JavaScript:
<script>
window.location.href = "getpushwooshid://";
alert(pushwooshplayerid);
</script>
Option 3: Use OneSignal Remote Push Notifications
If you want to use OneSignal for configuring Remote Push Notifications, this video tutorial will guide you step-by-step during this process.
In summary, the process for configuring OneSignal for push notifications is as follows:
- Go to the Android Studio and find the OneSignal Options. By default PUSH_ENABLE, PUSH_ENHANCE_WEBVIEW_URL and PUSH_RELOAD_ON_USERID are shown as false, so set them to true.
- Open your OneSignal account and select your organization and app name.
- If you have not created your app on the OneSignal project follow these steps first.
- Consider that for creating and configuring your OneSignal Account you will need a JSON file. To get this file you must have your Firebase account configured. If you do not have your Firebase configured to get the JSON file, check this additional tutorial.
- Once you have created your OneSignal App, go to the settings section and select Native Android as your platform, then copy the App ID code you obtained.
- Open the Android Studio and go to the Gradle Scrip Section and select build,grade (Module:app).
- On the section ONE_SIGNAL_APP_ID paste the code you had copied from OneSignal.
- Then, generate your APK file and run on a physical device.
- Go to OneSignal and your app project select New Message and click on New Push.
- Fill out the information required and it's done! You have tested your OneSignal Push Messages.
Replace ic_stat_onesignal_default.png to replace the default bell icon fallback of OneSignal push notifications.
Do you want to get each individual subscription ID on your server for further processing and individual user push messages? Just activate the PUSH_ENHANCE_WEBVIEW_URL option in Config.java (by switching the value from false to true) in order to append ?onesignal_push_id=XYZ to your WebView URL. If your WebView URL is https://www.example.org, WebViewGold will call https://www.example.org?onesignal_push_id=XYZ instead. Only your FIRST URL request will get that GET variable, so save it in a session or in a cookie to access it on your linked pages. An alternative or additional way would be to retrieve & process the information on any page via JavaScript:
<script>
window.location.href = "getonesignalplayerid://";
alert(onesignalplayerid);
</script>
Alternatively, consider turningAUTO_INJECT_VARIABLEStotruein Config.java to automatically inject this (and other) values into JavaScript without needing to call a URL upfront.
- Consider that for creating and configuring your OneSignal Account you will need a JSON file. To get this file you must have your Firebase account configured. If you do not have your Firebase configured to get the JSON file, check this additional tutorial.
Option 4: Use Firebase Remote Push Notifications
If you want to use Firebase for configuring Remote Push Notifications, this video tutorial will guide you step-by-step during this process.
In summary, the process for configuring Firebase for push notifications is as follows:
1. Rename package name & create a Firebase project
Please rename the package name of your WebViewGold Android app. Then, you have to create a Firebase project in your Firebase Console.
2. Activate Firebase in WebViewGold
In Android Studio, go to Config.java file and turn the FIREBASE_PUSH_ENABLED variable to true.

3. Register your app with Firebase
After you created your Firebase project, you can add your WebViewGold app to it.
a. In the center of the Firebase console's project overview page, click the Android icon to launch the setup workflow.
b. If you've already added an app to your Firebase project, click Add app to display the platform options.
Enter your app's package name as changed/defined in this step.
Make sure that you enter the package name that your app is using. You cannot add or modify this value after you register your app with your Firebase project.
4. Click the Register app button.
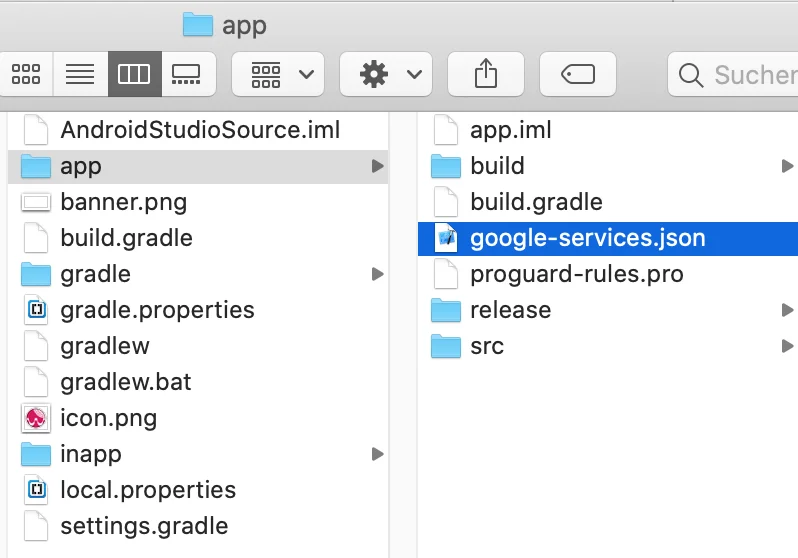
5. Download google-services.json
Click Download google-services.json to obtain your Firebase Android config file (google-services.json) and replace the sample file already included in the WebViewGold project by using the Mac Finder or the Windows Explorer:
That's it!
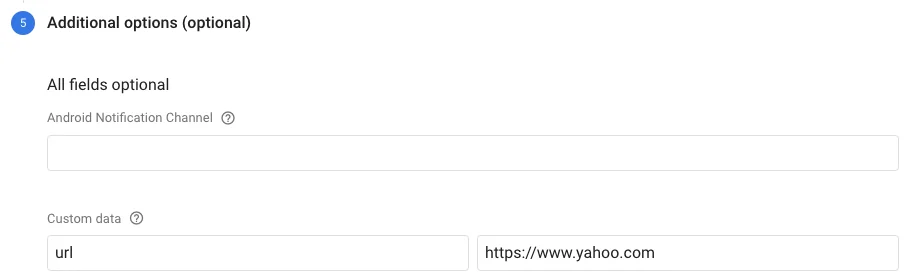
If you want to use Firebase URL Deeplinking (opens a specific URL when clicking on your notification), please add the desired URL in a Custom Data field (in the Additional options (optional) section) with Key = "url" and Value = {the desired URL}.
Do you want to get each individual subscription ID on your server for further processing and individual user push messages? Just activate the FIREBASE_PUSH_ENHANCE_WEBVIEW_URL option in Config.java (by switching the value from false to true) in order to append ?firebase_push_id=XYZ to your WebView URL. If your WebView URL is https://www.example.org, WebViewGold will call https://www.example.org?firebase_push_id=XYZ instead. Only your FIRST URL request will get that GET variable, so save it in a session or in a cookie to access it on your linked pages. An alternative or additional way would be to retrieve & process the information on any page via JavaScript:
<script>
window.location.href = "getfirebaseplayerid://";
alert(firebaseplayerid);
</script>
Alternatively, consider turning
AUTO_INJECT_VARIABLES to true in Config.java to automatically inject this (and other) values into JavaScript without needing to call a URL upfront.
Option 5: Use bubble.io Push Notifications
1. Create a bubble.io app
2. Install the WebViewGold OneSignal Push plugin:
3. Follow the OneSignal instructions (see above) and the plugin instructions (see here and here).
Banner, Interstitial & Rewarded ads via AdMob API
AdMob is a Google service for monetizing mobile apps on iOS and Android platforms. It allows developers to integrate banner, interstitial, and rewarded ads, which are paid by clicks (CPC, Cost-per-Click) or impressions (CPM, Cost-per-Mille). WebViewGold simplifies AdMob integration, enabling quick setup for displaying ads in your WebView-based Android application.
Step 1: Open Config.java File
To begin, open your app's Config.java file to set ad preferences and activate AdMob functionality.
Step 2: Monetize Your App with Native AdMob SDK
In Config.java you can:
- Enable or disable banner and/or interstitial ads by setting
SHOW_BANNER_ADto true for banner ads andSHOW_FULL_SCREEN_ADto true for interstitial ads. - Define intervals for displaying interstitial ads by changing
SHOW_AD_AFTER_Xto the desired number of website interactions before playing an interstitial ad.
Note: Before launching your app, ensure that your unique AdMob IDs are correctly added in the strings.xml file:

Step 3: Enable Rewarded Ads
- Setting Up Rewarded Ads:
- To enable rewarded ads, set
ENABLE_REWARDED_ADStotrue. - Use the following link to display a rewarded ad
<a href="displayrewardedad://">Display Rewarded Advertisement</a>
- Once a user completes viewing the ad, WebViewGold triggers the JavaScript function
updateRewardedStatus('true');for you to handle rewards within your app’s code.
- To enable rewarded ads, set
- Rewarded Ads as Default:
- If you prefer rewarded ads to display by default, set both
USE_REWARDED_ADS_WHERE_POSSIBLEandSHOW_FULL_SCREEN_ADtotrue. This will prioritize rewarded ads over interstitial ads.
- If you prefer rewarded ads to display by default, set both
Additional Resources:
For more detailed options, refer to the official AdMob SDK documentation, but skip the setup instructions as WebViewGold already includes the necessary framework.
You can also dynamically control the ad visibility for a user by calling the following custom URL schemes from your website or app:
enableads://– Set ads to be shown again for the current userdisableads://– Permanently disables ads for the current user
Banner and Interstitial ads via Facebook Audience Network Ads API
The Facebook Audience Network allows mobile app developers to monetize iOS and Android applications by displaying ads. Through WebViewGold, you can easily incorporate Facebook ads into your WebView-based Android app to earn revenue through clicks (CPC) and impressions (CPM).
Step 1: Open the Config.java File
- To begin, open your app's Config.java file to configure the Audience Network settings.
Step 2: Enable Facebook Audience Network Ads
- Activate Necessary Configuration Variables:
- Set the following variables to
truein Config.java:USE_FACEBOOK_ADSsets the app to use Facebook Audience Network ads instead of AdMob ads.SHOW_BANNER_ADturns on banner ads for your app.SHOW_FULLSCREEN_ADturns on fullscreen, interstitial ads for your app.
- Set
SHOW_AD_AFTER_Xto a desired number of website clicks to show an interstitial ad.
- Set the following variables to
- Enter Your Facebook Ad IDs:
- Go to
strings.xmland add your unique Facebook Ad IDs to the corresponding fields.
- Go to
After configuring the above settings and confirming your Ad IDs, your app is now ready to launch with Facebook Audience Network ads enabled.
For further details, you may also refer to the official Facebook Audience Network documentation for any additional setup or optimization tips specific to your ad strategy.
You can also dynamically control the ad visibility for a user by calling the following custom URL schemes from your website or app:
enableads://– Set ads to be shown again for the current userdisableads://– Permanently disables ads for the current user
<a href="enableads://">Enable Ads</a>
<a href="disableads://">Disable Ads</a>
Image, Music, and File Downloader API
WebViewGold’s Download API allows you to provide document, image, and audio file downloads within your WebView app. The following steps outline how to enable and customize the downloader functionality:
1. Downloading Images:
Save images to the camera roll of the user by calling links with savethisimage://?url= prefix:
<a href="savethisimage://?url=IMAGE URL HERE">Download Image</a>
2. Downloading PDF Files:
Save PDF files by calling links with a .pdf suffix:
<a href="https://www.example.org/file.pdf">Download PDF</a>
3. Downloading Music Files:
Save music files by simply calling links with a .mp3, .mp4 or .wav suffix:
<a href="https://www.example.org/file.mp3">Download MP3</a>
<a href="https://www.example.org/file.mp4">Download MP4</a>
<a href="https://www.example.org/file.wav">Download WAV</a>
4. Customizing Supported File Types:
To add additional file formats to the downloader, insert them into the downloadableExtension list in Config.java.
5. Enabling Automatic File Downloads:
Consider setting the AUTO_DOWNLOAD_FILES option in Config.java to enable automatic downloads for files flagged with Content-Disposition HTTP headers, independent of the downloadableExtension list. This ensures files are downloaded automatically based on server configurations.
Native Video with Picture-in-Picture (PiP) API
The Native Video API allows your website to launch a video stream in the device’s native player with Picture-in-Picture support. Trigger the native playback by opening a link with the startnativevideo://videostreamurl= prefix:
<a href="startnativevideo://videostreamurl=YOUR_VIDEO_STREAM_URL">Play Video in System Video Player with PiP Support</a>
The user can continue watching the video in a floating window while navigating your app or other apps.
Reset App API
In certain cases, resetting the app to its initial settings (by clearing cookies and cache) can be necessary to restore optimal performance. The Reset App API provides a straightforward way to initiate this reset.
Usage:
To reset the app data, simply use the following link within your app:
<a href="reset://">Reset App Link</a>
This link will:
- Clear all cookies
- Clear cached data
Testing the Reset Functionality:
To test this feature, add the following demo URL to your WebViewGold app: https://www.onlineappcreator.com/reset_test.html
Note: Use the reset functionality sensibly, as it will clear user data related to cookies and cache, which could impact saved settings or session data, including logging users out of active sessions.
Show/Hide the Loading Sign Manually
WebViewGold’s native Android loading indicator automatically appears when pages start or finish loading. However, you can also manually control the loading indicator for scenarios outside standard page loading events. This is particularly useful for processes where user awareness of loading is necessary, such as:
- Waiting in a live chat queue
- Running a background process on a cloud server
- Visualizing any other extended process for user awareness
Usage:
To manually control the loading indicator for your WebView app, use the following links:
<a href="spinneron://">Show the loading spinner</a>
<a href="spinneroff://">Hide the loading spinner</a>
Clipboard API
The WebViewGold Clipboard API provides a simple and secure way to access the device clipboard contents from within your WebView-based app. This serves as an alternative to relying on native WebView clipboard access, offering more reliability across platforms and updates.
Use Cases:
- Pre-filling form fields with copied data
- Enhancing user flows in authentication, note-taking, or sharing apps
- Creating quick paste features or clipboard history tools
How to Retrieve Clipboard Content:
To access the clipboard data, use the following call:
<a href="getclipboard://">Get Clipboard Data</a>
<a href="#" onClick="alert(clipboarddata);">Show Clipboard Data</a>
- Get Clipboard Data: Triggers the native clipboard read functionality.
- Show Clipboard Data: Displays the result stored in the
clipboarddataJavaScript variable.
Technical Note: Once getclipboard:// is triggered, WebViewGold automatically injects the clipboard content into the clipboarddata JavaScript variable on the page, making it accessible for any further actions.
UUID API
The WebViewGold UUID API allows you to retrieve a non-personal, unique device ID (UUID - "Universally Unique Identifier") via JavaScript, which can uniquely identify an Android device. This feature can be helpful for:
- Storing user-specific settings on the server
- Maintaining session states
- Recalling saved data on the client side
Privacy Note: Ensure compliance with local and international privacy laws when using this feature, as it involves device identification.
How to Retrieve UUID:
To retrieve the UUID from your WebView-based app, use the following code:
<a href="get-uuid://">Get UUID</a>
<a href="#" onClick="alert(uuid);">Show UUID</a>
- Get UUID: Requests the UUID from WebViewGold.
- Show UUID: Displays the UUID via an alert for easy testing.
Alternative Method: Append the UUID to the WebView URL
If you prefer to include the UUID in the URL parameters, enable the UUID_ENHANCE_WEBVIEW_URL option in Config.java by setting it to true. This will automatically append uuid=XYZ to your WebView URL on the first request, allowing you to access the UUID directly in your web content:
- Example: If your WebView URL is
https://www.example.org, it will be requested ashttps://www.example.org?uuid=XYZ. - Note: Only the initial URL request will include this GET parameter, so consider saving it in a session or cookie if you need to reference it later in the app.
Automatically Inject UUID into JavaScript:
To automatically make UUID (and other variables) available in JavaScript across all pages without modifying URLs, set AUTO_INJECT_VARIABLES to true in Config.java. This allows you to access the UUID and other values directly within any page.
Flashlight API
The Flashlight API of WebViewGold allows your website to control the device's flashlight (torch). This feature can be useful for:
- Building utility apps that require the flashlight toggle
- Upgrading user experience during app usage with gamification
- Providing additional accessibility features
How to Use:
You can trigger the flashlight on or off directly from your HTML content using the following links:
<a href="enableflashlight://">Turn On Flashlight</a>
<a href="disableflashlight://">Turn Off Flashlight</a>
Note: Make sure your app has the required camera permissions in Info.plist, as the flashlight functionality is tied to the device's camera hardware.
App Links / Deeplinking API
The WebViewGold App Links / Deeplinking API enables users to open specific pages in your app from external sources like email, social media, or messaging apps.
WebViewGold for Android supports two deep linking methods:
- Standard URL-based Deep Links: e.g.
https://www.example.org/subpages/example1 - Custom Scheme Deep Links: e.g.
webviewgold://https://www.example.org/subpages/example2
Step 1: Configure Your Link Scheme in AndroidManifest.xml
To support standard deep linking, configure your AndroidManifest.xml to associate your domain with your app. Replace www.webviewgold.com with your actual domain (e.g., www.example.org):

Step 2: Enable Deep Linking in Config.java
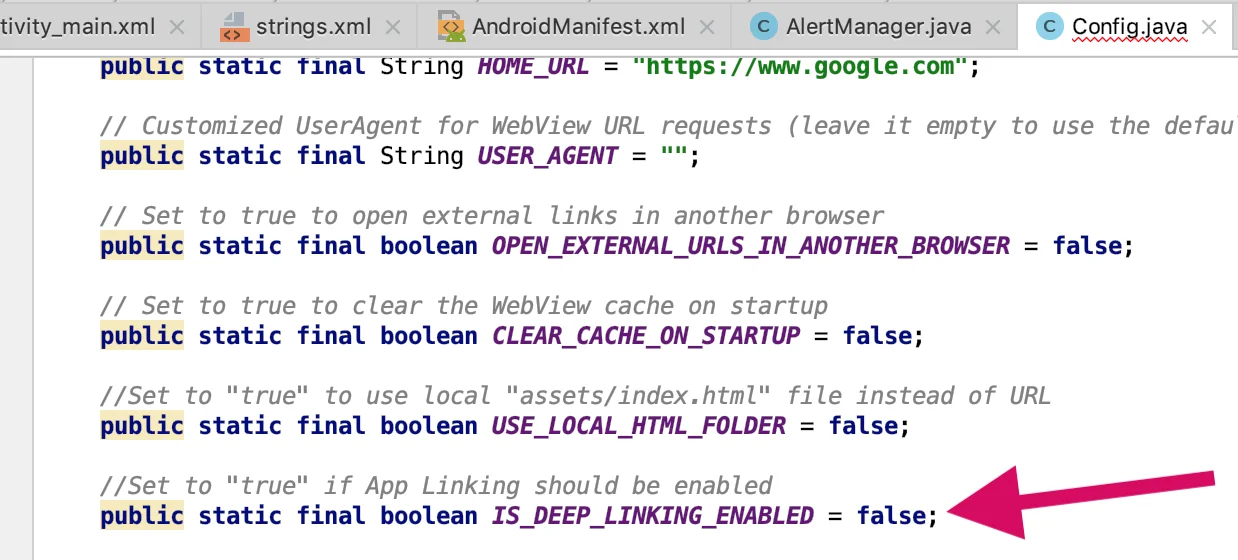
In your Config.java file, enable deep linking features:
// Enables standard deep linking (https:// links)
public static final boolean IS_DEEP_LINKING_ENABLED = true;

// Enables custom scheme deep linking (e.g., webviewgold://)
public static final boolean IS_CUSTOM_SCHEME_ENABLED = true;

// Set your desired scheme prefix (must match AndroidManifest.xml)
public static final String CUSTOM_DEEPLINK_SCHEME = "webviewgold";
Step 3: Verify Domain Ownership (for URL-based Deep Links)
To enable deep linking using HTTPS URLs, you must verify domain ownership with Google. Follow the Google Site Verification Guide.
Testing Your App Links
You can test both types of links via Android Studio or terminal:
- Using Android Studio: Open the App Links Assistant from the Tools menu for simulation and troubleshooting.
- Using Terminal or Command Prompt:
- Run the following command:
adb shell am start -a android.intent.action.VIEW -d "webviewgold://https://www.example.org/subpages/example2" com.webviewgold.myappname- Replace
com.webviewgold.myappnamewith your actual app package name. - You can also test with a URL link like
https://www.example.org/subpages/example1.
- Replace
- Run the following command:
Once everything is set up, users can open your app directly to any specific page using deep links like:
https://www.example.org/subpages/example1webviewgold://https://www.example.org/subpages/example2
Questions? Ping us anytime!
ShareIntent API (Receive Shared Data from Other Apps)
The WebViewGold ShareIntent API enables your app to appear as a target in Android’s native Share dialog. This allows users to share content such as text, URLs, or images (as base64 strings) from any other app directly into your WebView-based app.
Use Cases:
- Sharing links to user profiles, notes, or articles directly into your app
- Receiving content from messaging or browser apps
- Sending images from the gallery to your WebView interface (base64-encoded)
Step 1: Enable Sharing Support in AndroidManifest.xml
To allow your app to receive shared data, uncomment the relevant intent filters in your AndroidManifest.xml file:
<!-- Receive shared text (e.g., URLs or notes) -->
<intent-filter>
    <action android:name="android.intent.action.SEND" />
    <category android:name="android.intent.category.DEFAULT" />
    <data android:mimeType="text/plain" />
</intent-filter>

<!-- Receive a single shared image -->
<intent-filter>
    <action android:name="android.intent.action.SEND" />
    <category android:name="android.intent.category.DEFAULT" />
    <data android:mimeType="image/*" />
</intent-filter>

<!-- Receive multiple shared images -->
<intent-filter>
    <action android:name="android.intent.action.SEND_MULTIPLE" />
    <category android:name="android.intent.category.DEFAULT" />
    <data android:mimeType="image/*" />
</intent-filter>
Once these filters are active, your WebViewGold-based app icon will appear as a sharing target whenever users share content from another app.
Step 2: Handle Shared Data in Your WebView
When a user shares content to your app, WebViewGold will automatically inject the shared content into a JavaScript variable named sharedData.
<script>
    alert(sharedData); // Displays the shared content (text or base64 image)

</script>
- Text or URL: Will be passed as plain text into
sharedData - Image: Will be converted to a base64-encoded string and passed into
sharedData
Example Use: Automatically populate a form or preview an image based on the received content:
<script>
    if (sharedData) {
        document.getElementById("myInput").value = sharedData;
    }
</script>
Note: Ensure that your JavaScript is ready to handle both plain text and long base64 strings. You may also implement client-side checks to distinguish between different content types.
App Sharing Dialog API
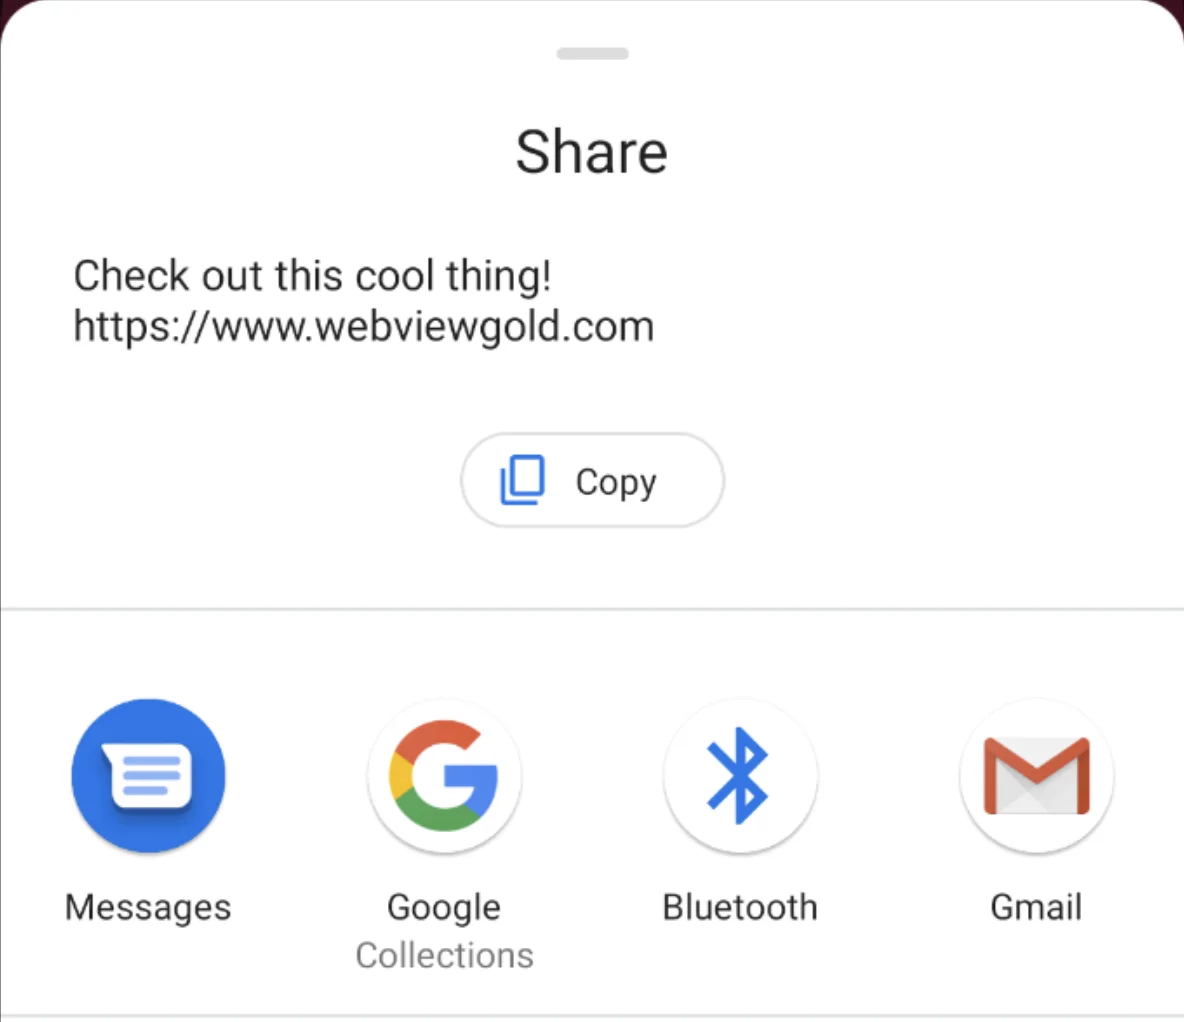
The App Sharing Dialog API in WebViewGold enables your users to share content from your app, such as the download link or custom messages, with friends and family via their preferred apps (e.g. WhatsApp, SMS, Email). This can be an effective way to increase your app’s visibility and grow your user base.
How to Use the App Sharing Dialog in Your WebView-Based Android App
You can trigger a native sharing dialog by using the shareapp:// URL scheme with customizable message and URL parameters.
Below are examples of the different ways to implement this feature:
<a href="shareapp://message?=Check out this cool thing!&url=https://www.webviewgold.com">Share (message, link)</a>

<a href="shareapp://message?=&url=https://www.webviewgold.com">Share (no message, link)</a>

<a href="shareapp://message?=Check out this cool thing!">Share (message, no link)</a>
In-App Purchase & In-App Subscription API
Within some apps, you can buy additional content or services. These kinds of purchases are called "in-app purchases". They can be an attractive source of revenue for developers and are very convenient for customers as they use existing accounts and payment sources for settlement. WebViewGold allows triggering Google Play In-App Purchases. Make sure to own an Extended License of WebViewGold if you plan to use this feature in an end product. Need to upgrade? Learn how to upgrade here.
Option 1 (Default): RevenueCat
Create your free RevenueCat account to get started. Pricing information is available on their website. Then set up RevenueCat by following their setup wizards and documentation (pricing details are available on their website). Afterwards, add your details to Config.java. This approach also supports the 15% Service Fee Tier Program of the Google Play Store and Apple's Small Business Program. If you participate in these reduced-fee programs, inform RevenueCat via their Apple Small Business Program or Google 15% reduced service fee pages. This is how setup in Config.java looks like:
public static final String REVENUECAT_API_KEY = "xxxxxxxsxxxxxxxxxxxxxxxxxxxxxxxxxx"; //Your RevenueCat API Key (sign up via tinyurl.com/register-revenuecat first, then follow tinyurl.com/api-key-revenuecat how to find it)
public static final String REVENUECAT_PROJECT_ID = "xxxxxxx"; //Your RevenueCat Project ID (sign up via tinyurl.com/register-revenuecat first, then follow tinyurl.com/project-id-revenuecat how to find it)
Ensure your package name on the APK and Google Play Console matches the project configured in RevenueCat. Trigger a purchase or subscription using:
revenuecat://purchase?external_id=user_123&product=sub_30_days
external_id = User identifier, e.g., your customer email or user ID. product = ID displayed on the RevenueCat console. It works for both Android & iOS.
Option 2: Manual (Non-RevenueCat)
We are committed to helping our WebViewGold customers achieve success, and we want to bring your attention to the 15% Service Fee Tier Program of the Google Play Store and Apple's Small Business Program. These programs allow eligible developers to qualify for a 15% commission, a significant reduction from the standard 30%. It's quick and easy to apply, and can potentially save you 50% in fees by reducing the Google and Apple commission rates from 30% to 15%. Once approved, you'll receive the reduced commission rate for all paid apps and in-app purchases made by customers on the respective stores. To learn more about the Google Play program, click here, and for the Apple program, visit here.
After setup, for in-app purchase products just link to this kind of URL:
<a href="inapppurchase://?package=purchase_package_identifier_name_here&disableadmob=true&consumable=true&successful_url=https://www.google.com">Buy In-App Purchase</a>
- The "package" is the product identifier of the item you want to sell.
- The "successful_url" is the URL you want the app to load once the purchase is complete.
- You may want to save a cookie on this page so that your web app remembers that the purchase has been made.
- Include "disableadmob=true" if you would like to disable ads after the purchase of the product.
- To enable the user to be charged again for the same in-app purchase product (if bought another time), set the attribute "consumable" to true. On the other hand, if you want to prevent the user from being charged again for the same product (if bought another time), set "consumable" to false or omit it altogether (since false is the default value). Make sure to use WebViewGold for Android v12.5 or newer.
Alternatively, use this kind of URL for in-app subscription products:
<a href="inappsubscription://?package=purchase_package_identifier_name_here&expired_url=https://www.yahoo.com&successful_url=https://www.google.com">Start In-App Subscription</a>
- The "package" is the product identifier of the subscription you want to sell.
- The "successful_url" is the URL you want the app to load once the purchase is complete.
- You may want to save a cookie on this page so that your web app remembers that the subscription has been activated.
- The "expired_url" is the URL you want the app to load when the subscription is no longer valid.
- You may want to update/delete a cookie on this page so that your web app remembers that the subscription has been deactivated.
In this URL example, https://www.google.com should be called after the successful subscription activation, and https://www.yahoo.com should be called as soon as the subscription is expired.
You can identify the user server-side. e.g., the site /buy_now.php redirects to In-App-Purchase API and that API redirects to /thanks.php, you can still access the user/session cookies server-sided and identify the user who just bought that In-App-Purchase. In this use case, please make sure that you deactivate the CLEAR_CACHE_ON_STARTUP in the Config.java file in order to keep cookies activated by the In-App Purchase process.
Managing/canceling subscriptions: WebViewGold for Android can link directly to the Play Store’s subscriptions management screen – just point your link to cancelinapppurchase://:
<script>
<a href="cancelinapppurchase://">Manage/cancel subscription in Google Play</a>
<script>
Restoring purchases: WebViewGold for Android provides a simple way to restore in-app purchases made by users. E.g., useful for scenarios where users reinstall the app or switch devices and need to regain access to their purchased content:
<script>
<a href="restoreinapppurchases://">Restore</a>
<script>
Server-Side Verification: Additionally or alternatively, WebViewGold also allows you to handle In-App Purchase or Subscription data from a server-side. After a successful transaction, the following JavaScript variables are created and injected into the webpage by WebViewGold:
1. planID: Contains the Product ID
2. transactionIdentifier: Contains the unique Transaction ID
3. subreceipts: Contains unique receipt IDs for the user’s subscriptions
These variables can be accessed directly on the webpage for server-side storage and validation. Note that these variables are injected directly into the global window object after a transaction. Make sure your JavaScript is executed on the same page where the variables are accessible. Add appropriate fallback mechanisms if the variables are not available within the expected time frame (as shown in the timeout implementation). Sending these variables to your server allows you to validate subscriptions and transactions securely using Apple’s receipt validation API or your chosen method. Here’s an example JavaScript implementation:
<script>
// Utility function to wait for a variable to be defined
function waitForVariable(variableName, callback, timeout = 5000) {
    const startTime = Date.now();

    (function checkVariable() {
        if (window[variableName] !== undefined) {
            callback(window[variableName]);
        } else if (Date.now() - startTime < timeout) {
            setTimeout(checkVariable, 100);
        } else {
            console.error(`Timeout: ${variableName} was not set within ${timeout} ms`);
        }
    })();
}

// Example: Handling In-App Purchase/Subscription variables
waitForVariable("planID", function(planID) {
    console.log("planID:", planID);
    // Send the Product ID to your server
    sendToServer("planID", planID);
});

waitForVariable("transactionIdentifier", function(transactionIdentifier) {
    console.log("transactionIdentifier:", transactionIdentifier);
    // Send the Transaction ID to your server
    sendToServer("transactionIdentifier", transactionIdentifier);
});

waitForVariable("subreceipts", function(subreceipts) {
    console.log("subreceipts:", subreceipts);
    // Send Subscription Receipt IDs to your server
    sendToServer("subreceipts", subreceipts);
});

// Function to send data to your server for validation
function sendToServer(key, value) {
    fetch("https://example.com/api/validate", {
        method: "POST",
        headers: {
            "Content-Type": "application/json"
        },
        body: JSON.stringify({ [key]: value })
    })
    .then(response => response.json())
    .then(data => console.log(`Server Response for ${key}:`, data))
    .catch(error => console.error(`Error sending ${key}:`, error));
}
</script>
Localized Pricing / Get Store Location: The getstorelocation:// URL scheme injects the Play Store location into a JavaScript variable. When getstorelocation:// is called/linked, the WebViewGold wrapper retrieves the Play Store's country code, if available. Alternatively, consider setting autoInjectVariable to true in the configuration file to automatically inject this (and other) values into JavaScript without needing a URL call. The country code is then injected into a JavaScript variable storeLocation for further use by your web app (e.g., for displaying localized pricing). If the code is not available, storeLocation will be set to null:
- If successful (example United States):
var storeLocation = 'US'; - If no country code is found:
var storeLocation = null;
Note: As with any technology, it is essential to mention that also while using our API, there is a risk that some (technically savvy) users may be able to access the restricted content without paying for it. This could, for example, occur through retrieving and opening the Success URL link directly, by uninstalling the app while afterward canceling subscription products so that the Expiration URL never gets called (to minimize this risk, you can, therefore, occasionally request reauthorizations) or by using withdrawal rights and/or chargeback processes of credit cards. However, it is worth noting that some kind of risk is present with any sort of digital approach. In general, our API is a practical and easy-to-integrate approach for delivering paid content to app users, and we continue to work on ways to reduce risks further. The use of our API is still at your own risk and without warranty, but overall, while it is essential to be aware of the risk of unauthorized/unpaid access to content, the benefits of using our API far outweigh the risks for most users. It is recommended to track and compare the sales data of the Google Play Store Developer Console with server-side activations of in-app purchase products to ensure accurate revenue reporting and identify any potential discrepancies.
QR Code Scanner API
To trigger the QR code scanner within your WebView-based Android app, use the following HTML link format:
<a href="qrcode://">Scan QR Code</a>
Clicking this link will open the device’s camera to scan a QR code, and any URL encoded in the QR code will load automatically within the WebView.
Use Cases:
- Bridging print and digital content (e.g., scanning a QR code from a magazine to open a webpage).
- Quick access to promotions, product information, or events.
- Securely linking users to internal app resources or specific landing pages.
Scanning Mode API
If your web app presents information on the screen to be scanned (for example, a QR code), it can be helpful to turn the screen brightness up to 100% and to prevent the screen from sleeping. WebViewGold provides the Scanning Mode API to dynamically enable these optimal scanning conditions.
This API includes 3 commands:
- "auto" = turns on scanning mode and automatically turns it off on page redirect.
- "on" = turns on scanning mode, stays on after page redirects.
- "off" = turns off scanning mode.
Link to these kinds of URLs to use the Scanning Mode API:
<a href="scanningmode://auto">Enable Scanning Mode; will automatically disable on page redirect.</a>
<a href="scanningmode://on">Enable Scanning Mode; will persist until manually disabled.</a>
<a href="scanningmode://off">Disable Scanning Mode.</a>
Barcode Scanner API
The WebViewGold Barcode Scanner API enables your WebView-based app to activate the device camera for scanning barcodes. Once a barcode is successfully scanned, the result is automatically passed back into your web content.
Use Cases:
- Scanning product barcodes for inventory systems
- Processing tickets or access codes in logistics or event apps
- Enabling fast data capture from printed barcodes
How to Trigger the Scanner:
Use the following HTML to start the native barcode scanner:
<a href="barcodescanner://">Start Barcode Scanner</a>
<a href="#" onClick="alert(barcodescanresult);">Show Scan Result</a>
- Start Barcode Scanner: Opens the device camera to detect supported barcode formats
- Show Scan Result: Displays the scanned barcode content stored in the
barcodescanresultJavaScript variable
Technical Note: After scanning, the decoded barcode value is injected into the current page via the barcodescanresult JavaScript variable. You can use this variable to auto-fill forms, trigger custom logic, or perform lookups based on scanned data.
Permissions: Make sure the app has access to the device camera, as it is required for barcode scanning to function properly.
Take Screenshot API
The screenshot API of WebViewGold allows you to take screenshots programmatically from the WebView content and save them to the Photos gallery of your app user. One possible use case for this API is, for example, to programmatically save a screenshot of your e-tickets (for festivals, travels, …) of your web app so that they can be shown when the user is offline and cannot access the WebView content (e.g., while being in a festival location, on a train ride, …).
Link to this kind of URL to trigger a screenshot:
<a href="takescreenshot://">Save</a>
App Version Check API
Using this WebViewGold App Version Check API, your website/web app can retrieve the version of the Android app being used by your Android app user. This API is especially helpful if you want to notify users of an older version to update their app. Moreover, you can hide web app sections that require app features supported by a specific app version.
Use JavaScript to this kind of URL to read and alert the app version and app bundle number:
<script>
window.location.href = "getappversion://";
alert(versionNumber);
alert(bundleNumber);
</script>
Alternatively, consider turning
AUTO_INJECT_VARIABLES to true in Config.java to automatically inject this (and other) values into JavaScript without needing to call a URL upfront.
Contacts API
WebViewGold allows for the export of contacts into a JavaScript variable, in the format below via the readcontacts:// API. The JSON object is stored in the contacts variable. In order to access this, your app must first gain permission through the requestcontactpermission:// API, which will prompt your user to enable contact permissions. Without completing this step, the readcontacts:// will populate the contacts variable with a null value.
Example output stored in JS contacts variable:
              {
                "John Appleseed":[
                   "888-555-5512",
                   "888-555-1212"
                ],
                "Daniel Higgins":[
                   "555-478-7672",
                   "(408) 555-5270",
                   "(408) 555-3514"
                ],
                "David Taylor":[
                   "555-610-6679"
                ],
                "Hank Zakroff":[
                   "(555) 766-4823",
                   "(707) 555-1854"
                ]
             }
In order to add this contact functionality, the
android.permission.READ_CONTACTS permission needs to be added to the AndroidManifest.xml file so the permission can be granted by users.
Dynamic UI API
WebViewGold allows you to dynamically customise the UI elements in your web app. These elements may consist of the status bar, bottom bar (iOS), navigation bar (Android) and pull to refresh (iOS). WebViewGold includes the following commands to dynamically customise these elements:
- statusbarcolor://
- The MASTER COMMAND to change the color of the status bar and any other relevant UI features automatically, such as the status bar text color, the bottom bar color (iOS), navigation bar color (Android), etc.
- statusbartextcolor://
- Allows you to manually change the text color of the status bar (iOS and Android).
- bottombarcolor://
- If a bottom bar (iOS) or navigation bar (Android) UI element exists, allows you to manually change its color.
- navbartextcolor://
- Allows you to manually change the text color of the navigation bar on Android. Request will be ignored on iOS (the bottom bar on iOS does not have text).
- hidebars://
- Allows you to hide the background of the status and navigation bar.
Changing the color of the Status Bar (and other UI elements automatically):
This feature supports a color input in the following format:
- RGB = {red, green, blue}
Use JavaScript to this kind of URL to change the color of the status bar:
<script>
// Example: red
window.location.href = "statusbarcolor://255,0,0";
</script>
When you change the status bar color, the status bar text will automatically change to a suitable color (white or black) depending on how dark the color is.
Optional UI features like Pull To Refresh (iOS), the Bottom Bar (iOS) and the Navigation Bar (Android) will also have their colors automatically adjusted.
Changing the color of the Status Bar text:
If you would like to manually choose the color of the status bar text, you can do so using this option.
This feature supports a text input for the following options:
- "white"
- "black"
<script>
// Example: white text
window.location.href = "statusbartextcolor://white";
// Example: black text
window.location.href = "statusbartextcolor://black";
</script>
Changing the color of the Navigation Bar:
This feature supports a color input in the following format:
- RGB = {red, green, blue}
Use JavaScript to this kind of URL to change the color of the status bar:
<script>
// Example: red
window.location.href = "bottombarcolor://255,0,0";
</script>
Changing the color of the Navigation Bar text:
If you would like to manually choose the color of the navigation bar text, you can do so using this option. Please note that this request will be ignored on iOS.
This feature supports a text input for the following options:
- "white"
- "black"
<script>
// Example: white text
window.location.href = "navbartextcolor://white";
// Example: black text
window.location.href = "navbartextcolor://black";
</script>
Hiding the status and bottom bars
The hidebars functionality can either be on or off.
Note, the status bar text, such as the time and battery percentage do not remain visibile to the user. However, these can be brought back to view with a user swipe from the top.
Use JavaScript to change the visibility status of the status and navigation bar:
<script>
// Example: hide the bars from view
window.location.href = "hidebars://on";
// Example: redisplay the bars after being hidden
window.location.href = "hidebars://off";
</script>
Haptic Feedback API
WebViewGold allows for the implementation of native Android haptic control within your web app. Using our API, you are able to perform the following actions:
An example of how this API can be utilised can be seen below, with an anchor tag and custom javascript function which interact with our haptic API.
<a onclick="lightHaptic('index.html')">Navigation Link with Haptics</a>

<script>
function lightHaptic(url) {
  if (isWebViewBrowser) {
    window.location.href = url;
    loadInnerHref("lighthaptic://");
  } else {
    window.location.href = url;
  }
}

function loadInnerHref(url) {
  iFrame = document.createElement("iframe");
  iFrame.setAttribute("src", url);
  document.body.appendChild(iFrame);
  iFrame.parentNode.removeChild(iFrame);
  iFrame = null;
}
</script>
Click here to view a demonstration web page for this feature. Inspect the page to view the example code.
NFC Plugin
Near-Field Communication (NFC) enables two devices or a device and an NFC tag to communicate wirelessly when in close proximity. NFC is widely used on Android devices for reading and writing small amounts of data, making it an effective tool for sharing information via NFC-enabled cards or tags.
Since Android Nougat (7.0), the Android NFC API has allowed developers to read and write data to NFC tags directly from app code. This opens up new ways for apps to interact with users, from sharing contact information to embedding text snippets. NFC is particularly useful for Android WebView apps, where a JavaScript bridge enables NFC functionality within the app interface.
WebViewGold NFC Plugin Integration
While NFC is not included in WebViewGold’s standard feature set, we offer a custom NFC plugin integration on an individual basis that supports JavaScript-based NFC interactions.
Please send us your requirements (e.g., writing/reading text snippets and/or contact card details to/from NFC tags) via an email to [email protected] for a free consultation and a non-binding quote.
Build and publish your app
Your app is ready, and now it's time to upload it to the Google Play Store and reach an audience of millions? Exciting! The following section will show you how to do it - whether you want to do it yourself or have some work done for you.
Prefer a browser-based workflow? The WebViewGold Cloud Builder (paid add-on) compiles and uploads your app straight from the browser without Android Studio.
Option A) Full App Publishing Service
Bringing your app to the Google Play Store should be smooth and stress-free. Treat yourself to some support — with appsubmitter.io, you can enjoy a convenient, expert-led publishing process — so you can focus on what matters most while we handle the details.
Why Choose appsubmitter.io?
- Save time – We take care of certificates, screenshots, and uploads.
- Expert handling – Your app is submitted professionally, with no hassles.
- Published under your account – You have full control, no restrictions.
- Approval guarantee – If Google rejects your app, you get a full refund (see Terms and Conditions).
Ready to launch? Book a video call and let’s get your app live!

Option B) Manual Publishing Process
We updated the default package name to make it easier for you to use a standardized package name format. Now, WebViewGold for Android's default package name is com.webviewgold.myappname. You can easily customize this to your own personalized package name in your app.
So, if You don't want to use our pleasant submission service, but you want to deal with it yourself? Sure, follow this guide:
In the first step, please change the package name to any unique package name.
Do a full backup of your source code folder before renaming the package name.
Tip: The WebViewGold Cloud Builder (paid add-on) automatically takes care of package naming and Play Store uploads, so you can skip the manual steps.
Afterward, please consider a professional User Experience/UX Review on UXreviewer.io or similar services for best Play Store approval results. Such a UX review also helps you to achieve better customer retention in general for your product with suggestions for improvement.
Great, now you are ready to follow the steps of this second video:
Make sure that the content does not contradict the legal requirements of the Google Play Store. If Google rejects your app, we offer you a full refund of the WebViewGold license (by claiming within 14 days after purchase; see Terms and Conditions). Just contact us by mail.
Congrats on your own published Android app! 🎉
How to Shorten The Package Name
The video explains in detail the process to make your package name shorter, and some recommendations to do it. So you can change your app's name from com.webviewgold.myappname to com.myappname
No time or don't you feel like signing and uploading manually? Consider the appsubmitter.io service:
Of course, after the release should be celebrated first! But then perhaps the next project is already on the agenda? Our App Specialists are also happy to help you with individual development services for web apps, iOS apps, Android apps, chat bots, marketing ideas, and much more. Learn more
Credits / License / Upgrade to Extended License
Please don't forget to add your Envato/CodeCanyon Purchase Code in the PURCHASECODE field for each app published by you. One license per each customized and published end product is required.
You will need an Envato/CodeCanyon Extended License if any of these cases apply:
- You charge your users for the Play Store download
- In-App Purchases API or In-App Subscription API will be used in your app
- You sell your final app on any marketplace
If you already bought the Regular License, you can upgrade the existing license here. Alternatively, if you do not want to request a refund or upgrade the license, you can re-use your existing Regular License for another app covered by the Regular License.
All rights (e.g. of images) belong to their respective owners. The provider of this source code is OnlineAppCreator by jocapps® GmbH - registered in Germany - and is not affiliated with Google.
Please take a look for license info of your CodeCanyon purchase: https://codecanyon.net/licenses/standard
WebViewGold for Android uses android-inapp-billing-v3 (© 2014 AnjLab) which is licensed under the Apache License, version 2.0; you may not use this file except in compliance with the license.
WebViewGold for Android uses QRCodeScanner (© 2018 blikoon) which is licensed under the GPLv3; you may not use this file except in compliance with the license.
WebViewGold for Android uses Google Mobile Ads SDK (© 2020 Google) which is licensed under the Google Developers Site Terms of Service; you may not use this file except in compliance with the license.
WebViewGold for Android uses OneSignal-Android-SDK (© 2016 OneSignal) which is licensed under a modified MIT License; you may not use this file except in compliance with the license.
WebViewGold for Android uses Android-SpinKit (© 2019 ybq) which is licensed under the MIT License; you may not use this file except in compliance with the license.
WebViewGold for Android uses FilePicker (© 2018 jaiselrahman) which is licensed under the Apache License, Version 2.0; you may not use this file except in compliance with the license.
WebViewGold for Android uses glide (© 2020 bumptech) which is licensed under the BSD License, part MIT and Apache 2.0; you may not use this file except in compliance with the license.
WebViewGold for Android uses android-gif-drawable (© 2020 koral) which is licensed under the MIT License; you may not use this file except in compliance with the license.
WebViewGold for Android uses firebase-android-sdk (© 2020 Firebase) which is licensed under the Apache License, Version 2.0; you may not use this file except in compliance with the license.
Rate WebViewGold
If you have 10 seconds, please rate WebViewGold (it's a great motivation for future updates ^^):
1. Go to CodeCanyon.net and sign in
2. Navigate to https://www.codecanyon.net/downloads
3. Click the stars, as shown in this picture:

Thank you very much!
Get WebViewGold for iOS
Get WebViewGold for macOS