
What's new: Changelog
See the changelog here.
1) Setting up your web app/website/HTML files
Option A) Use a URL for accessing your web application (= store files online)
Create a mobile-optimized website, for example, using jQuery Mobile and upload your site to your webserver/webspace. WebViewGold supports all kinds of web apps/websites (including HTML, PHP, WordPress, Progressive Web Apps, HTML5 Games, WiX, apprat.io, bubble.io, …). Please make sure to optimize your website to feel like an app. By default, WebViewGold for iOS permits both HTTPS content and HTTP content. However, if you prefer to enhance app security by enabling only HTTPS content, there's an option to modify this setting (and/or consider 'blockfaultyandselfsignedhttpscerts' option). Please consider a professional User Experience/UX Review on UXreviewer.io or similar services for best App Store approval results. Such a UX review also helps you to achieve better customer retention in general for your product with suggestions for improvement.
Option B) Use a local HTML folder for accessing your web application (= store files within the app)
WebViewGold supports web apps based on local HTML folders, too: Set uselocalhtmlfolder to true (see next step) and copy your HTML/CSS/JavaScript files (including subdirectories) to the "local-www" folder in your Xcode project. To do this, make sure to:
- Delete the default files in the "local-www" folder by selecting them in the Xcode file hierarchy, then right-click to press "Delete", then press "Move to Trash".
- Select all the files for your local website, then drag and drop them into the Xcode file hierarchy under the "local-www" folder. Make sure "Create folder references" is checked and press "Finish".
Option C) Use an HTML folder if the user is offline, and use a remote URL if the user is online (= store files online + store backup/fallback files within the app)
Copy your HTML/CSS/JavaScript files (including subdirectories) to the "local-www" folder in your Xcode project. To do this, make sure to:
- Delete the default files in the "local-www" folder by selecting them in the Xcode file hierarchy, then right-click to press "Delete", then press "Move to Trash".
- Select all the files for your local website, then drag and drop them into the Xcode file hierarchy under the "local-www" folder. Make sure "Create folder references" is checked and press "Finish".
2) Setting up WebViewGold for iOS
Download the WebViewGold app template for iOS here.

Want to avoid installing software? The WebViewGold Cloud Builder (paid add-on) lets you configure, build, and upload your app directly from your browser without opening Xcode.
After downloading the .zip file of WebViewGold from CodeCanyon, there are three setup options for Xcode. Which setup option should be taken is determined by the kind of Mac system you might (or might not) own:
a) You use no Mac system:
If you do not own a Mac for running the required Xcode app, check out MacInCloud as it allows you to rent a virtual Mac online (we are not affiliated with the provider of that service). Using that service, you can build your iOS apps based on WebViewGold, even without using a Mac. Additionally, the WebViewGold Cloud Builder (paid add-on) lets you configure, build, and upload your app directly from your browser without a Mac.
OR
b) You use a Mac system with an Intel chip (detect your chip type):
Download and install the Xcode app from the Mac App Store.
OR
Download and install the Xcode app from the Mac App Store. Then follow these steps to run your app using Rosetta:
(Rosetta is a software translation tool which makes the app compatible with the Apple Silicon chip)
- If you are using Xcode 14.3 and above:
- Make sure that you are using macOS Ventura or above.
- Open Xcode. Then in the menu bar, go to Product > Destination > Destination Architectures and select "Show All Destinations".
- This will allow you to run and test your app on Rosetta simulators that are compatible with the app.
- If you are using older Xcode versions (14.2 and below):
- If you are using macOS Ventura (or above), make sure to upgrade to Xcode 14.3 (or above), or your app will not work.
- If you want to test your app on iOS 16.4 and above, make sure to upgrade to macOS Ventura (or above) and Xcode 14.3 (or above).
- Search for the Xcode application in your Applications folder.
- Select the Xcode icon, and then press Command (CMD) + I (or right-click/use the File menu and select Get Info).
- In the newly opened window, check the “Open using Rosetta” checkbox and close the window.
- This will ensure that Xcode always opens with Rosetta.
That's it, Xcode is ready for WebViewGold!
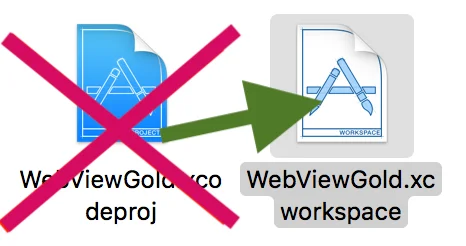
If you’re already running Xcode, please completely quit it (Command/CMD + Q). Then, please open WebViewGold.xcworkspace (instead of WebView.xcodeproj):
Within Xcode, open Config.swift and you will see a document like this: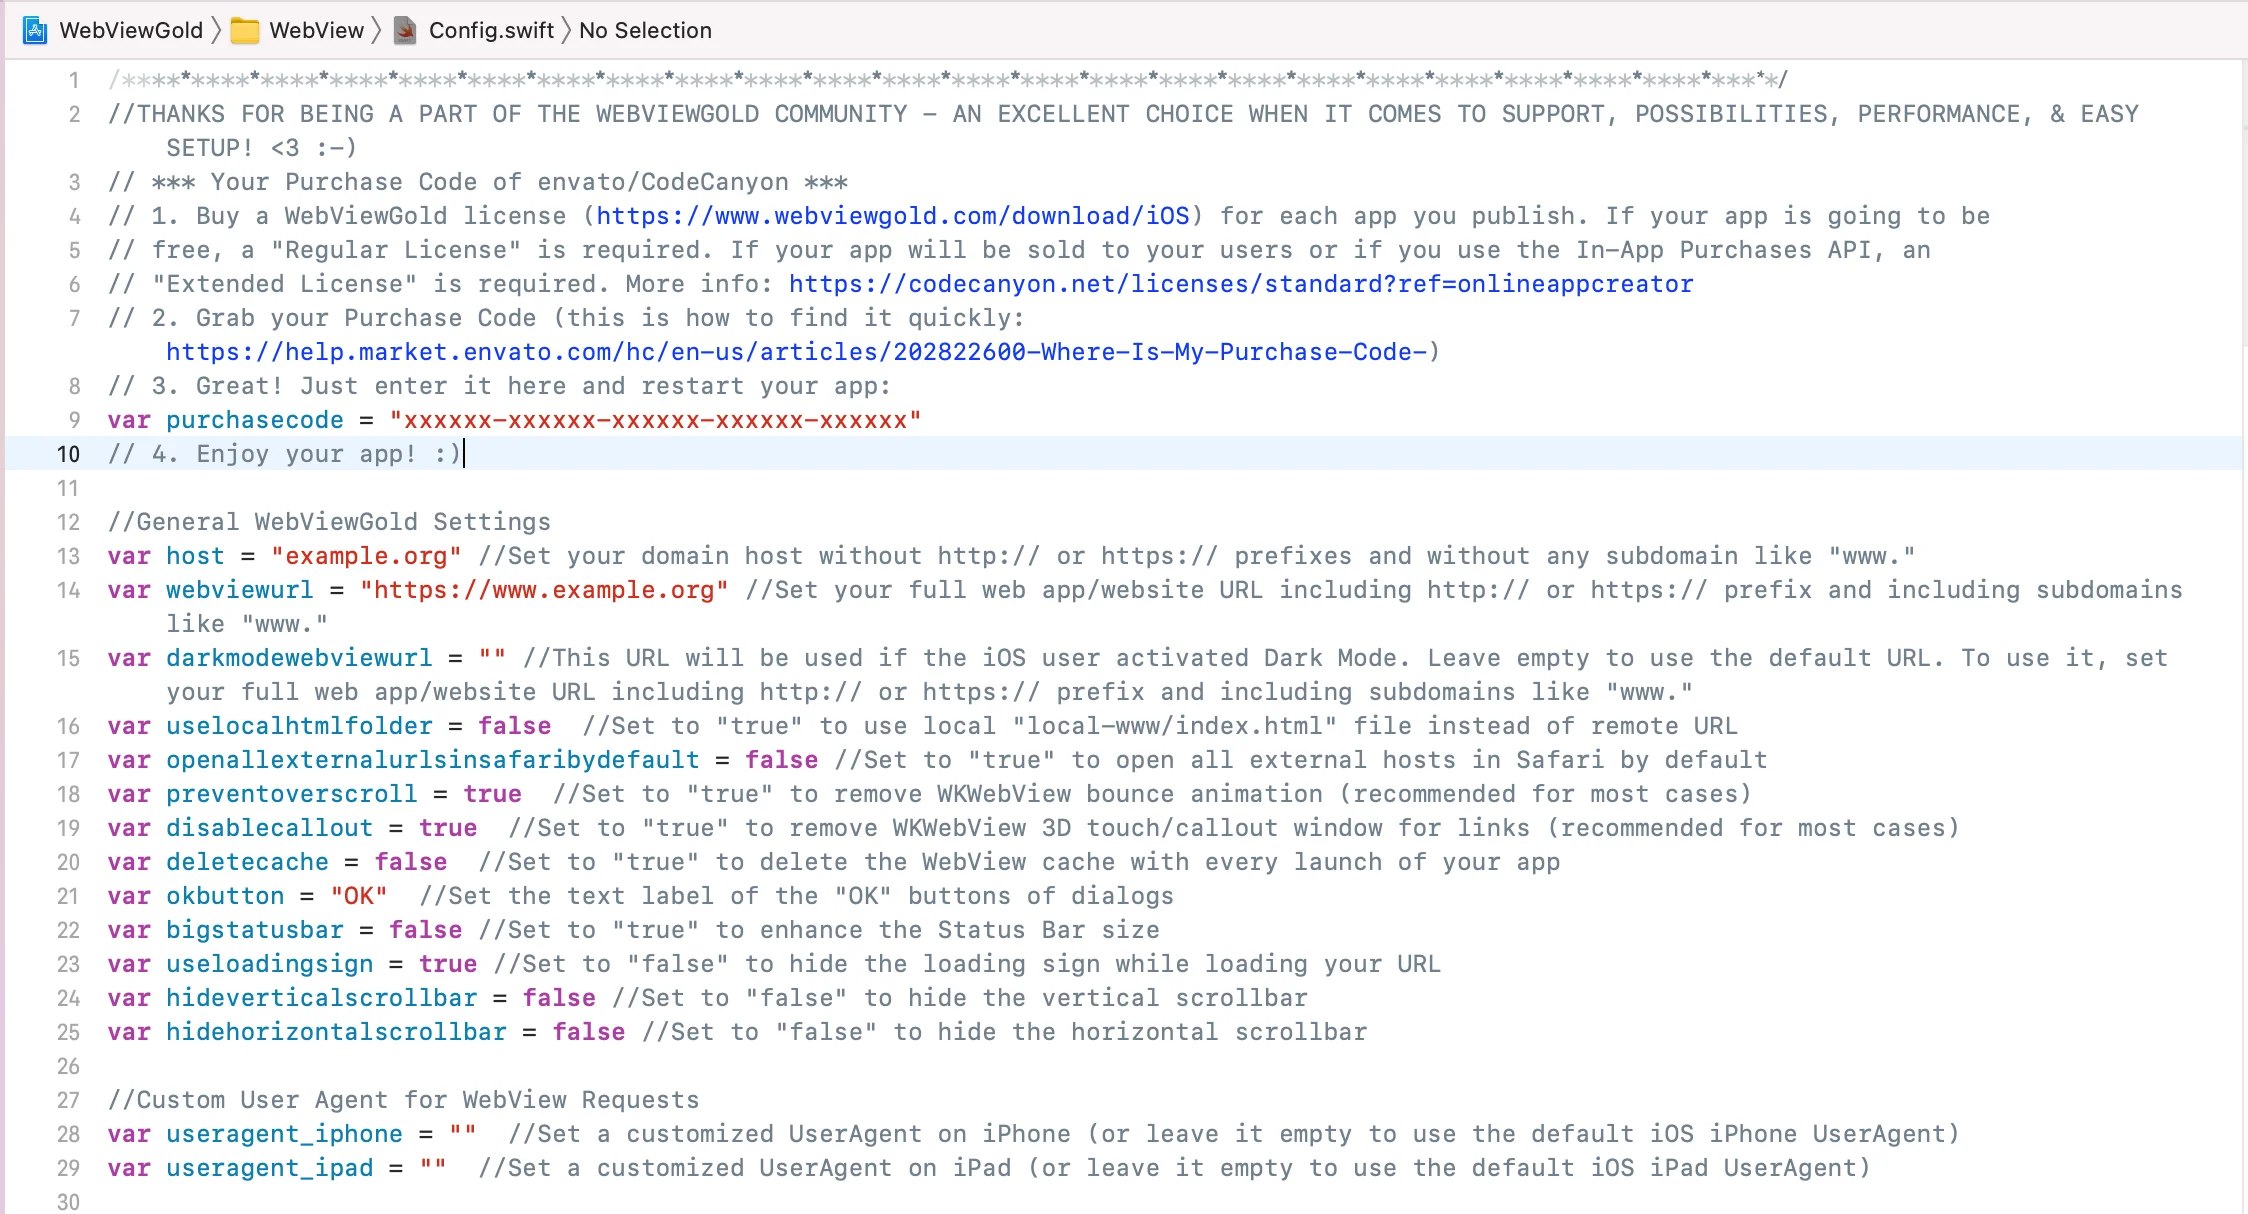
Here you can set up your app easily. Setting up apps with WebViewGold is very easy and does not require any coding knowledge. Please don't forget to add your Envato/CodeCanyon Purchase Code in the purchasecode field for each app published by you. One license per each customized end product is required. License info of your CodeCanyon purchase: https://codecanyon.net/licenses/standard
Please take a look at this overview of all built-in configuration options:
enablepulltorefresh:// or disablepulltorefresh:// from your website to activate or deactivate pull-to-refresh dynamically.barcodescanner://enableflashlight://
3) Change App Name, Icon, and Splash Screen
Changing the Displayed App Name:
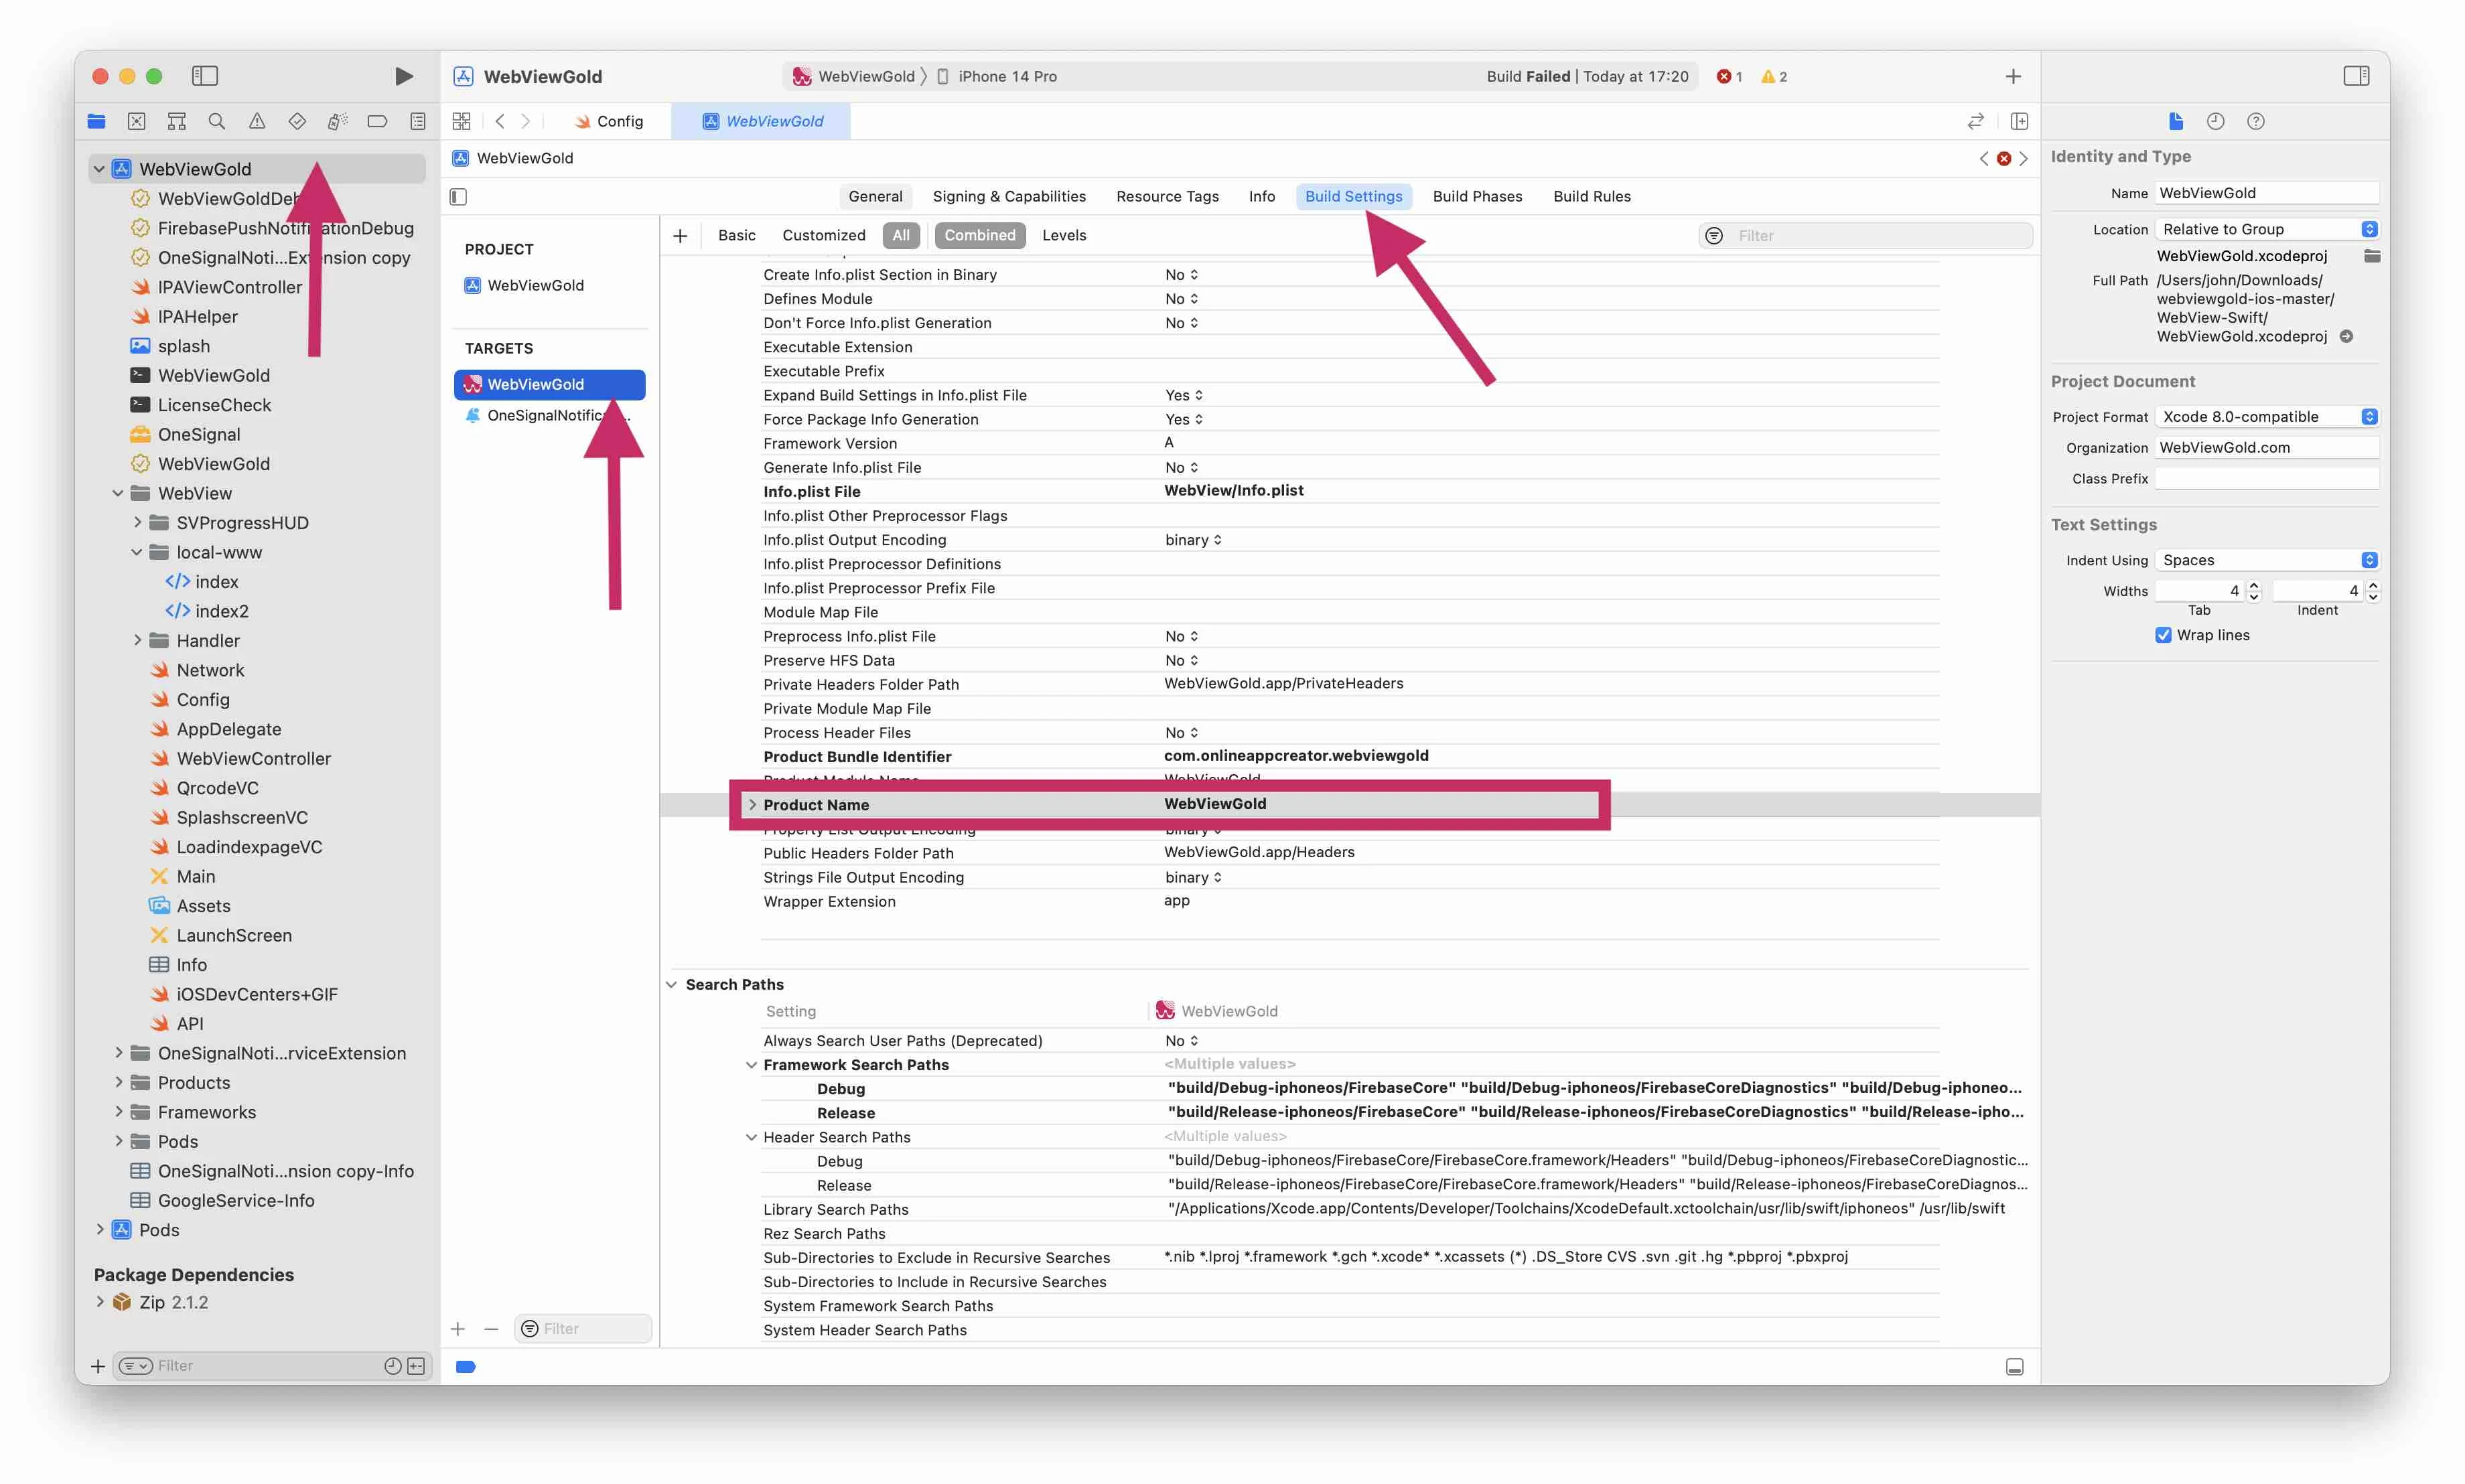
Navigate as shown in the screenshot via WebViewGold → WebViewGold → Build Settings to Product Name and change the name as shown in the screenshot below:NOTE: If your app name contains accent letters (like 'à', for example), you will need to replace them with normal letters for the Product Name. The Product Name is also used for naming files in your app, so it does not support accent letters (the app will crash). Then, to ensure that your app displays the correct name to users on the iOS homescreen, please also change the Bundle Display Name (located in the Info.plist file) from "$PRODUCT_NAME" to your app name with accent letters. For example, if your app name is "WebViewGold", the Product Name should be "WebViewGolda" and the Bundle Display Name should be "WebViewGold".
Adding a Custom App Icon:
Follow these easy steps to add a custom app icon to your WebView-based iOS app:1. Locate App Icon Settings
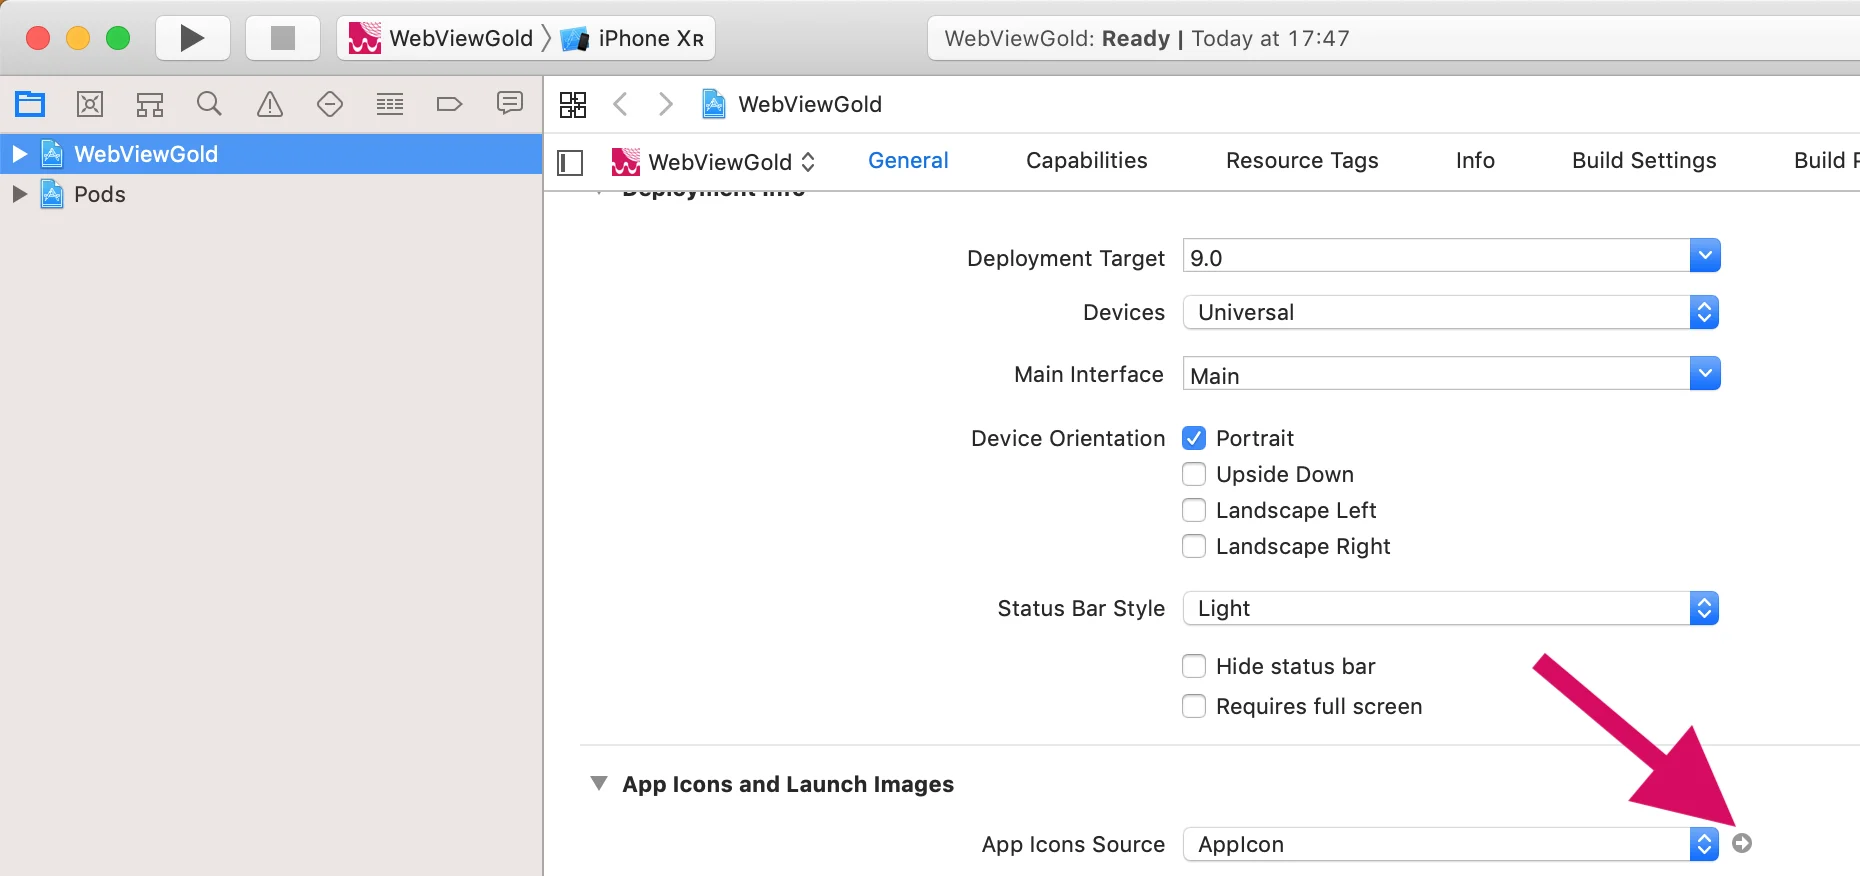
Navigate to WebViewGold → WebViewGold → General → App Icons and Launch Screen → App Icon Source.
2. Replace with Your Icon
Just replace the included image files with your own resized image files. There are free tools online to help generate these different image sizes like App Icon Generator, for example (we are not affiliated with the developer company). Alternatively, you can search for any "iOS App Icon Generator" tool you like.
Adding a Custom Splash Screen:
Follow these steps to add custom splash screen graphics to your WebView-based iOS app:1. Enable the Splash Screen
To activate the splash screen for your app:
- Open the Config.swift file and search for
splashScreenEnabled. - Make sure this variable is set to
true.
2. Replace the Splash Screen Image
To use your own branding as the splash screen:
- Replace the existing splash.gif file in the main folder of the XCode project with your own GIF file.
- Important: Ensure your image file is square (width = height) for optimal display. For example:
- 128x128 px
- 512x512 px
- 1024x1024 px
3. Adjust the Display Timeout
To control how long the splash screen appears:
- Open the Config.swift file and search for
splashTimeout. - Modify the timeout setting to your desired duration (in milliseconds).
Example: Set to 2000 for a 2-second display.
Set the remainSplashOption option (can be found in Config.swift file) to true if you want to display the Splash Screen until your page was loaded successfully. Otherwise, it will be displayed for a short time only, and the native iOS loading indicator will begin.
Use the splashscreencolor option (can be found in Config.swift file) to modify the background color of the splash screen. Color options can be found here.
4. Optional App Disclosure for your Privacy Policy / Terms & Conditions
If you offer (WebViewGold-based) mobile apps to your users, you may optionally include the following statement in your Privacy Policy or Terms & Conditions (this note is provided for informational purposes only and does not constitute legal advice. We assume no liability for how this text is used. Please consult a legal professional for individual guidance):
    Our mobile apps (iOS/Android) are developed using WebViewGold by jocapps GmbH (Germany). These apps display the content of our website using a WebView framework and enrich it with selected native features to improve usability and performance. Accordingly, the same privacy policy and terms of service that apply to our website also apply to our mobile apps. For more information, please visit
    https://www.webviewgold.com/#convert-website-to-app-privacy, or contact us directly.
Modify Safe Area of Devices with a Home Bar
The jump from iPhone 8 to iPhone X and beyond changed a lot in terms of User Interface in the mobile industry by removing the Home button and introducing the Home bar. Depending on your web app design, the lower menu bar may be positioned incorrectly on devices (overlapping content) with the Home bar due to the change in the default safe area.
The good news is that WebViewGold has a feature that allows you to turn on a bottombar and choose its color to match your app theme. Since the issue of the Home bar overlapping app content may not appear in iPads (due to the larger screen and possible different layout), there is also an option to disable the feature in iPads.
To implement this feature, use the following variables in Config.swift under the heading "Custom Bottom Bar Design". Make sure to set bottombar to true.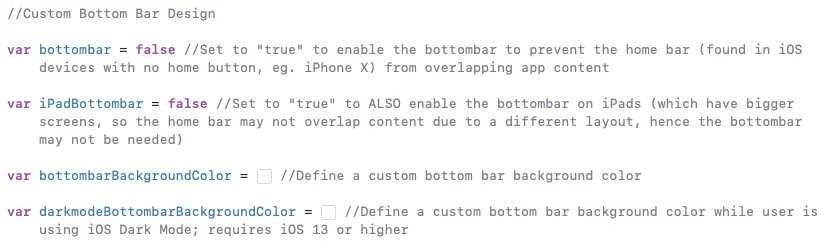
Advanced: Instead of using the bottombar feature, you can search for this code snippet part (Press CMD+F then enter "switch UIDevice.current.userInterfaceIdiom") in the WebViewController.swift file where you can change the border value 20 to any desired value like 10, 30, etc as shown below: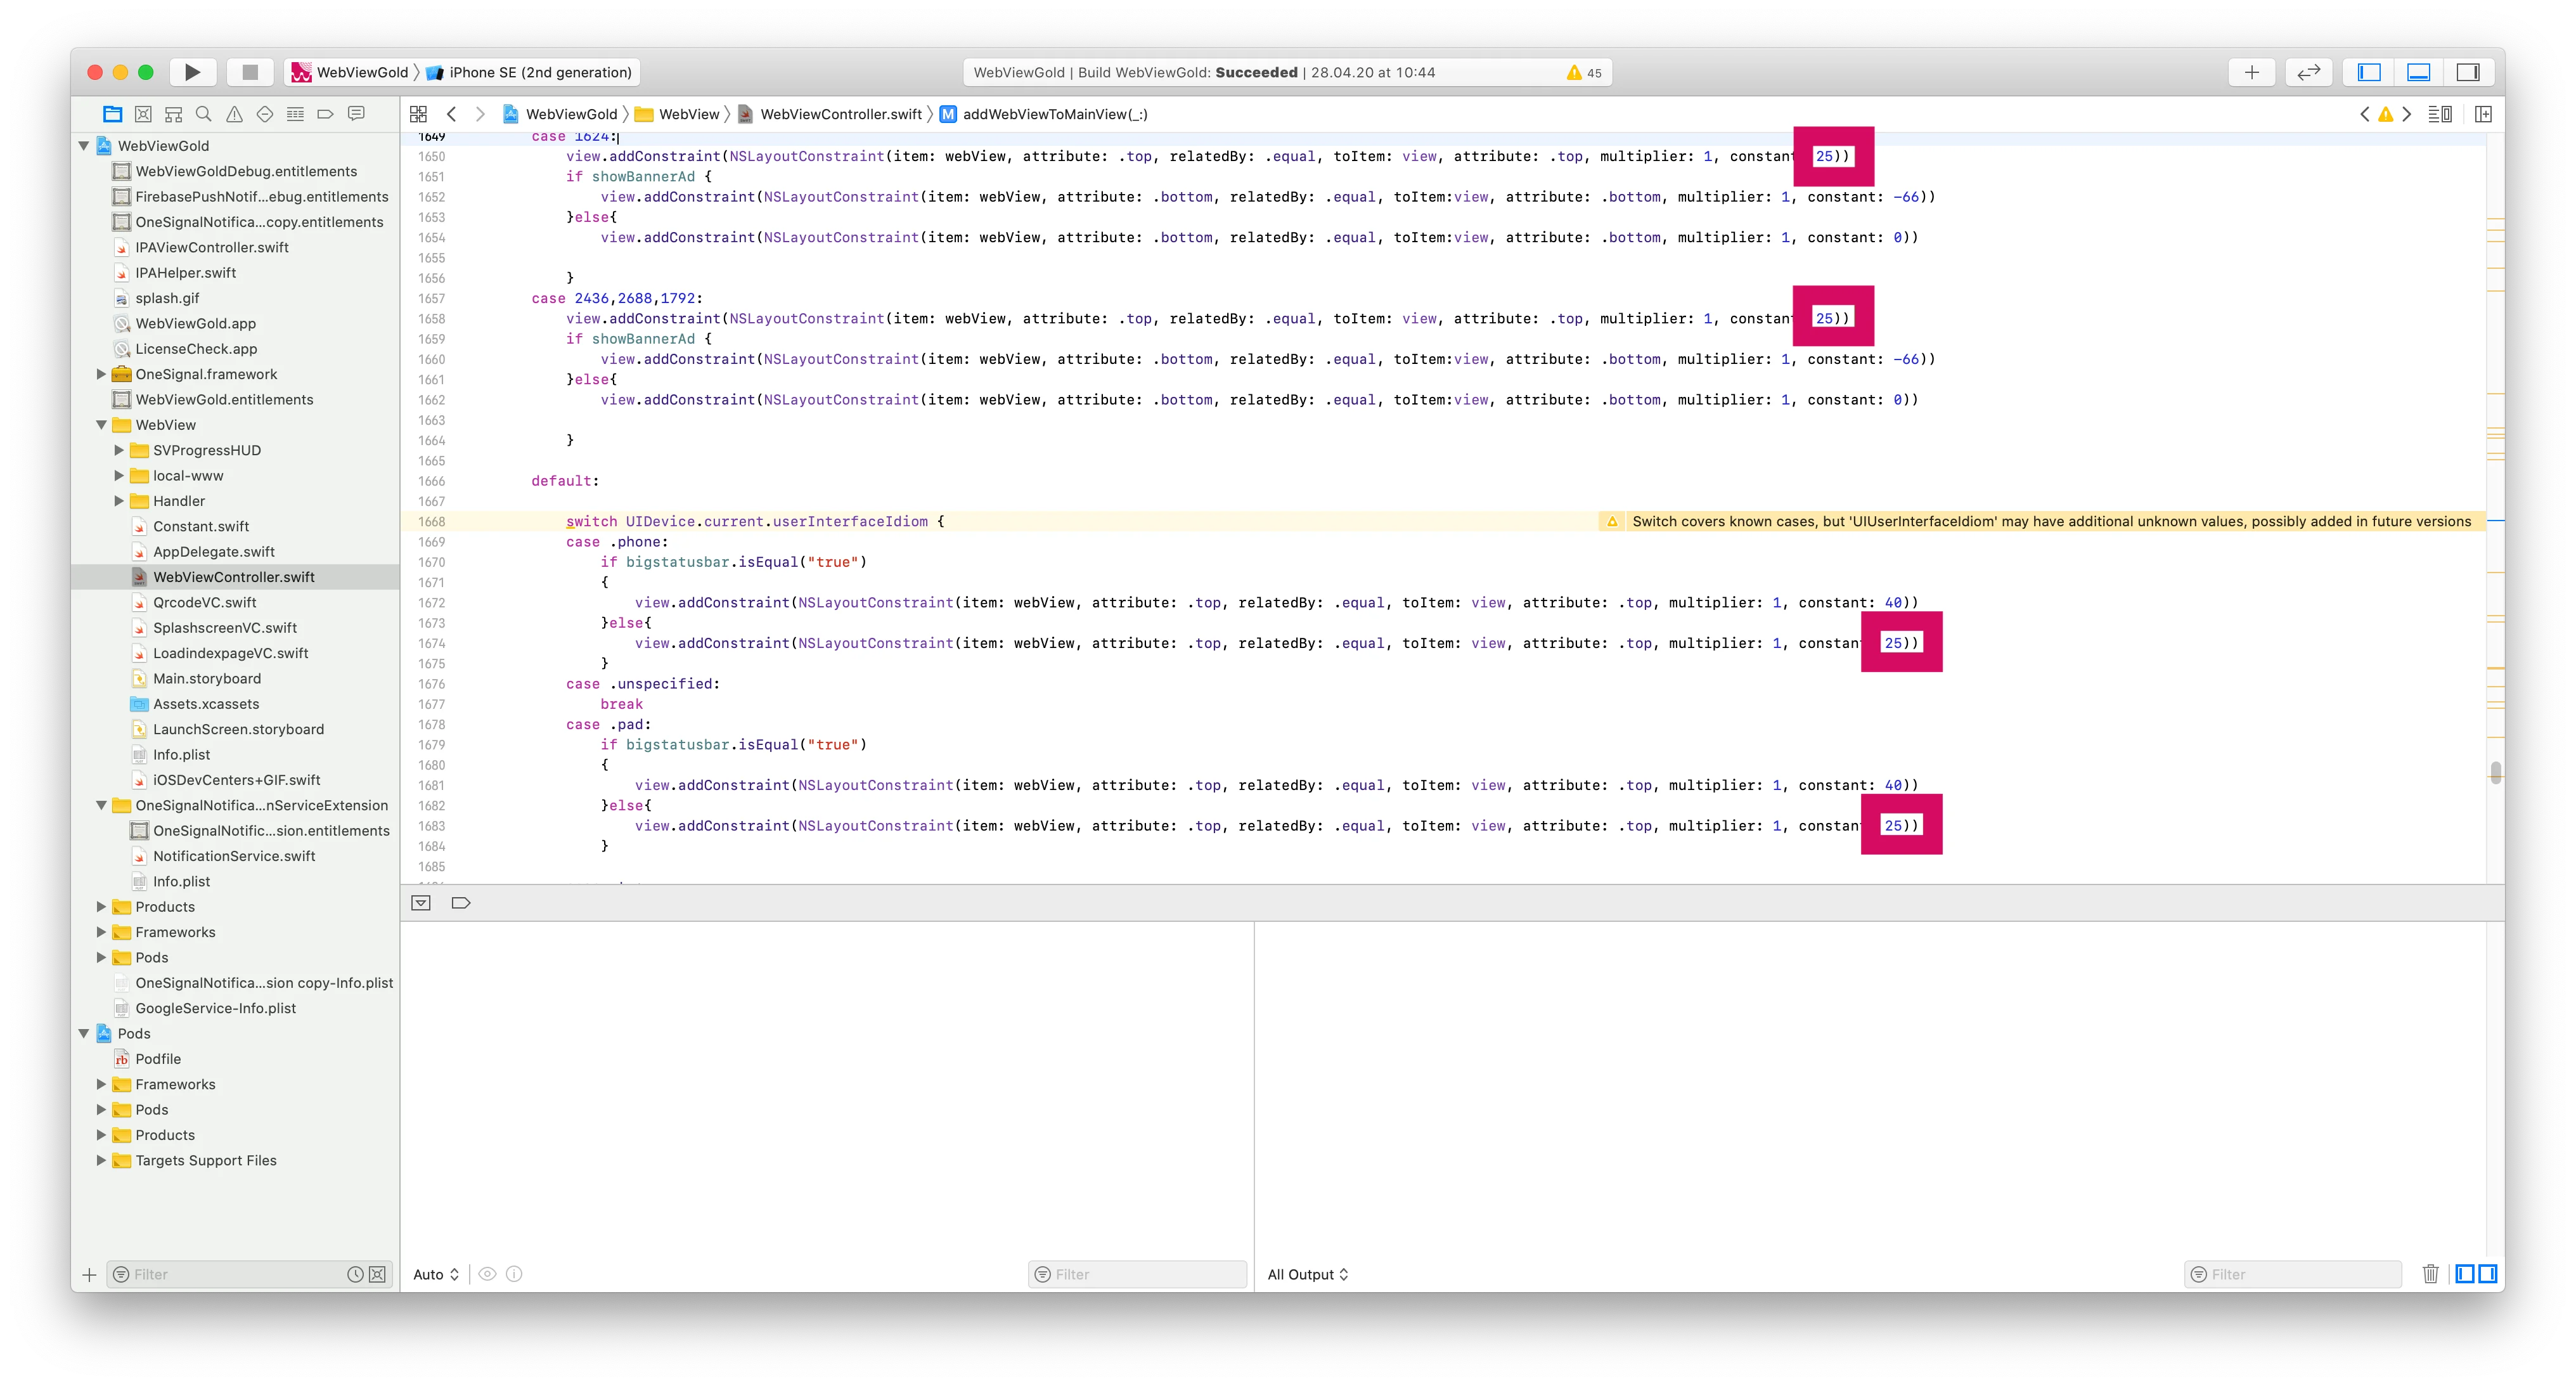
HTML5 Geolocation API
The HTML5 Geolocation API enables users to share their location with your app, enhancing features like location-based content. In WebViewGold, the Geolocation API is supported by default once integrated into your web content. Here is how to implement Geolocation tracking into your WebView-based iOS app:
Setting up HTML5 Geolocation:
For basic Geolocation setup, refer to Mozilla's Geolocation Guide for details on how to implement this feature into your website or web app.
For a demonstration, visit this W3Schools Geolocation Demo.
Since iOS 10, Geolocation is available for https-sites only, so please make sure to use a web app URL starting with https:// instead of http:// when using location requests.
Push Notifications API via Pushwoosh, OneSignal, Firebase, and JavaScript
Push notifications are notifications that appear on your smartphone without opening the app. These types of messages allow fantastic interaction with customers and users of the app. Your app does not have to be open to receiving these kinds of notifications. This way, your customers do not miss any important news or messages. Push Notifications are suitable for many cases, e.g., for updates to orders, live tickers, or social media community. There must be an internet connection to allow app users to receive push messages. WebViewGold supports multiple ways of reaching your users via push notifications. If you do NOT want to use push notifications at all, open Config.swift and set askforpushpermissionatfirstrun to false in order to prevent asking the app user for notification permission.
Option 1: Use Local Push Notification JavaScript API
You can insert a piece of code (JavaScript) in your website, to define a push notification, which can be shown after your app was closed (while scheduling it during the app is open). This works without OneSignal configuration at all.
  <script>
  var title = "Your cart is waiting!"; //notification title
  var message = "You have left a cart full of dreams and deals behind. Dont leave it feeling abandoned"; //notification message
  var seconds = 120; //seconds from now on
  var url = "https://myshop.org/cart.php"; //deep-linking URL

  window.location.href = "sendlocalpushmsg://push.send?s="+ seconds +"=msg!"+ message +"&!#"+ title +"&!#"+ url +"";
  </script>
It could be used for different situations (countdowns, happy hours, specific reminders, ...).
To cancel all scheduled local push notifications run:
  <script>
  window.location.href = "sendlocalpushmsg://push.send.cancel";
  </script>
Option 2: Use Pushwoosh Remote Push Notifications
WebViewGold users are eligible for two free months of Pushwoosh!
To claim this offer, please email your WebViewGold License to [email protected] and you will get a personal reply soon.
If you want to use Pushwoosh (good choice!) for push notifications in your app, just activate the options in Config.swift by setting kPushwooshEnable to true and ensure to also update the Pushwoosh_APPID in the Info.plist file with your own Pushwoosh Application ID.


Make sure to also complete Pushwoosh setup on their website including certificate import.
Congratulations, your setup is already completed. You're now ready to send push notifications:

Want to get each individual user's device ID for personalized push notifications or further processing? Simply set kPushwooshEnhanceUrl to true in Config.swift to append ?pushwoosh_id=XYZ to your WebView URL:
For example, if your WebView URL is https://www.example.org, WebViewGold will call https://www.example.org?pushwoosh_id=XYZ instead. Remember, only the initial URL request will receive this GET variable, so please save it in a session or a cookie for later use within your linked pages. Alternatively or additionally, you can retrieve & process this information on any page using JavaScript:
<script>
window.location.href = "getpushwooshid://";
alert(pushwooshplayerid);
</script>
Option 3: Use OneSignal Remote Push Notifications
If you want to use OneSignal in your app, activate these options in Config.swift (by switching the values from false to true) and make sure to also replace the placeholder oneSignalID with your own.

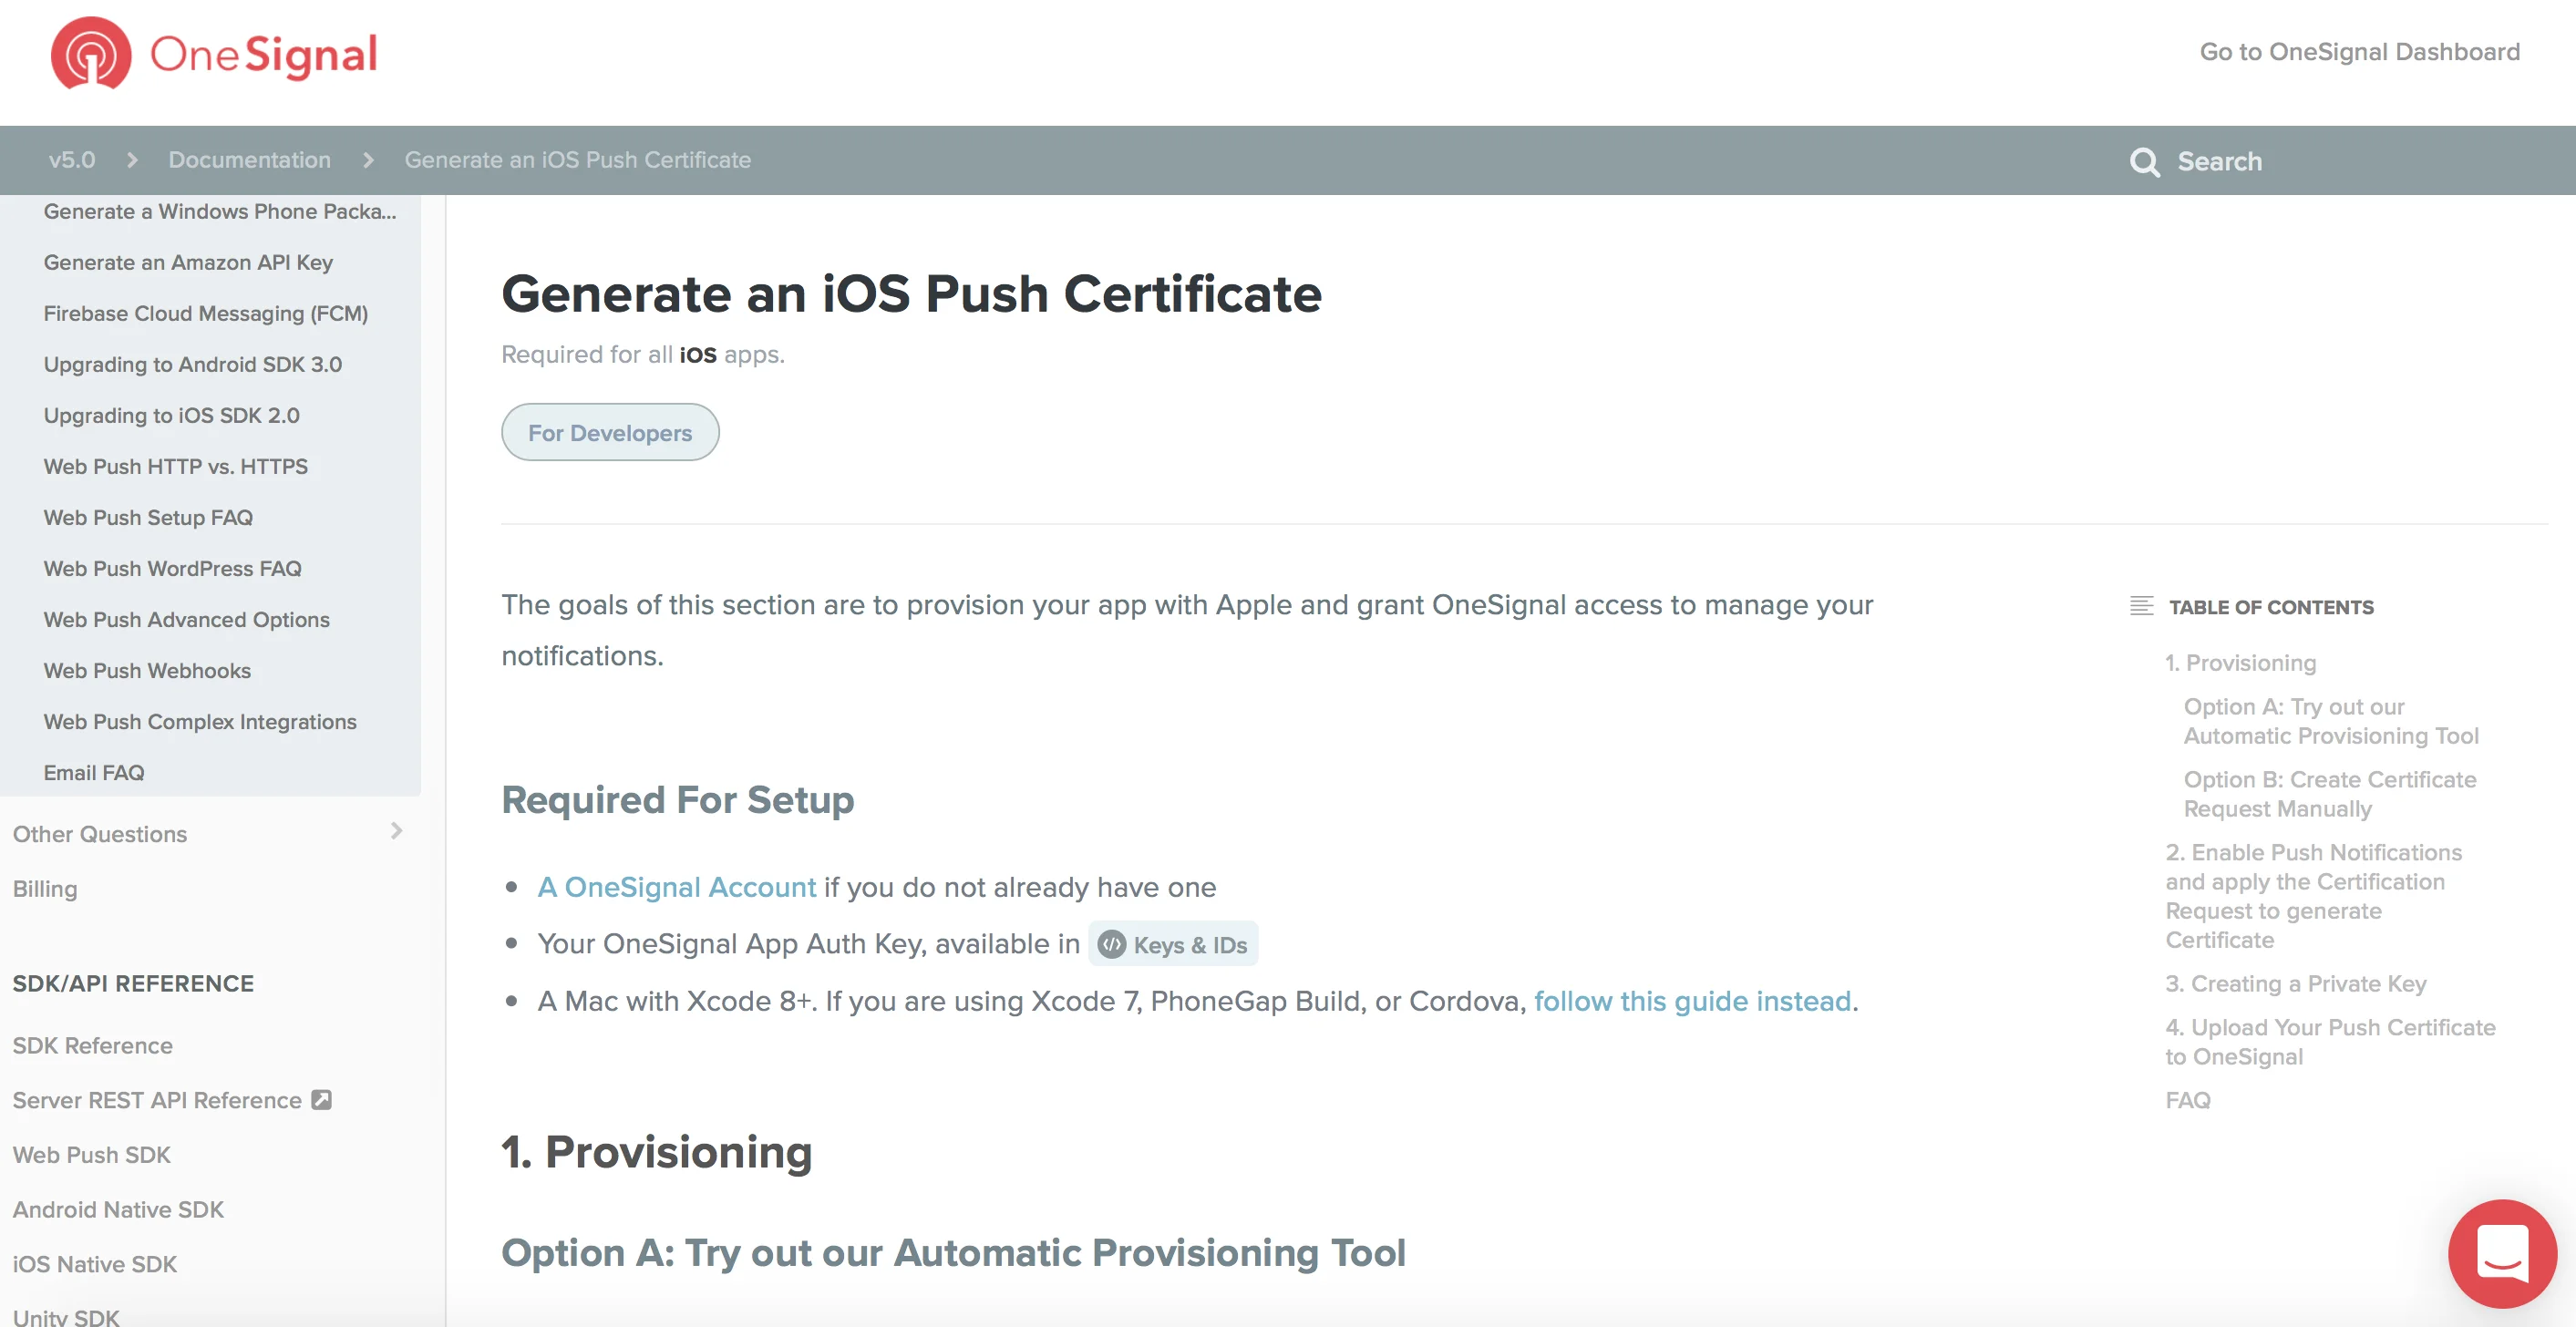
Now Generate an iOS Push Certificate and import it:
Yay, you are done. You can send push notifications now:
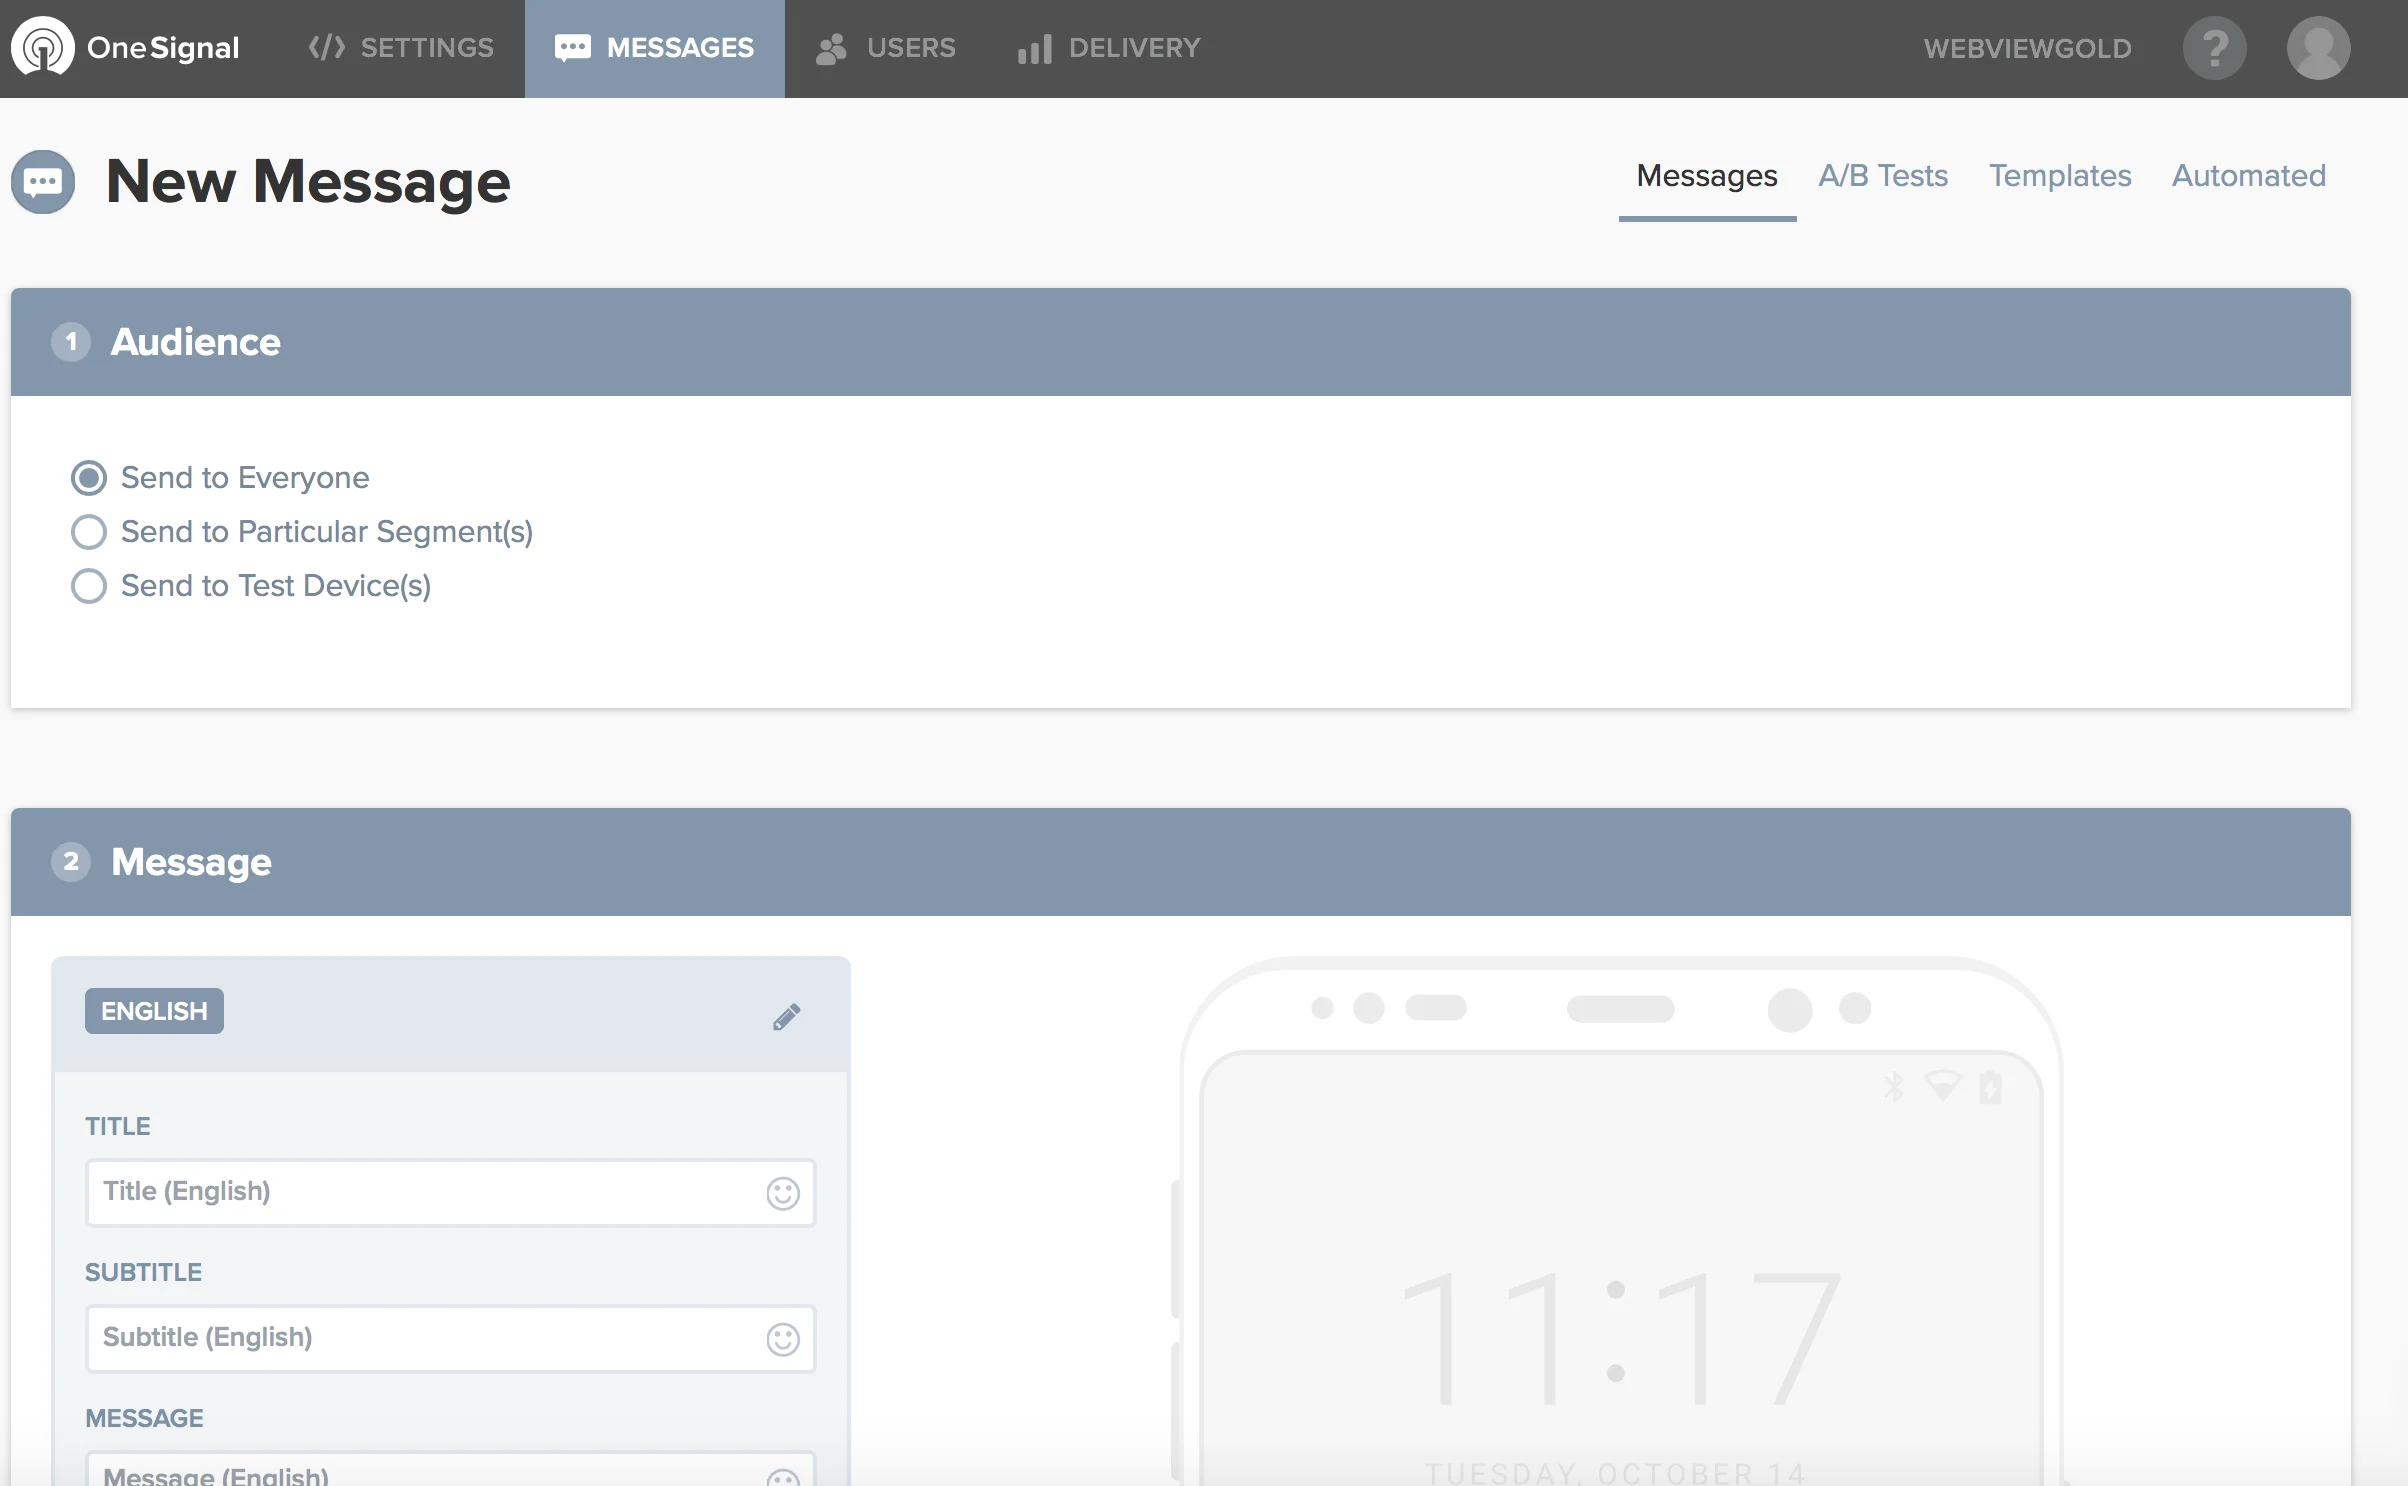
If you want to use OneSignal URL Deeplinking (opens a specific URL when clicking on your notification), please add the desired URL with a custom field called url: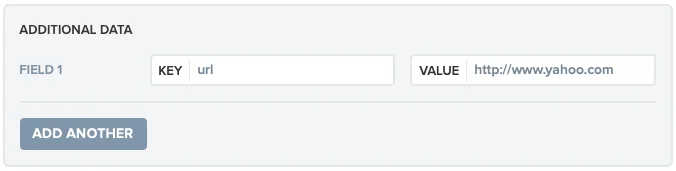
On the OneSignal.com Backend, you can fill in this key-value-pair window after clicking on "Advanced settings". Using the OneSignal API, you can add the "url" field to the API request (https://documentation.onesignal.com/docs/onesignal-api).
Do you want to get each individual subscription ID on your server for further processing and individual user push messages? Just activate the kPushEnhanceUrl option in Config.swift (by switching the value from false to true) in order to append ?onesignal_push_id=XYZ to your WebView URL. If your WebView URL is https://www.example.org, WebViewGold will call https://www.example.org?onesignal_push_id=XYZ instead. Only the first URL request will get that GET variable, so please save it in a session or in a cookie to access it on your linked pages. An alternative or additional way would be to retrieve & process the information on any page via JavaScript:
<script>
window.location.href = "getonesignalplayerid://";
alert(onesignalplayerid);
</script>
Alternatively, consider turning
autoInjectVariable to true in Config.swift to automatically inject this (and other) values into JavaScript without needing to call a URL upfront.
Option 4: Use Firebase Remote Push Notifications
Step 1: Create a Firebase Project
Begin by creating a Firebase project in your Firebase Console. This is a prerequisite for integrating Firebase with your WebViewGold app.
Step 2: Register Your App with Firebase
Once your Firebase project is ready, you can add your WebViewGold app to it by following these steps:
a. Navigate to the project overview page in your Firebase console, then select the iOS icon to start the app registration process.
b. To add a new app to your project, click Add app and select the platform options. When prompted, enter your app's bundle ID into the iOS bundle ID field. This ID is crucial and can be found by:
- Opening your app project in Xcode.
- Selecting the project name at the top of the navigator to access the General tab.
- Your app's bundle ID is listed under the Bundle Identifier field (e.g., com.onlineappcreator.webviewgold).
Ensure you input the exact bundle ID used by your app. This value is permanent once your app is registered with Firebase.
c. Complete the setup by providing the required app information, including:
- App Nickname: A convenience identifier for your reference in the Firebase console.
- App Store ID: Necessary for Firebase Dynamic Links and Google Analytics integration. You can add this later if your app doesn't have one yet.
Step 3: Register Your App
Click Register app to complete the registration process.
Step 4: Download GoogleService-Info.plist
Download this configuration file and replace the placeholder in your WebViewGold project with the downloaded GoogleService-Info.plist file.
Step 5: Activate Firebase in WebViewGold
In the Config.swift file, set the kFirebasePushEnabled variable to true to enable Firebase functionalities.
Step 6: Set Up APN and Sign Your App
Generate an APN key for Firebase, upload it, and then sign your app using the Firebase provisioning profile. For a detailed guide, visit Firebase documentation on iOS certificates.
Step 7: Implement URL Deeplinking (Optional)
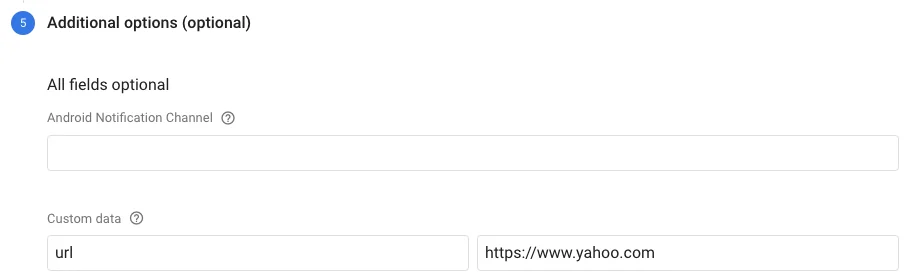
For Firebase URL Deeplinking support, add the target URL in a Custom Data field under Additional options (optional), with Key = "url" and Value = {desired URL}.
To subscribe to a Firebase topic, set firebaseTopic in Config.swift to the name of the topic you would like.
Do you want to get each individual subscription ID on your server for further processing and individual user push messages? Just activate the kFirebaseEnhanceUrl option in Config.swift (by switching the value from false to true) in order to append ?firebase_push_id=XYZ to your WebView URL. If your WebView URL is https://www.example.org, WebViewGold will call https://www.example.org?firebase_push_id=XYZ instead. Only your FIRST URL request will get that GET variable, so save it in a session or in a cookie to access it on your linked pages. An alternative or additional way would be to retrieve & process the information on any page via JavaScript:
<script>
window.location.href = "getfirebaseplayerid://";
alert(firebaseplayerid);
</script>
Alternatively, consider turning
autoInjectVariable to true in Config.swift to automatically inject this (and other) values into JavaScript without needing to call a URL upfront.
Option 5: Use bubble.io Push Notifications
1. Create a bubble.io app
2. Install the WebViewGold OneSignal Push plugin:
3. Follow the OneSignal instructions (see above) and the plugin instructions (see here and here).
Banner, Interstitial & Rewarded ads via AdMob API
AdMob is a Google service for monetizing mobile apps on iOS and Android platforms. It allows developers to integrate banner, interstitial, and rewarded ads, which are paid by clicks (CPC, Cost-per-Click) or impressions (CPM, Cost-per-Mille). WebViewGold simplifies AdMob integration, enabling quick setup for displaying ads in your WebView-based iOS application.
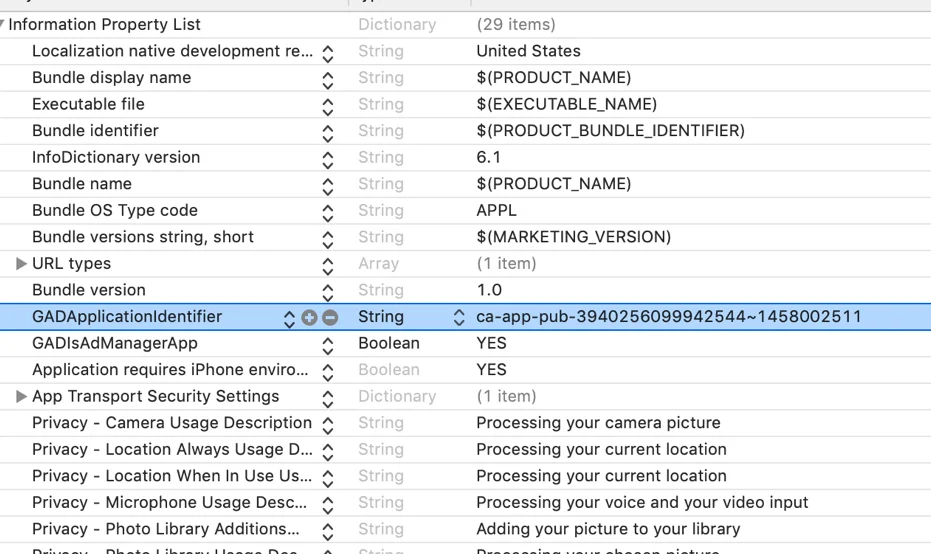
Step 1: Open Info.plist file and set your AdMob global account ID in the GADApplicationIdentifier field:
Step 2: Please insert your AdMob IDs in the Config.swift for AdmobBannerID and AdmobinterstitialID:
Step 3: Within Config.swift you can:
- Enable or disable banner and/or interstitial ads by setting
showBannerAdtotruefor banner ads andshowFullScreenAdtotruefor interstitial ads. - Define intervals for displaying interstitial ads by changing
showadAfterXto the desired number of website interactions before playing an interstitial ad.
To enable rewarded ads (only available for iOS versions greater than 13.0): Set
enableRewardedAds to true.
To play a rewarded ad, use a call to our rewarded ad API functionality.
<a href="displayrewardedad://>Display Rewarded Advertisement</a>Upon completion of full viewing of an advertisement, your website will be sent a call to a JavaScript function, updateRewardedStatus('true');. This function is up to you to implement in your JavaScript code, as it is up to you to decide how you want to reward the user.
WebViewGold supports displaying rewarded ads as the default advertisement option, overwriting the interstitial options. For this to occur, set
useRewardedAdsWherePossible and showFullScreenAd to true.
For more information, please consider the official AdMob SDK documentation as well (but skip the setup parts as WebViewGold already includes the framework).
Interstitial Ads via Facebook Audience Network
The Facebook Audience Network allows mobile app developers to monetize iOS and Android applications by displaying ads. Through WebViewGold, you can easily incorporate Facebook ads into your WebView-based iOS applications to earn revenue through clicks (CPC) and impressions (CPM).
Step 1: Create a Facebook Audience Network Account
You must create a Facebook Audience Network account and create a property under integration in the Monetization Manager. Then you must connect an iOS app (however, you do not need to link to a published iOS app for testing purposes).
Follow this guide for reference: https://www.facebook.com/business/help/191133327919314
Step 2: Set the Necessary Configuration Variables
- Open Config.swift and set
useFacebookAdstotrue. - Enter your Facebook Placement ID at
facebookAdsID.

Step 3: Configure Ad Settings
- To use timed ads, set
useTimedAdstotrueand setshowFBAdsEveryNSecondsto the desired time between ads. - You can add URL trigger words to
fbadstriggerurlsto initialize ads on command.
Further considerations:
- A real iOS device must be used to test (not a simulator)
- The device must be added as a test device, see https://developers.facebook.com/docs/audience-network/setting-up/testing/platform
- Facebook must be installed and logged in on the device
- “Limit Ad Tracking” or any similar setting that may be released with upcoming iOS versions must be disabled.
Activate HTML background audio
For some scenarios, it may be useful to play audio content even after minimizing the app (for example, if you're making a radio stream or your music available in the app).
Our video below shows how to quickly and easily activate HTML background audio for your iOS application, allowing users to play audio even when they switch to a different foreground app or when they lock their iPhone or iPad.
Downloader for PDF, ePub, Wallet, Documents, and Music Files
WebViewGold’s Download API allows you to provide document, image, and audio file downloads within your WebView app. The following steps outline how to enable and customize the downloader functionality:
1. Downloading Images:
Save images to the camera roll of the user by calling links with savethisimage://?url= prefix:
<a href="savethisimage://?url=IMAGE URL HERE">Download Image</a>
2. Downloading Files:
Save files by calling links with a relevant suffix (e.g., .mp3):
<a href="https://www.example.org/file.pdf">Link PDF</a>
<a href="https://www.example.org/file.mp3">Link mp3 Music</a>
<a href="https://www.example.org/file.mp4">Link mp4 Music</a>
<a href="https://www.example.org/file.wav">Link wav Music</a>
<a href="https://www.example.org/file.epub">Link epub eBook</a>
<a href="https://www.example.org/file.pkpass">Link Passbook / Apple Wallet</a>
<a href="https://www.example.org/file.docx">Link Word</a>
<a href="https://www.example.org/file.pptx">Link PowerPoint</a>
<a href="https://www.example.org/file.xlsx">Link Excel</a>
3. Customizing Supported File Types:
You can add more filetypes that should trigger the file downloader functionality (e.g., .epub, .zip, ...) This can be done via the list variable extentionARY that can be found in the Config.swift file.
4. Enabling Automatic File Downloads:
Consider setting the autodownloader option in Config.swift to enable automatic downloads for files flagged with Content-Disposition HTTP headers, independent of the extentionARY list. This ensures files are downloaded automatically based on server configurations.
iCal Calendar API
WebViewGold is set up for easy Calendar (previously known as iCal) integration.
To add a calendar entry from your WebView-based iOS application, simply link to an .ics file:
<a href="https://www.webviewgold.com/demo/test.ics">Save to Calendar</a>
UUID API
The WebViewGold UUID API allows you to retrieve a non-personal, unique device ID (UUID - "Universally Unique Identifier"), which can uniquely identify an iOS device. This feature can be helpful for:
- Storing user-specific settings on the server
- Maintaining session states
- Recalling saved data on the client side
Privacy Note: Ensure compliance with local and international privacy laws when using this feature, as it involves device identification.
How to Retrieve UUID:
To retrieve the UUID from your WebView-based app, use the following code:
<a href="get-uuid://">Get UUID</a>
<a href="#" onClick="alert(uuid);">Show UUID</a>
- Get UUID: Requests the UUID from WebViewGold.
- Show UUID: Displays the UUID via an alert for easy testing.
Alternative Method: Append the UUID to the WebView URL
If you prefer to include the UUID in the URL parameters, enable the enhanceUrlUUID option in Config.swift by setting it to true. This will automatically append uuid=XYZ to your WebView URL on the first request, allowing you to access the UUID directly in your web content:
- Example: If your WebView URL is
https://www.example.org, it will be requested ashttps://www.example.org?uuid=XYZ. - Note: Only the initial URL request will include this GET parameter, so consider saving it in a session or cookie if you need to reference it later in the app.
Automatically Inject UUID into JavaScript:
To automatically make UUID (and other variables) available in JavaScript across all pages without modifying URLs, set autoInjectVariable to true in Config.swift. This allows you to access the UUID and other values directly within any page.
Flashlight API
The Flashlight API of WebViewGold allows your website to control the device's flashlight (torch). This feature can be useful for:
- Building utility apps that require the flashlight toggle
- Upgrading user experience during app usage with gamification
- Providing additional accessibility features
How to Use:
You can trigger the flashlight on or off directly from your HTML content using the following links:
<a href="enableflashlight://">Turn On Flashlight</a>
<a href="disableflashlight://">Turn Off Flashlight</a>
Note: Make sure your app has the required camera permissions in Info.plist, as the flashlight functionality is tied to the device's camera hardware.
Reset App API
In certain cases, resetting the app to its initial settings (by clearing cookies and cache) can be necessary to restore optimal performance. The Reset App API provides a straightforward way to initiate this reset.
Usage:
To reset the app data, simply use the following link within your app:
<a href="reset://">Reset App Link</a>
This link will:
- Clear all cookies
- Clear cached data
Testing the Reset Functionality:
To test this feature, add the following demo URL to your WebViewGold app: https://www.onlineappcreator.com/reset_test.html
Note: Use the reset functionality sensibly, as it will clear user data related to cookies and cache, which could impact saved settings or session data, including logging users out of active sessions.
Get User App Tracking Decision
In iOS, apps have to ask to track user data based on the Apple AppTrackingTransparency framework. WebViewGold allows you to see what choice the user made when they installed your app to act accordingly in your web app. The JavaScript variable trackingDisabled can be either set by WebViewGold to true to represent that tracking has been blocked or false if it hasn't been. On your web app, you can easily check the JavaScript status by first getting the JavaScript variable and then alerting it:
<a href="user-disable-tracking://">Set JavaScript variable</a>
<a href="#" onClick="alert(trackingDisabled);">Show tracking decision</a>
Show/hide the loading sign manually
WebViewGold’s native iOS loading indicator automatically appears when pages start or finish loading. However, you can also manually control the loading indicator for scenarios outside standard page loading events. This is particularly useful for processes where user awareness of loading is necessary, such as:
- Waiting in a live chat queue
- Running a background process on a cloud server
- Visualizing any other extended process for user awareness
Usage:
To manually control the loading indicator for your WebView app, use the following links:
<a href="spinneron://">Show the loading spinner</a>
<a href="spinneroff://">Hide the loading spinner</a>
URL Handling API
To improve user experience, it's often beneficial to customize how your app handles different types of web links. For example, social media buttons can be configured to open in the system browser or respective app, rather than within your app. WebViewGold provides flexible settings to customize URL handling for your WebView-based Android app.
Types of Links:
- External Links: Links that lead to a different domain from your app's primary domain.
- Example: If your app's domain is mydomain.com, an external link would be google.com.
- Internal Links: Links that stay within the same domain as your app.
- Example: If your app's domain is mydomain.com, an internal link would be mydomain.com/purchase.
- Special Links: Links that include special attributes, such as target="_blank".
To configure the URL Handling API, open Config.swift:
- To open all external links in Safari:
- Set
openallexternalurlsinsafaribydefaulttotrue.
- Set
- To set domains which always open in Safari (regardless of
openallexternalurlsinsafaribydefaultsetting):- Add the desired domains to the
safariwhitelistlist. - Insert another host like so: ["alwaysopeninsafari.com", "google.com", "m.facebook.com"].
- Please enter the host exactly how you link to it (with or without www, but always without http/https).
- Add the desired domains to the
- To set domains which never open in Safari (regardless of
openallexternalurlsinsafaribydefaultsetting):- Add the desired domains to the
safariblacklistlist. - Insert another host like so: ["alwaysopeninsafari.com", "google.com", "m.facebook.com"].
- Please enter the host exactly how you link to it (with or without www, but always without http/https).
- Add the desired domains to the
Open links in a tab/additional In-App-Browser
Some links, like a Terms and Conditions page, may not be significant enough to open in an external system browser yet too specific for your app's primary WebView. WebViewGold provides a creative solution for handling these links: an in-app browser tab that opens over the main WebView, providing a hybrid app and browser experience. Here's what it will look like:
Key Features of the In-App Browser Tab:
- The in-app browser tab includes an address bar and navigation buttons, offering a more browser-like experience than the primary WebView.
- Ideal for content that requires easy navigation, such as tutorials, knowledge bases, or pages with specific information.
How to Use the In-App Browser Tab in Your WebView-Based iOS App:
To open a link in the in-app browser tab, set openspecialurlsinnewtab to true format the URL in your HTML as follows:
<a href="https://www.example.com" target="_blank">Open link in an in-app tab</a>
Simply, a special link is classified as a link that has the "_blank" target attached. In a normal browser, this would make the link open in a new tab. In WebViewGold app, you can make it open in the in-app tab instead.
Please note that if the link you are using is external (has a different domain to your website like "www.google.com", for example) please also make sure that openallexternalurlsinsafaribydefault is set to false as it will override the special-external link to open in the Safari app instead.
To see how your app will handle different types of links, use the following URL as the WebView URL during testing:
Test Link: https://www.webviewgold.com/demo/testlinks.php
Note: You can also open the same domain in your desktop browser to view the source code and copy the format for your links.
Custom CSS and JavaScript API
WebViewGold allows you to customize your app’s appearance and functionality using Custom CSS and Custom JavaScript without modifying the app’s native code. Here’s how to use these features to tailor your app to your brand and user experience preferences.
How to Style your WebView-based iOS app with Custom CSS:
The Custom CSS feature enables you to adjust the look and feel of your app effortlessly:
- Add your custom CSS code to the custom.css file.
- Save the file to apply these styles across all web pages loaded by your WebViewGold app.
Examples of Customization with CSS:
- Update colors to match your branding.
- Incorporate animations.
- Style text, buttons, and other elements.
How to Enhance your App's Behavior with Custom JavaScript:
With Custom JavaScript, you can personalize your app’s functionality for users without altering the original web app’s remote code:
- Add your custom JavaScript code to the custom.js file.
- Save the file to apply these scripts across all pages loaded by your app.
Examples of Customization with JavaScript
- Create alerts or notifications.
- Add interactive elements or event-driven actions.
- Tailor user interactions and page behavior.
Universal Links API
The Universal Links API simplifies linking to content within your app, providing a more seamless and native user experience. WebViewGold enables you to configure your domain so that links from apps like Mail, Safari, and others automatically open within your WebViewGold-based app—without requiring additional prompts.
Note: the app must be installed on the user's device first for this feature to work.
Alternatively, it is possible to use our Deep Linking API. While it operates in a similar manner, it uses a different syntax. However, it's worth noting that the syntax of the Universal Links API is more common than the syntax of the Deep Linking API. For most apps, it's wise to choose either one, but not both.
To set up Universal Links in your iOS app, please follow the steps below:
- Apple Developer Center Setup:
- Log in to your account on the Apple Developer Center.
- Click on 'Certificates, Identifiers & Profiles'.
- Under 'Identifiers', select 'App IDs' and then choose your app's ID from the list.
- Under the 'App Services' section, check the 'Associated Domains' option and save your changes.
- Xcode Setup:
- Open your app project in Xcode.
- Select the target (in most cases "WebViewGold"). In the 'Signing & Capabilities' tab, navigate to the 'Associated Domains' section. Click on '+' to add a domain. Your domain should be prefixed with 'applinks:', like this:
applinks:example.org&applinks:www.example.org: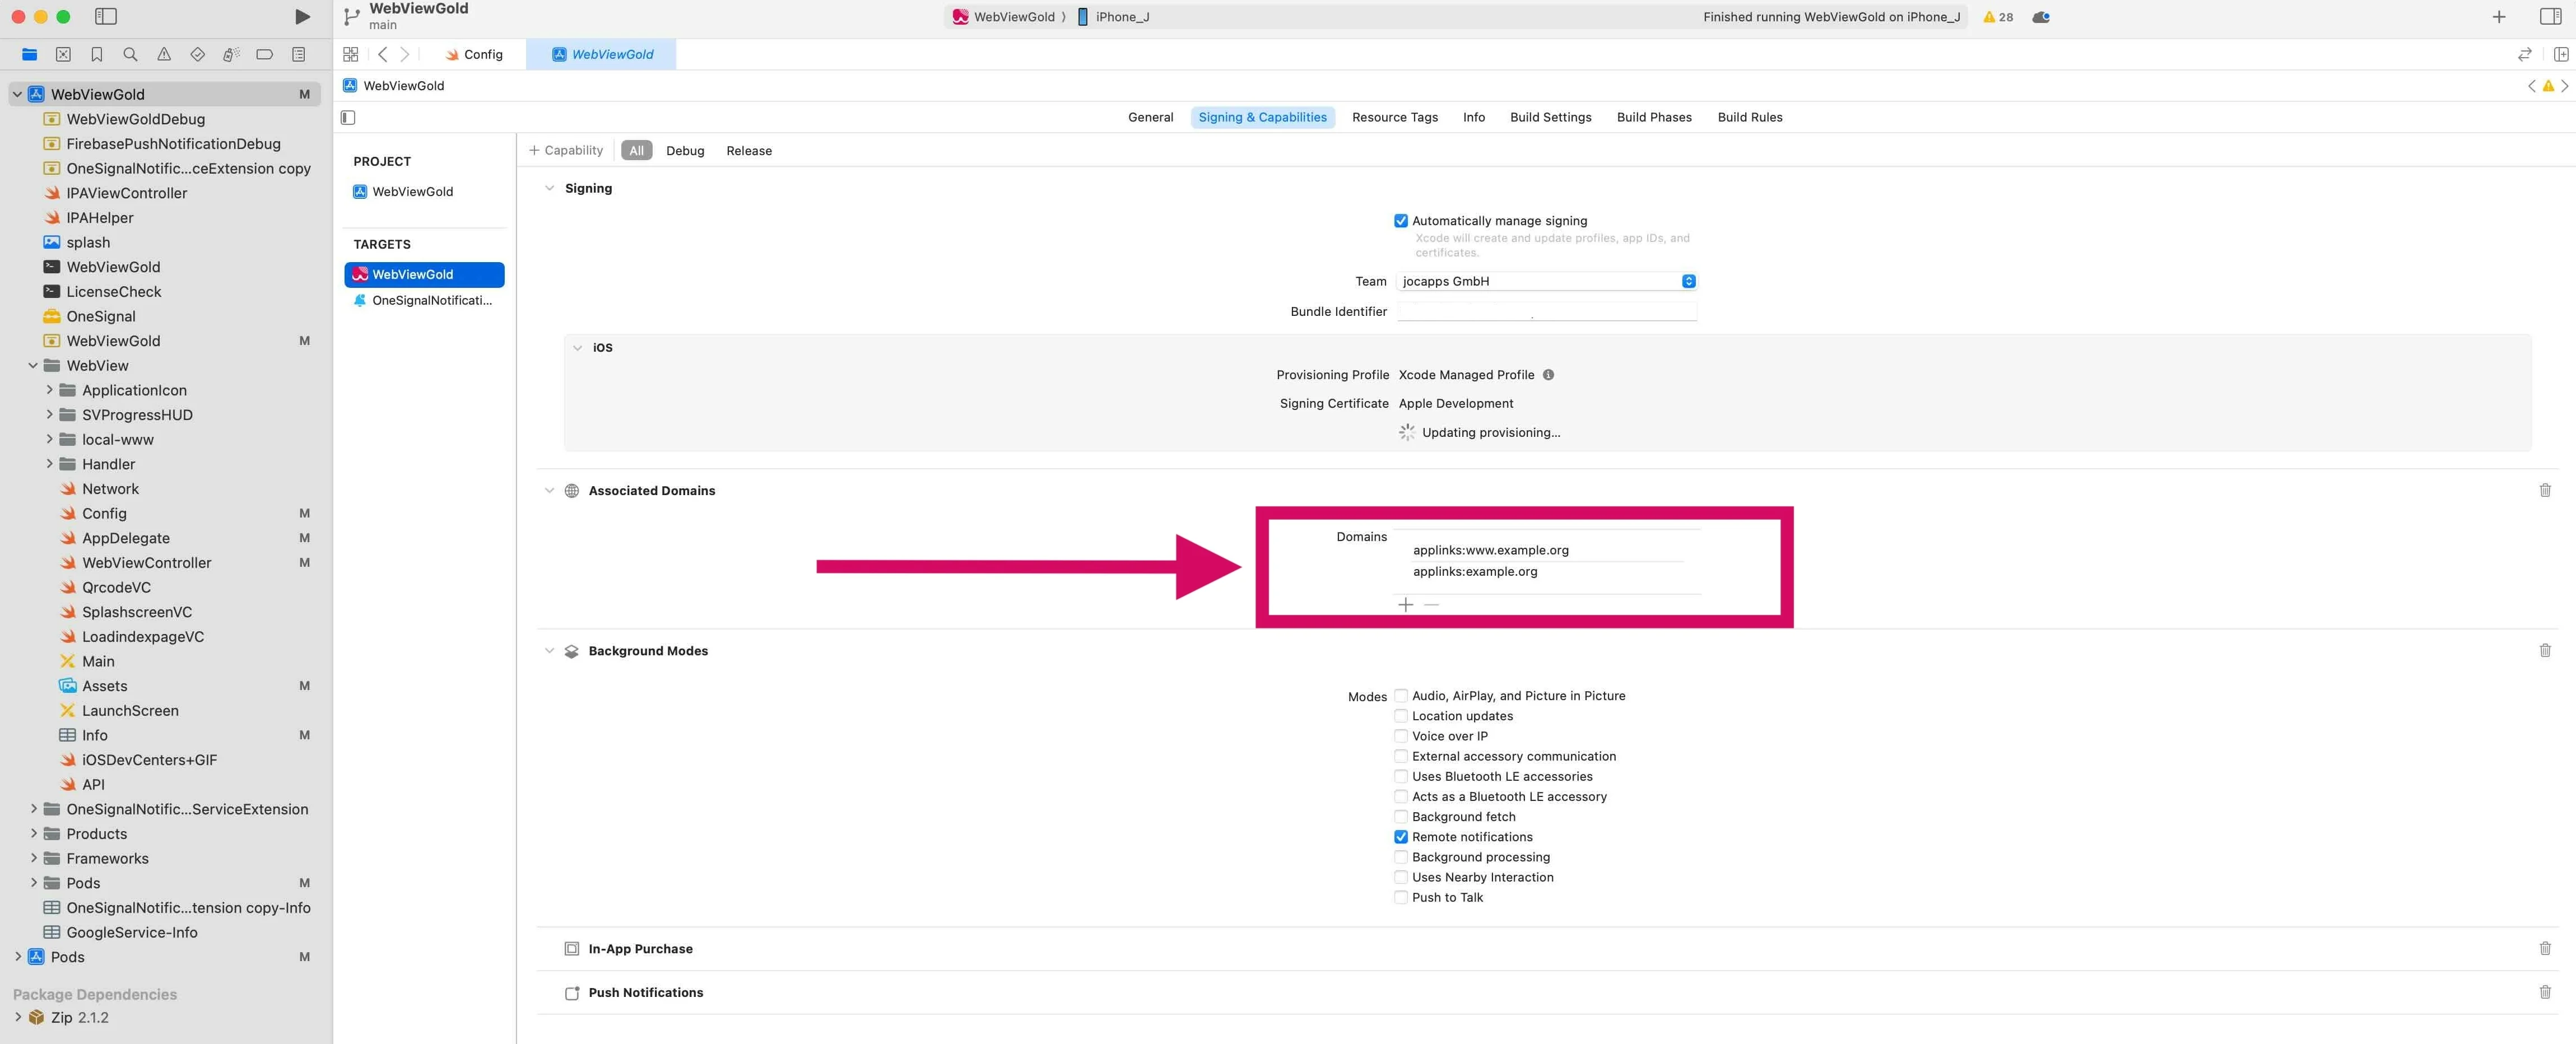
- In Config.swift, turn ShowExternalLink to true.
- Be mindful of subdomains. There's a distinction between "www.*" and non-"www" domains (consider adding both). Ensure that you have the correct provisioning profile with the 'Associated Domains' capability. If not, Xcode should prompt you to fix it.
- Server Setup:
- On your website server, you need to host an Apple App Site Association (AASA) file at the root level of your server or using the
/.well-known/prefix. E.g.,https://example.org/.well-known/apple-app-site-association - The AASA file should contain details about the app and the associated domains. Refer to the official documentation for the exact structure. Ensure that the apple-app-site-association file is hosted on a server that supports HTTPS, not just HTTP.
Done! :-) Testing in the Simulator isn't as effective as on a real device. For best results, use an actual iPhone or iPad.
Deep Linking API (configure a link scheme like webviewgold://)
The Deep Linking API makes it easy to direct users to specific content inside your app. WebViewGold allows you to configure a Custom URL Scheme (e.g., webviewgold://) that can be triggered from apps like Mail, Safari, and others to open links directly in your WebView app.
Note: the app needs to be installed first for this feature to work.
Alternatively, it is possible to use our Universal Links API. While it operates in a similar manner, it uses a different syntax which is more common than the syntax of the Deep Linking API. For most apps, it's wise to choose either one, but not both.
To set up Deep Linking in your iOS app, please follow the steps below:
- Open Config.swift:
- Set
ShowExternalLinktotrue.
- Set
- Open Info.plist:
- Change the URL Scheme to your own app name (e.g.,
your-app-name://instead ofwebviewgold://).
- Change the URL Scheme to your own app name (e.g.,


Done! :) The example below would open google.com in the WebView app:
WebViewGold://url?link=https://www.google.com
App Sharing Dialog API
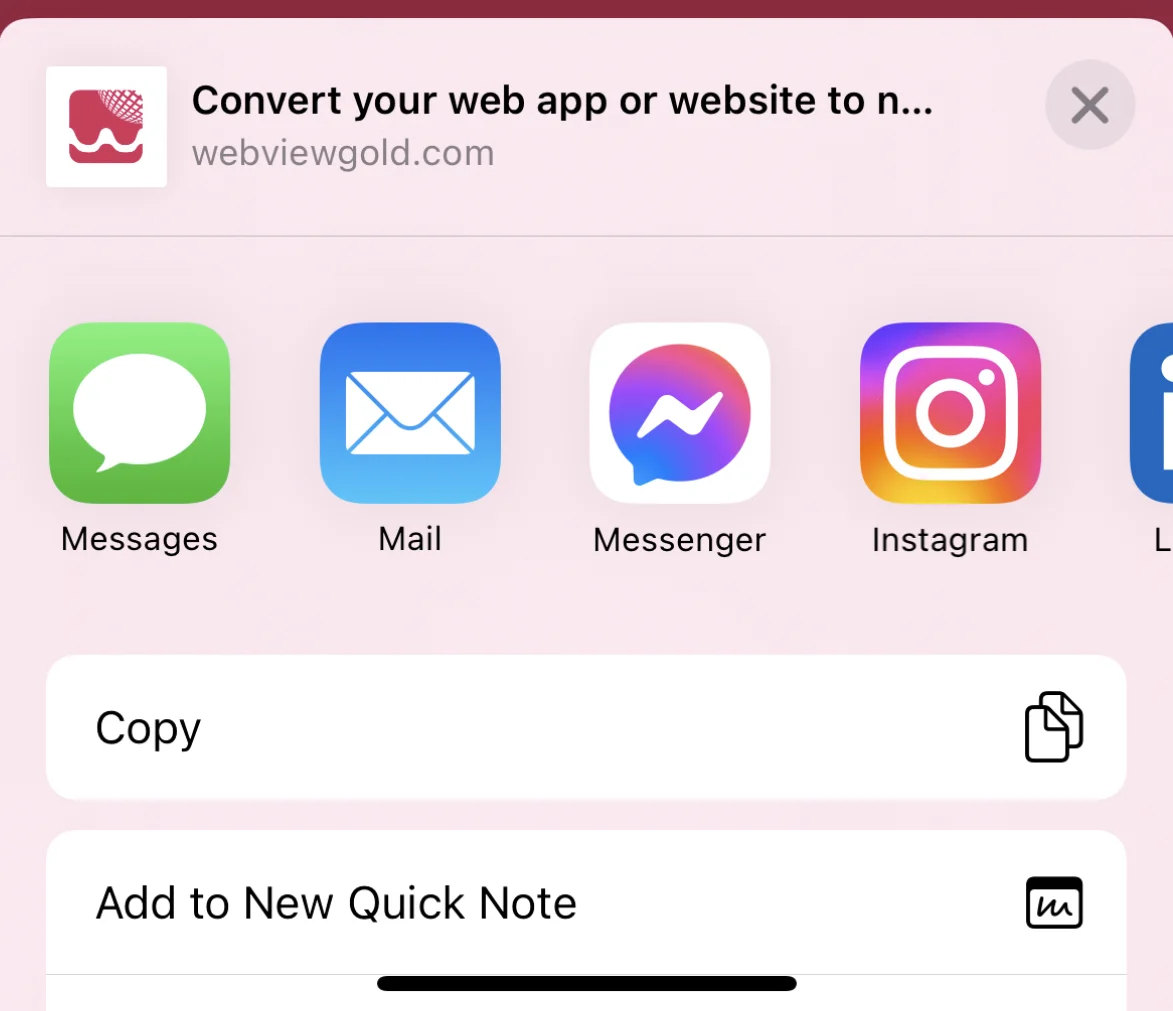
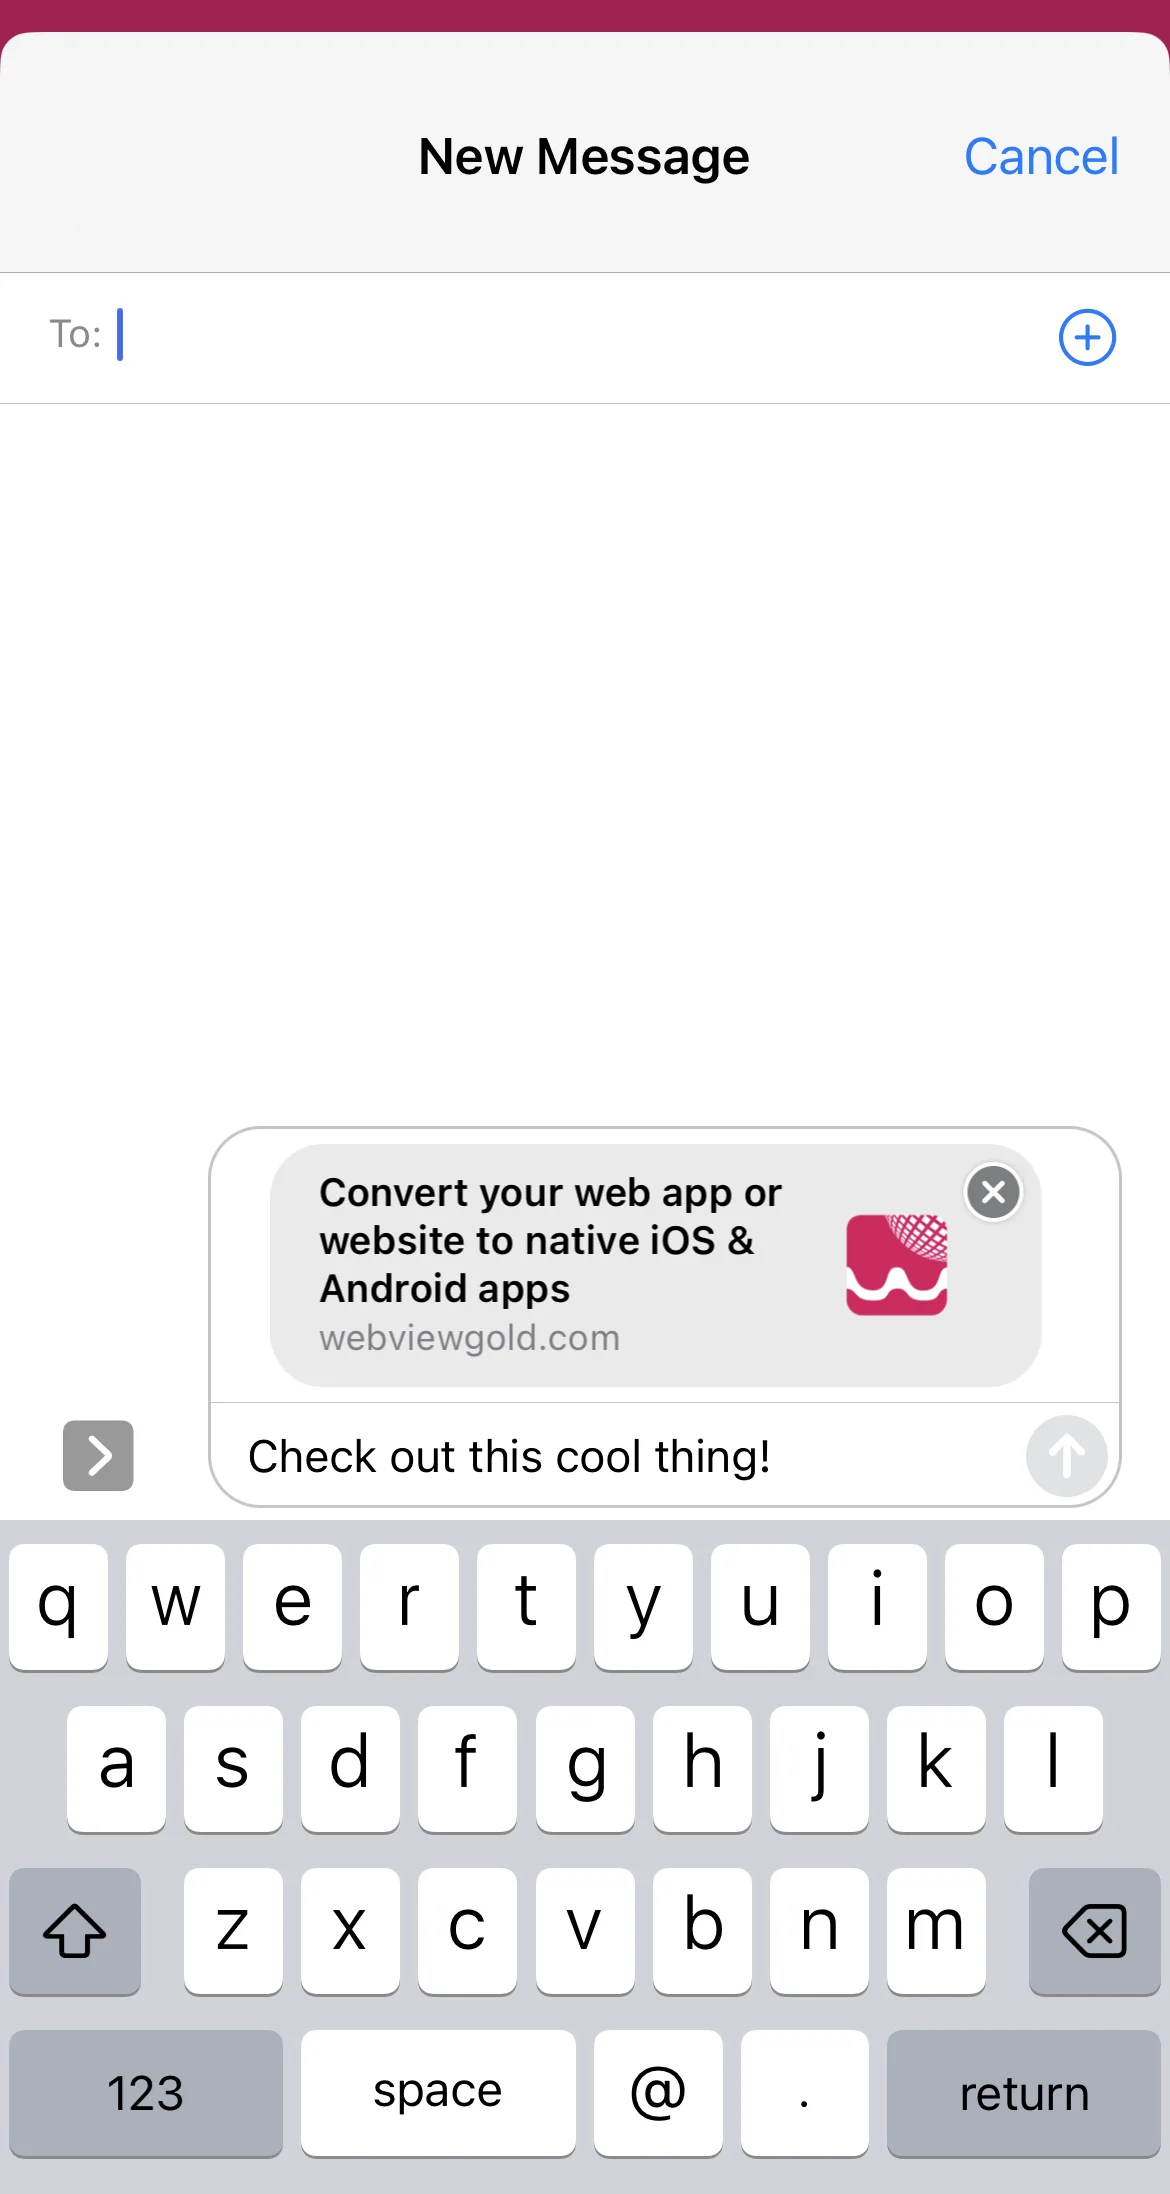
The App Sharing Dialog API in WebViewGold enables your users to share content from your app, such as the download link or custom messages, with friends and family via their preferred apps (e.g., WhatsApp, SMS, Email). This can be an effective way to increase your app’s visibility and grow your user base.
How to Use the App Sharing Dialog in Your WebView-Based iOS App
You can trigger a native sharing dialog by using the shareapp:// URL scheme with customizable message and URL parameters.
Below are examples of the different ways to implement this feature:
<a href="shareapp://message?=Check out this cool thing!&url=https://www.webviewgold.com">Share (message, link)</a>

<a href="shareapp://message?=&url=https://www.webviewgold.com">Share (no message, link)</a>

<a href="shareapp://message?=Check out this cool thing!">Share (message, no link)</a>
In-App Purchase & In-App Subscription API
Within some apps, you can buy additional content or services. These kinds of purchases are called "in-app purchases". They can be an attractive source of revenue for developers and are very convenient for customers as they use existing accounts and payment sources for settlement. WebViewGold allows triggering App Store In-App Purchases. Make sure to own an Extended License of WebViewGold if you plan to use this feature in an end product. Need to upgrade? Learn how to upgrade here.
Option 1 (Default): RevenueCat
Create your free RevenueCat account to get started. Pricing information is available on their website. Then set up RevenueCat by following their setup wizards and documentation (pricing details are available on their website). Afterwards, add your details to Config.swift. This approach also supports the 15% Service Fee Tier Program of the Google Play Store and Apple's Small Business Program. If you participate in these reduced-fee programs, inform RevenueCat via their Apple Small Business Program or Google 15% reduced service fee pages. This is how setup in Config.swift looks like:
static let revenueCatAPIKey = "xxxxxxxxxxxxxxxxxxxxxxxxxxxxxxxx" //Your RevenueCat API Key (sign up via tinyurl.com/register-revenuecat first, then follow tinyurl.com/api-key-revenuecat how to find it)
static let revenueCatProjectID = "xxxxxxxxx" //Your RevenueCat Project ID (sign up via tinyurl.com/register-revenuecat first, then follow tinyurl.com/project-id-revenuecat how to find it)
Ensure your Bundle ID in Xcode & App Store Connect matches the project configured in RevenueCat. Trigger a purchase or subscription using:
revenuecat://purchase?external_id=user_123&product=sub_30_days
external_id = User identifier, e.g., your customer email or user ID. product = ID displayed on the RevenueCat console.
Option 2: Manual (Non-RevenueCat)
In the first step, insert the App Store Connect details of your In-App Purchase "Shared Secret" in Config.swift file. To find your "Shared Secret" in App Store Connect, you need to first log into your App Store Connect account. Then, go to the "Users and Access" section, and select the "Shared Secret" tab. Your generated "Shared Secret" will be listed, and you can copy/paste it to the relevant "IAPSharedSecret" field in Config.swift of WebViewGold.
We care about the success of our customers and are here to support them in any way we can: That’s why we want to mention the App Store Small Business Program and the Google Play Store 15% Service Fee Tier Program here. Under these programs, eligible developers can qualify for a reduced 15% commission down from the standard 30% commission. It only takes minutes to fill out their forms, and they can potentially save you 50% of fees (reduction from 30% commission to 15%). Once approved, you will receive the reduced commission rate for all paid apps and in-app purchases made by customers on the respective stores. Find more information on the Apple program here and on the Google Play program here.
After setup, for in-app purchase products just link to this kind of URL:
<a href="inapppurchase://?package=IN-APP_PURCHASE_PRODUCT_IDENTIFIER&disableadmob=true&successful_url=https://www.google.com">Buy In-App Purchase</a>
- The "package" is the product identifier of the item you want to sell.
- The "successful_url" is the URL you want the app to load once the purchase is complete.
- You may want to save a cookie on this page so that your web app remembers that the purchase has been made.
- Include "disableadmob=true" if you would like to disable AdMob ads after the purchase of the product.
For in-app subscription products, use this kind of URL scheme:
<a href="inappsubscription://?package=IN-APP_PURCHASE_PRODUCT_IDENTIFIER&expired_url=https://www.yahoo.com&successful_url=https://www.google.com">Start In-App Subscription</a>
- The "package" is the product identifier of the subscription you want to sell.
- The "successful_url" is the URL you want the app to load once the purchase is complete.
- You may want to save a cookie on this page so that your web app remembers that the subscription has been activated.
- The "expired_url" is the URL you want the app to load when the subscription is no longer valid.
- You may want to update/delete a cookie on this page so that your web app remembers that the subscription has been deactivated.
All information about the In-App Purchase Product Identifier can be found here.
You can identify the user server-side. e.g., the site /buy_now.php redirects to In-App-Purchase API and that API redirects to /thanks.php, you can still access the user/session cookies server-sided and identify the user who just bought that In-App-Purchase. In this use case, please make sure that you deactivate the deletecache option in the Config.swift file in order to keep cookies activated by the In-App Purchase process.
Server-Side Verification: Additionally or alternatively, WebViewGold also allows you to handle In-App Purchase or Subscription data from a server-side. After a successful transaction, the following JavaScript variables are created and injected into the webpage by WebViewGold:
1. planID: Contains the Product ID
2. transactionIdentifier: Contains the unique Transaction ID
3. subreceipts: Contains unique receipt IDs for the user’s subscriptions
These variables can be accessed directly on the webpage for server-side storage and validation. Note that these variables are injected directly into the global window object after a transaction. Make sure your JavaScript is executed on the same page where the variables are accessible. Add appropriate fallback mechanisms if the variables are not available within the expected time frame (as shown in the timeout implementation). Sending these variables to your server allows you to validate subscriptions and transactions securely using Apple’s receipt validation API or your chosen method. Here’s an example JavaScript implementation:
<script>
// Utility function to wait for a variable to be defined
function waitForVariable(variableName, callback, timeout = 5000) {
    const startTime = Date.now();

    (function checkVariable() {
        if (window[variableName] !== undefined) {
            callback(window[variableName]);
        } else if (Date.now() - startTime < timeout) {
            setTimeout(checkVariable, 100);
        } else {
            console.error(`Timeout: ${variableName} was not set within ${timeout} ms`);
        }
    })();
}

// Example: Handling In-App Purchase/Subscription variables
waitForVariable("planID", function(planID) {
    console.log("planID:", planID);
    // Send the Product ID to your server
    sendToServer("planID", planID);
});

waitForVariable("transactionIdentifier", function(transactionIdentifier) {
    console.log("transactionIdentifier:", transactionIdentifier);
    // Send the Transaction ID to your server
    sendToServer("transactionIdentifier", transactionIdentifier);
});

waitForVariable("subreceipts", function(subreceipts) {
    console.log("subreceipts:", subreceipts);
    // Send Subscription Receipt IDs to your server
    sendToServer("subreceipts", subreceipts);
});

// Function to send data to your server for validation
function sendToServer(key, value) {
    fetch("https://example.com/api/validate", {
        method: "POST",
        headers: {
            "Content-Type": "application/json"
        },
        body: JSON.stringify({ [key]: value })
    })
    .then(response => response.json())
    .then(data => console.log(`Server Response for ${key}:`, data))
    .catch(error => console.error(`Error sending ${key}:`, error));
}
</script>
Restore Purchases: A restoreinapppurchases:// call allows your app to re-enable previously purchased content. When a user taps a link with this URL scheme, the app initiates a process to revalidate and restore in-app purchases—ideal for scenarios like app reinstallation or device change. Simply add a link like the following to let users restore their purchases:
<a href="restoreinapppurchases://">Restore Purchases</a>
Cancel Subscription: A cancelinapppurchase:// call directs users to the official Apple subscription management portal, allowing them to cancel their subscriptions through Apple's native interface. Simply add a link like the following to forward users to manage their subscriptions:
<a href="cancelinapppurchase://">Cancel Subscription</a>
Localized Pricing / Get Store Location: The
getstorelocation:// URL scheme injects the App Store location into a JavaScript variable. After getstorelocation:// is called/linked to, the WebViewGold wrapper retrieves the App Store's country code if available. Alternatively, consider turning autoInjectVariable to true in Config.swift to automatically inject this (and other) values into JavaScript without needing to call a URL upfront. The country code is then injected into a JavaScript variable storeLocation for further use by your web app (e.g., for displaying localized pricing). If the code is not available, storeLocation will be set to null:- If successful (example United States of America):
var storeLocation = 'US'; - If no country code is found:
var storeLocation = null;
Note: Using our API for delivering paid content to app users does carry some risk of technically savvy users accessing the content without paying for it. This could occur through various methods, such as retrieving and opening the Success URL link directly, canceling subscription products after uninstalling the app, or using withdrawal rights and chargeback processes for credit cards. However, it is crucial to note that some level of risk is present with any digital approach. While we continue to work on ways to reduce these risks, it is ultimately up to the WebViewGold user/developer to accept the risk of unauthorized/unpaid access to content when using the suggested approach, as the API comes without a warranty. Despite this, the benefits of using our API generally outweigh the risks for most users. To ensure accurate revenue reporting and identify potential discrepancies, we recommend tracking and comparing the sales data of App Store Connect with server-side activations of in-app purchase products.
QR Code Scanner API
To trigger the QR code scanner within your WebView-based iOS app, use the following HTML link format:
<a href="qrcode://">Scan QR Code</a>
Clicking this link will open the device’s camera to scan a QR code, and any URL encoded in the QR code will load automatically within the WebView.
Use Cases:
- Bridging print and digital content (e.g., scanning a QR code from a magazine to open a webpage).
- Quick access to promotions, product information, or events.
- Securely linking users to internal app resources or specific landing pages.
Barcode Scanner API
The WebViewGold Barcode Scanner API enables your WebView-based app to activate the device camera for scanning barcodes. Once a barcode is successfully scanned, the result is automatically passed back into your web content.
Use Cases:
- Scanning product barcodes for inventory systems
- Processing tickets or access codes in logistics or event apps
- Enabling fast data capture from printed barcodes
How to Trigger the Scanner:
Use the following HTML to start the native barcode scanner:
<a href="barcodescanner://">Start Barcode Scanner</a>
<a href="#" onClick="alert(barcodescanresult);">Show Scan Result</a>
- Start Barcode Scanner: Opens the device camera to detect supported barcode formats
- Show Scan Result: Displays the scanned barcode content stored in the
barcodescanresultJavaScript variable
Technical Note: After scanning, the decoded barcode value is injected into the current page via the barcodescanresult JavaScript variable. You can use this variable to auto-fill forms, trigger custom logic, or perform lookups based on scanned data.
Permissions: Make sure the app has access to the device camera, as it is required for barcode scanning to function properly.
Scanning Mode API
If your web app presents information on the screen to be scanned (for example, a QR code), it can be helpful to turn the screen brightness up to 100% and to prevent the screen from sleeping. WebViewGold provides the Scanning Mode API to dynamically enable these optimal scanning conditions.
This API includes 3 commands:
- "auto" = turns on scanning mode and automatically turns it off on page redirect.
- "on" = turns on scanning mode, stays on after page redirects.
- "off" = turns off scanning mode.
Link to these kinds of URLs to use the Scanning Mode API:
<a href="scanningmode://auto">Enable Scanning Mode; will automatically disable on page redirect</a>
<a href="scanningmode://on">Enable Scanning Mode; will persist until manually disabled</a>
<a href="scanningmode://off">Disable Scanning Mode</a>
Take Screenshot API
The screenshot API of WebViewGold allows you to take screenshots programmatically from the WebView content and save them to the Photos gallery of your app user. One possible use case for this API is, for example, to programmatically save a screenshot of your e-tickets (for festivals, travels, …) of your web app so that they can be shown when the user is offline and cannot access the WebView content (e.g., while being in a festival location, on a train ride, …).
Link to this kind of URL to trigger a screenshot:
<a href="takescreenshot://">Save</a>
App Version Check API
Using this WebViewGold JavaScript API approach, your website/web app can retrieve the version of the iOS app being used by your app user. This is especially helpful if you want to notify users of an older version to update their app. Moreover, you can hide web app sections that require app features supported by a specific app version.
Use JavaScript to this kind of URL to read and alert the app version and app bundle number:
<script>
window.location.href = "getappversion://";
alert(versionNumber);
alert(bundleNumber);
</script>
Alternatively, consider turning
autoInjectVariable to true in Config.swift to automatically inject this (and other) values into JavaScript without needing to call a URL upfront.
Dynamic UI API
WebViewGold allows you to dynamically customise the UI elements in your web app. These elements may consist of the status bar, bottom bar (iOS), navigation bar (Android) and pull to refresh (iOS). WebViewGold includes the following commands to dynamically customise these elements:
- statusbarcolor://
- The MASTER COMMAND to change the color of the status bar and any other relevant UI features automatically, such as the status bar text color, the bottom bar color (iOS), navigation bar color (Android), etc.
- statusbartextcolor://
- Allows you to manually change the text color of the status bar (iOS and Android).
- bottombarcolor://
- If a bottom bar (iOS) or navigation bar (Android) UI element exists, allows you to manually change its color.
- hidebars://
- Allows you to hide the background of the status bar, whos text remains on a transparent background.
Changing the color of the Status Bar (and other UI elements automatically):
This feature supports a color input in the following format:
- RGB = {red, green, blue}
Use JavaScript to this kind of URL to change the color of the status bar:
<script>
// Example: red
window.location.href = "statusbarcolor://255,0,0";
</script>
When you change the status bar color, the status bar text will automatically change to a suitable color (white or black) depending on how dark the color is.
Optional UI features like Pull To Refresh (iOS), the Bottom Bar (iOS) and the Navigation Bar (Android) will also have their colors automatically adjusted.
Changing the color of the Status Bar text:
If you would like to manually choose the color of the status bar text, you can do so using this option.
This feature supports a text input for the following options:
- "white"
- "black"
<script>
// Example: white text
window.location.href = "statusbartextcolor://white";
// Example: black text
window.location.href = "statusbartextcolor://black";
</script>
Changing the color of the Bottom Bar:
This feature supports a color input in the following format:
- RGB = {red, green, blue}
Use JavaScript to this kind of URL to change the color of the status bar:
<script>
// Example: red
window.location.href = "bottombarcolor://255,0,0";
</script>
Hiding the status bar
The hidebars functionality can either be on or off.
Note, the status bar text, such as the time and battery percentage remain visible to the user, but the background surrounding the text becomes transparent and the WebView expands to fill the room left.
Use JavaScript to change the visibility status of the bar:
<script>
// Example: hide the bars from view
window.location.href = "hidebars://on";
// Example: redisplay the bars after being hidden
window.location.href = "hidebars://off";
</script>
Dynamic App Icon API
This API allows the users of your app to change the app icon with the click of button. WebViewGold allows up to three alternative app icons from your default app icon. Whenever the app icon is dynamically changed, the user will be notified upon successful completion:![]()
If you wish to change the app icon of your app on behalf of your users, you can do so by publishing a new version of your app with the new app icon installed. See how to change your app icon on WebViewGold here.
To dynamically change the app icon, just link to one of the following URL formats:
<script>
// Change to Alternative App Icon 1
window.location.href = "changeicon://icon1"

// Change to Alternative App Icon 2
window.location.href = "changeicon://icon2"

// Change to Alternative App Icon 3
window.location.href = "changeicon://icon3"

// Revert to the Default App Icon
window.location.href = "changeicon://default"

</script>
View a demonstration and testing page for this API here.
To set your alternative app icons, open your app files in Finder and navigate to WebView-Swift/WebView/ApplicationIcon/AppIconAlternate.
In this folder, you will see template app icons for all of the required app icon sizes in iOS (iPhones and iPads), for each alternative icon:
The default names of each alternative app icon are: "AppIconAlternate1", "AppIconAlternate2" and "AppIconAlternate3".
If you like, you can change the default names by editing the alternativeAppIconNames variable in the Config file:
Each app icon (for example, 'AppIconAlternateX') requires five different sizes, which are described by the file name suffix:
- For iPhones:
- AppIconAlternateX (60x60 pixels)
- AppIconAlternateX@2x (120x120 pixels)
- AppIconAlternateX@3x (180x180 pixels)
- For iPads:
- AppIconAlternateX-ipad@2x (152x152 pixels)
- AppIconAlternateX-ipad@3x (167x167 pixels)
When replacing these template app icons with your own, make sure they follow the same file name format (with the suffixes listed above) with the correct image size.
View a more detailed guide on app icon specifications here.
To activate this API (also for App Store Review), please open Info.plist as source code (right-click on the file and select "Open As" -> "Source Code" from the contextual menu): Within Info.plist, search for
<key>CFBundleIcons</key>
	<dict>
		<key>CFBundlePrimaryIcon</key>
		<dict>
			<key>CFBundleIconFiles</key>
			<array>
				<string></string>
			</array>
			<key>UIPrerenderedIcon</key>
			<false/>
		</dict>
	</dict>
and replace it with
<key>CFBundleIcons</key>
<dict>
	<key>CFBundleAlternateIcons</key>
	<dict>
		<key>AppIconAlternate1</key>
		<dict>
			<key>CFBundleIconFiles</key>
			<array>
				<string>AppIconAlternate1</string>
			</array>
			<key>UIPrerenderedIcon</key>
			<false/>
		</dict>
		<key>AppIconAlternate2</key>
		<dict>
			<key>CFBundleIconFiles</key>
			<array>
				<string>AppIconAlternate2</string>
			</array>
			<key>UIPrerenderedIcon</key>
			<false/>
		</dict>
		<key>AppIconAlternate3</key>
		<dict>
			<key>CFBundleIconFiles</key>
			<array>
				<string>AppIconAlternate3</string>
			</array>
			<key>UIPrerenderedIcon</key>
			<false/>
		</dict>
	</dict>
	<key>CFBundlePrimaryIcon</key>
	<dict>
		<key>CFBundleIconFiles</key>
		<array>
			<string></string>
		</array>
		<key>UIPrerenderedIcon</key>
		<false/>
	</dict>
</dict>
Moreover, search for
<key>CFBundleIcons~ipad</key>
<dict>
    <key>CFBundlePrimaryIcon</key>
    <dict>
        <key>CFBundleIconFiles</key>
        <array>
            <string></string>
        </array>
        <key>UIPrerenderedIcon</key>
        <false/>
    </dict>
</dict>
and replace it with
<key>CFBundleIcons~ipad</key>
<dict>
	<key>CFBundleAlternateIcons</key>
	<dict>
		<key>AppIconAlternate1</key>
		<dict>
			<key>CFBundleIconFiles</key>
			<array>
				<string>AppIconAlternate1-ipad</string>
			</array>
			<key>UIPrerenderedIcon</key>
			<false/>
		</dict>
		<key>AppIconAlternate2</key>
		<dict>
			<key>CFBundleIconFiles</key>
			<array>
				<string>AppIconAlternate2-ipad</string>
			</array>
			<key>UIPrerenderedIcon</key>
			<false/>
		</dict>
		<key>AppIconAlternate3</key>
		<dict>
			<key>CFBundleIconFiles</key>
			<array>
				<string>AppIconAlternate3-ipad</string>
			</array>
			<key>UIPrerenderedIcon</key>
			<false/>
		</dict>
	</dict>
	<key>CFBundlePrimaryIcon</key>
	<dict>
		<key>CFBundleIconFiles</key>
		<array>
			<string></string>
		</array>
		<key>UIPrerenderedIcon</key>
		<false/>
	</dict>
</dict>
This is the default setting regarding alternative app icon names and amount of alternative app icon files.
Contacts API
WebViewGold allows for the export of contacts into a JavaScript variable, in the format below via the readcontacts:// API. The JSON object is stored in the contacts variable. In order to access this, your app must first gain permission through the requestcontactpermission:// API, which will prompt your user to enable contact permissions. Without completing this step, the readcontacts:// will populate the contacts variable with a null value.
Example output stored in JS contacts variable:
              {
                "John Appleseed":[
                   "888-555-5512",
                   "888-555-1212"
                ],
                "Daniel Higgins":[
                   "555-478-7672",
                   "(408) 555-5270",
                   "(408) 555-3514"
                ],
                "David Taylor":[
                   "555-610-6679"
                ],
                "Hank Zakroff":[
                   "(555) 766-4823",
                   "(707) 555-1854"
                ]
             }
Biometric Authentication API
This is an independent, more powerful, yet more complicated alternative to our simple Config.swift-based enableBioMetricAuth option. This API allows you to use biometric authentication in your app and return result via JavaScript to your website. Biometric authentication includes Face ID (in newer iPhone designs) and Touch ID (in older iPhone designs) with code as fallback. By calling the "bioauth://" URL command, you can trigger the biometric authentication natively in your app. Once the process is complete, WebViewGold will report the results back to your web app by calling one of the following functions:
- onBioAuthSuccess()
- Called when the authentication process was successful.
- onBioAuthFailure(errorCode, errorMessage)
- Called when the authentication process fails and provides error information.
- onBioAuthUnavailable()
- Called when biometric authentication is found to be unavailable on the device.
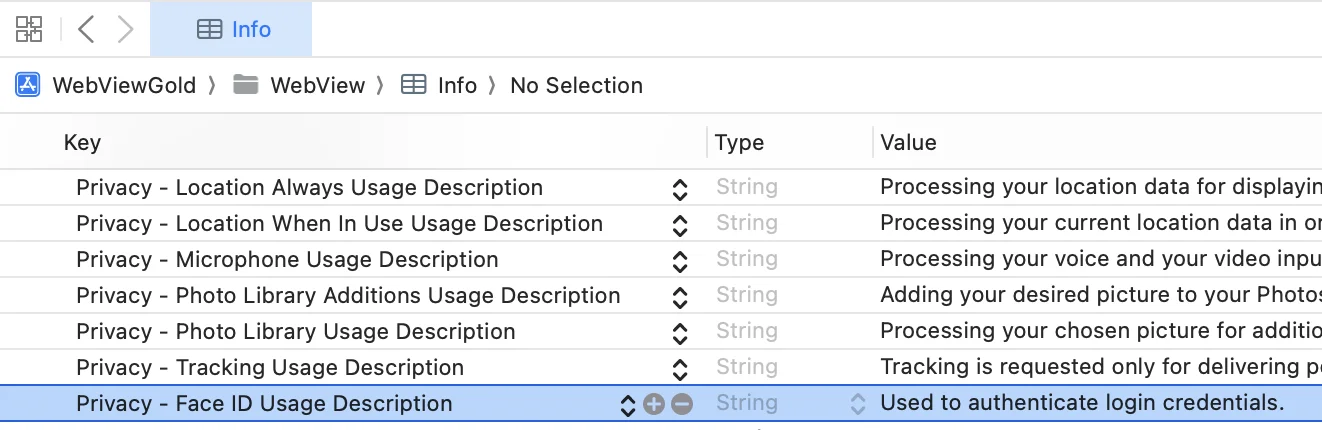
To use this API, first, you must add the privacy key for Face ID biometric authentication in your Info.plist file. This is done by opening Info.plist, hovering over an exisiting key, clicking the (+) symbol to add a new key below your currently selected one and selecting the "Privacy - Face ID Usage Description" key option. Without this key, the app will not support Face ID. The value for this key is a description that is presented to the user the first time your app attempts to use Face ID. This description should clearly explain why your app needs to use Face ID. See below for an example description for this key:
Next, you must define the following functions (in JavaScript) in your web app to handle the results of a biometric authentication:
<script>

function onBioAuthSuccess() {
    alert("Bio Authentication Succeeded");
}

function onBioAuthFailure(errorCode, errorMessage) {
    // errorCode = Int, errorMessage = String
    alert(`Bio Authentication Failed, ${errorMessage} (code ${errorCode})`);
}

function onBioAuthUnavailable() {
    alert("Bio Authentication Unavailable");
}

</script>
Then, load this kind of URL to trigger the biometric authentication process in your web app:<script> window.location.href = "bioauth://"; </script>
Security Notice: It should be noted that malicious users may be able to cause the onBioAuthSuccess() function to be called without completing the authentication process. Since authentication is a sensitive process, it is recommended to add an extra layer of security in your web app, such as a cookie or geolocation check, to help ensure the integrity of the authentication. Please consult your website cybersecurity expert for tailored guidance for your web app's needs.
Haptic Feedback API
WebViewGold allows for the implementation of native iOS haptic control within your web app. Using our API, you are able to perform the following actions:
We suggest previewing Apple's best practices overview before including these features into your application. An example of how this API can be utilised can be seen below, with an anchor tag and custom javascript function which interact with our haptic API.
<a onclick="lightHaptic('index.html')">Navigation Link with Haptics</a>

<script>
function lightHaptic(url) {
  if (isWebViewBrowser) {
    window.location.href = url;
    loadInnerHref("lighthaptic://");
  } else {
    window.location.href = url;
  }
}

function loadInnerHref(url) {
  iFrame = document.createElement("iframe");
  iFrame.setAttribute("src", url);
  document.body.appendChild(iFrame);
  iFrame.parentNode.removeChild(iFrame);
  iFrame = null;
}
</script>
Click here to view a demonstration web page for this feature. Inspect the page to view the example code.
Shortcut API
Enable var useShortcuts = true in Config.swift to register dynamic shortcuts defined in Shortcuts.json. Each shortcut can open a URL, inject JavaScript, and display an SF Symbol. Example:
{
    "shortcuts": [
        {
            "title": "Open Google",
            "redirection_link": "https://google.com",
            "injection": "",
            "symbol": "wrench.and.screwdriver"
        },
        {
            "title": "Open & Inject",
            "redirection_link": "https://apple.com",
            "injection": "(function() { console.log('Injected and executed!'); })();",
            "symbol": "lock.open"
        }
    ]
}
Users can access the shortcuts by long-pressing the app icon.
Clipboard API
Call getclipboard:// to inject the current clipboard contents into the JavaScript variable clipboarddata.
<a href="getclipboard://">Read Clipboard</a>
<script>
function showClipboard() {
    console.log(clipboarddata);
}
</script>
Share Extension
When users share text or images to your app from apps such as Photos or Safari, the data becomes available in the JavaScript variable sharedData. Shared images are provided as Base64 strings.
<script>
if (typeof sharedData !== 'undefined') {
    console.log(sharedData);
}
</script>
Widget Extension
Offer an image widget (SVG or PNG) on the home screen. Activate it following our video guide and configure widgetRefreshTime (in minutes) and widgetfallbackURL in Config.swift. The widget image can be updated from your web app by loading a URL such as widget://https://example.org/image.svg?user=30.
App Clip Extension
Provide an App Clip experience by following our activation video. Afterwards adjust the behaviour in AppClipConfig.swift, e.g., to set the clip URL or appearance.
Native Navigation Footer
Set var showNavFooter = true in Config.swift to enable the native navigation footer bar. Configure buttons and links in FooterBar.json. Example:
{
   "colour":"dark",
   "layout":[
      {
         "redirection_link":"https://webviewgoldtest.github.io/index.html",
         "sf_symbol":"house",
         "name": "Home"
      },
      {
         "redirection_link":"https://webviewgoldtest.github.io/appControls.html",
         "sf_symbol":"wrench.and.screwdriver",
         "name": "Controls"
      },
      {
         "redirection_link":"https://webviewgoldtest.github.io/NFCtesting.html",
         "sf_symbol":"wifi.square",
         "name": "NFC"
      },
      {
         "redirection_link":"https://webviewgoldtest.github.io/IAPtesting.html",
         "sf_symbol":"cart",
         "name": "Purchases"
      },
      {
         "redirection_link":"https://webviewgoldtest.github.io/permissions.html",
         "sf_symbol":"lock.open",
         "name": "Permissions"
      }
   ]
}
Each
sf_symbol uses an SF Symbol and opens the redirection_link in the main WebView.
Screen Capture Detection
Set let preventScreenCapture = true in Config.swift to detect screenshots or screen recordings and automatically call the JavaScript function onScreenCaptureAttempt.
<script>
function onScreenCaptureAttempt() {
    alert('Screen capture detected');
}
</script>
MultiAPICall Feature
This is an optional feature for iOS since Apple-based browsers process multiple page reloads on the same script differently to Android-based browsers.
This means calling window.location.href = "exampleAPItrigger" multiple times on the same web page script will not work on iOS, unlike on Android.
The MultiAPICall feature allows you to call multiple APIs in a single window.location.href assignment at the end of your web page script. This may be useful to you if you wanted to pre-load more than one data feature from the app, ready to be used on a page.
MultiAPICall supports the following data collection APIs as entries:
"get-uuid", "user-disable-tracking", "getonesignalplayerid", "getappversion", "__haptics (light, medium, heavy, success, warning, error)"
Use JavaScript to this kind of URL to call multiple APIs at once (make sure to include a check to only use on the iOS platform):
<script>
// Example combination: "getonesignalplayerid" and "getappversion"

if (getMobileOperatingSystem() == "iOS") {
    // iOS: Use MultiAPICall feature, separate API names by commas (","), NO spaces
    window.location.href = "multiapicall://getonesignalplayerid,getappversion";
} else {
    // Android: Can handle multiple calls at once, use normal API call structure
    window.location.href = "getonesignalplayerid://";
    window.location.href = "getappversion://";
}
</script>
Click here to view a demonstration web page for this feature. Inspect the page to view the example code.
NFC Plugin (sold separately)
Near-Field Communication (NFC) technology is one of the latest technologies that has become very popular among mobile users. It enables two devices or a device and an NFC tag to communicate wirelessly when in close proximity. NFC is widely used on iOS devices for reading and writing small amounts of data, making it an effective tool for sharing information via NFC-enabled cards or tags.
The NFC API allows developers to read and write data to NFC tags directly from app code. This opens up new ways for apps to interact with users, from sharing contact information to embedding text snippets.
WebViewGold NFC Plugin Integration
While NFC is not part of the general WebViewGold feature scope, we offer a custom, easy WebViewGold NFC plugin integration (via JavaScript) on an individual basis.
Please send us your requirements (e.g., writing/reading text snippets and/or contact card details to/from NFC tags) via an email to [email protected] for a free consultation and a non-binding quote.
Writing
To write a value to an NFC tag, send a command from your web app by loading the following URL: writenfc://?value=data
Example:<a href="writenfc://?value=WebViewGold.com"> Write to an NFC tag </a>
This puts your app into Write Mode and stores the value until a tag is scanned.
Writing to a VCARD
Use the same API as writing plaintext. Format the text like:
VCARDSeparate properties with an underscore (
FN:John Doe
Title:Developer
TEL;TYPE=CELL:0452641211
_
_
_
_) and prefix the text with VCARD_. See https://en.wikipedia.org/wiki/VCard#Properties for a list of supported properties.
Reading
To read an NFC tag, load readnfc://. The app will return the information to your web app by calling readNFCResult(data, id, tag) where data is the stored value, id the tag identifier and tag the tag type. Define this JavaScript function in your web app to handle the values.
How to Test the API
- Open the Config file of your app’s codebase.
- Enter your purchase code.
- Set the app’s URL to the NFC API Test Page: https://webviewgoldtest.github.io/NFCtesting.html
- Run the app.
- Press one of the Read or Write options to enable the corresponding mode. If writing, enter a value.
- Bring the NFC tag to the device to complete the read or write operation. The test page and app will display the results.
Siri Plugin (sold separately)
Enable Siri integration by entering your plugin token in static let siriEnabled within Config.swift and adding the Siri capability to the WebViewGold target.
Reach out to [email protected] for more information.
How to implement Siri functionality
- Create a JavaScript function that Siri should trigger:
function playRadio() {
   // Add desired functionality
}
- Add a button or link to register the Siri command (avoid phrases like "Open" which may confuse Siri):
<a href="addtosiri://?command=Play%20Radio&jsFunction=playRadio()">Add Play Radio to Siri</a>
The command parameter provides the recommended phrase, while jsFunction specifies the JavaScript function to execute.
Apple HealthKit Plugin (sold separately)
Activate HealthKit features by setting static let HealthKitEnabled in Config.swift to your plugin token and adding the HealthKit capability.
Contact [email protected] for details.
Build and publish your app
Your app is ready, and now it's time to upload it to the Apple App Store and reach an audience of millions? Exciting! The following section will show you how to do it — whether you want to do it yourself or have some work done for you.
Prefer a browser-based workflow? The WebViewGold Cloud Builder (paid add-on) handles configuration, building, and uploads right from your browser without Xcode.
Option A) Full App Publishing Service
Bringing your app to the App Store should be smooth and stress-free. Treat yourself to some support — with appsubmitter.io, you can enjoy a convenient, expert-led publishing process — so you can focus on what matters most while we handle the details.
Why Choose appsubmitter.io?
- Save time – We take care of certificates, screenshots, and uploads.
- Expert handling – Your app is submitted professionally, with no hassles.
- Published under your account – You have full control, no restrictions.
- Approval guarantee – If Apple rejects your app, you get a full refund (see Terms and Conditions).
Ready to launch? Book a video call and let’s get your app live!
Option B) Manual Publishing Process
You don't want to use our stress-free submission service, but you want to deal with it yourself? Sure, follow this guide:
Use your Apple Developer Program Subscription to publish your app in the App Store. Before uploading, please change the Bundle Identifier (also called the "Bundle ID"):
Tip: The WebViewGold Cloud Builder (paid add-on) automatically handles bundle identifiers and App Store uploads, so you can skip this step.
Repeat this process for each target such as OneSignalNotificationServiceExtension, AppClip, and other extensions. Each target's bundle identifier must use your main app bundle ID as a prefix. For example, if your main app bundle ID is com.my.app, the OneSignal app extension bundle ID should be com.my.app.OneSignalNotificationServiceExtension.
Please note that the Bundle Identifier and your app's displayed name (the Product Name) are the only identification components that you need to change in the app template. Please avoid changing the Project Name (called "WebViewGold"; it is the name that sits at the top of the project navigator in the left panel of the Xcode window) as it can cause issues. The Project Name is not visible to users of your app and is not important in the app submission process.
Afterward, please add customized texts to the permission details in terms of location, photo/camera access, and all other API details. Delete permissions which are not required by your app - except for the Privacy - Tracking Usage Description key (which is required by Apple for all apps; removing this key will cause your app to crash). You find the details in Info.plist file: 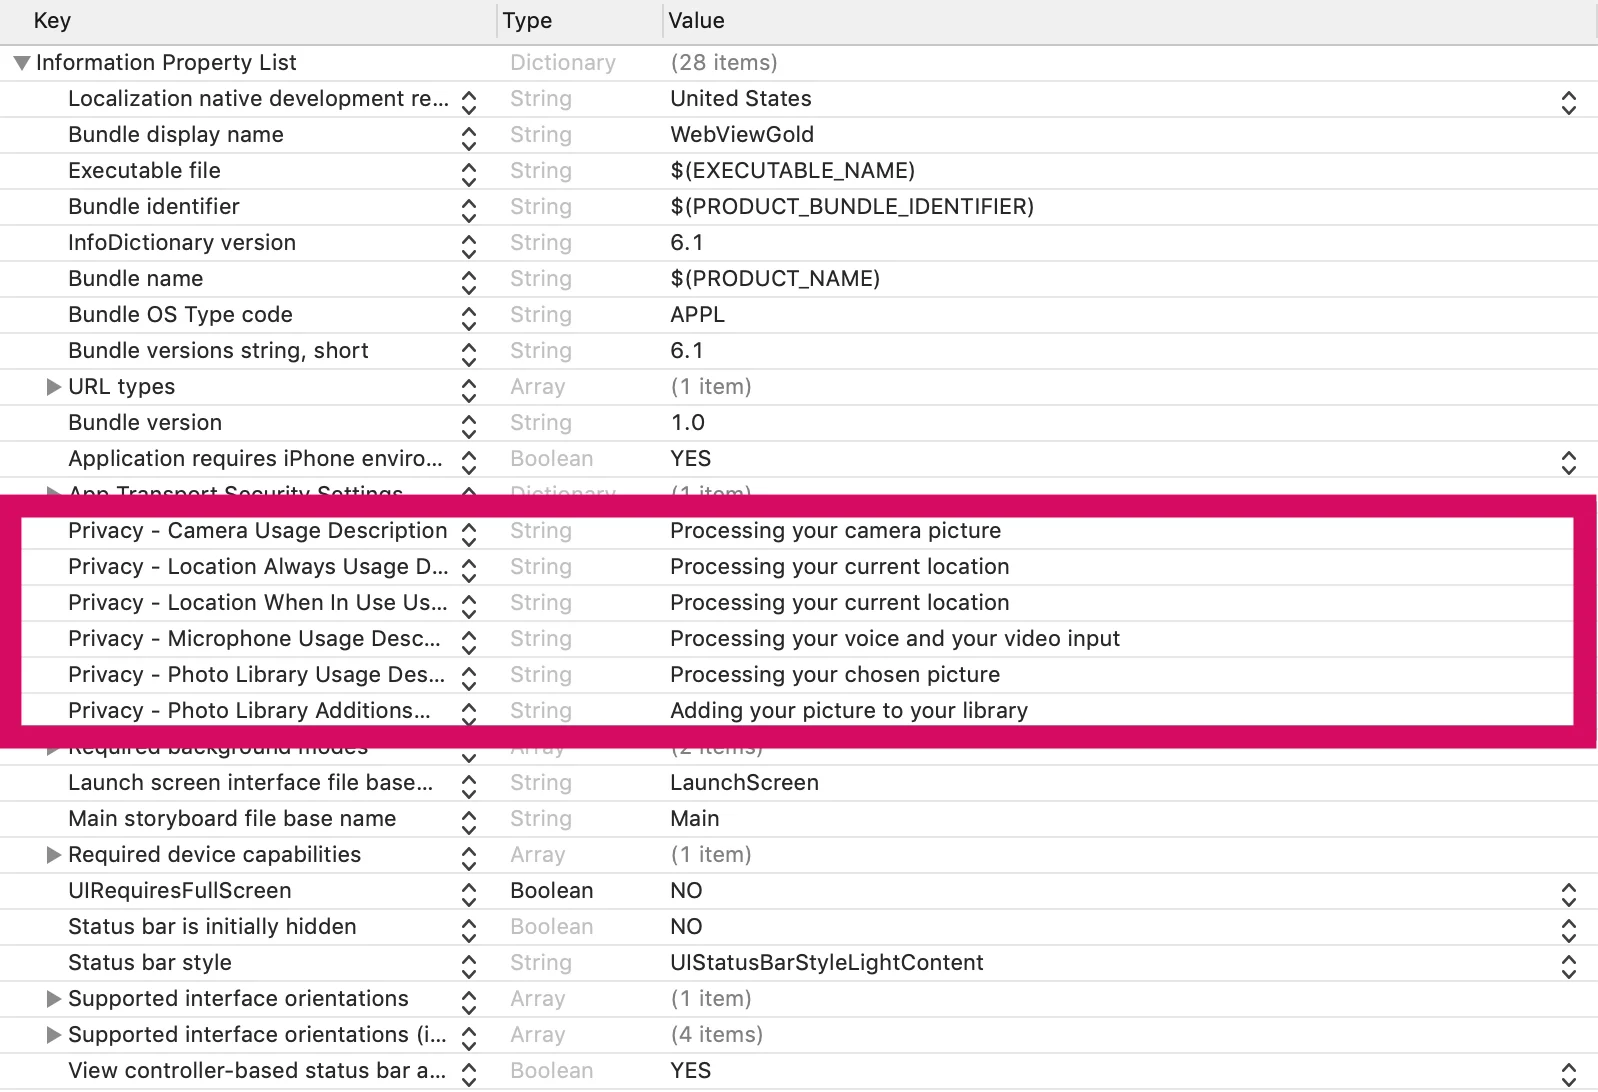
Afterward, please consider a professional User Experience/UX Review on UXreviewer.io or similar services for best App Store approval results. Such a UX review also helps you to achieve better customer retention in general for your product with suggestions for improvement.
Great, now you are ready for the App Store submission of your web app. App Store approval works in most cases without any problems but highly depends on the content you provide in your app as WebViewGold does not provide content by itself. Please make sure to submit an app using a website/web app that behaves like a mobile app (for example, by using responsive design). Make sure that the content does not contradict the legal requirements of the Apple Developer Program. Use different link colors than standard HTML colors for better user experience.
Afterward, please follow the steps of this second video:
One addition to the tutorial video: In timestamp 07:00, after creating the App Identifier, please make sure to activate both the capabilities "App Groups" and "Push Notifications" in the App Identifier section on the Apple Developer Portal (choose the correct App ID here). See these screenshots: https://prnt.sc/xz4hg5 & https://prnt.sc/xz4j01. Restart Xcode afterward.
The App Store upload asks you whether you use encryption? We do not offer legally binding advice, but "No" must be indicated here in most cases. However, if HTTPS is used, an annual security report may have to be submitted to US authorities. More information about this can be found here.
The App Store upload asks you whether you use the Ad ID / IDFA? The Ad ID is included because AdMob is integrated, but not active by default. Removing the AdMob SDK will produce a lot of dependency errors, so the easiest suggestion would be to choose "Yes" at the "Does your app use the Ad ID?" question and selecting the tickbox "Attribute this app installation to a previously served advertisement" only (leave all other tickboxes blank). So, if you use AdMob banner/interstitial ads in WebViewGold, please configure this screen like this. If you do not use AdMob banner/interstitial ads in WebViewGold while the SDK is still embedded (which is the typical case while not using AdMob in WebViewGold), please select these options.
If Apple rejects your app, please use Apple Resolution Center to explain the app feature in general (like "Our app enables our existing users to login in/use our products on their handheld device/....). If Apple still rejects your app, we can offer you a full refund of the WebViewGold license (by claiming within 14 days after purchase; see Terms and Conditions). Just contact us by mail.
Congrats on your own published iOS app! 🎉
No time or don't you feel like signing and uploading manually? Consider the appsubmitter.io service:
Of course, after the release should be celebrated first! But then perhaps the next project is already on the agenda? Our App Specialists are also happy to help you with individual development services for web apps, iOS apps, Android apps, chat bots, marketing ideas, and much more. Learn more
Credits / License / Upgrade to Extended License
Please don't forget to add your Envato/CodeCanyon Purchase Code in the purchasecode field for each app published by you. One license per each customized and published end product is required.
You will need an Envato/CodeCanyon Extended License if any of these cases apply:
- You charge your users for the App Store download
- In-App Purchases API or In-App Subscription API will be used in your app
- You sell your final app on any marketplace
If you already bought the Regular License, you can upgrade the existing license here. Alternatively, if you do not want to request a refund or upgrade the license, you can re-use your existing Regular License for another app covered by the Regular License.
All rights (e.g., of images) belong to their respective owners. The provider of this source code is OnlineAppCreator.com c/o jocapps GmbH - registered in Germany - and is not affiliated with Apple. iOS is a registered trademark of Cisco and used under license by Apple Inc. iPad, iPhone, iPod, Xcode, and Xcode logo are registered trademarks of Apple Inc.
One license per each customized end product is required. Please take a look for license info of your CodeCanyon purchase: https://codecanyon.net/licenses/standard
WebViewGold for iOS uses OneSignal-iOS-SDK (© 2017 OneSignal) which is licensed under a modified MIT License; you may not use this file except in compliance with the license.
WebViewGold for iOS uses SVProgressHUD (© 2011-2018 Sam Vermette, Tobias Tiemerding and contributors) which is licensed under the MIT License; you may not use this file except in compliance with the license.
WebViewGold for iOS uses firebase-ios-sdk (© 2020 Firebase) which is licensed under the Apache License, version 2.0; you may not use this file except in compliance with the license.
WebViewGold for iOS uses Google Mobile Ads SDK (© 2020 Google) which is licensed under the Google Developers Site Terms of Service; you may not use this file except in compliance with the license.
WebViewGold for iOS uses nanopb (© 2011 Petteri Aimonen) which is licensed under the zlib License; you may not use this file except in compliance with the license.
WebViewGold for iOS uses promises (© 2020 Google) which is licensed under the Apache License, version 2.0; you may not use this file except in compliance with the license.
WebViewGold for iOS uses protobuf (© 2020 Google) which is licensed under a Google License; you may not use this file except in compliance with the license.
WebViewGold for iOS uses SwiftQRCodeScanner (© 2017 vinodiOS) which is licensed under the MIT License; you may not use this file except in compliance with the license.
WebViewGold for iOS uses SwiftyStoreKit (© 2015-2016 Andrea Bizzotto) which is licensed under the MIT License; you may not use this file except in compliance with the license.
WebViewGold for iOS uses GIF-Swift (© https://iosdevcenters.blogspot.com/).
Rate WebViewGold
If you have 10 seconds, please rate WebViewGold (it is a great motivation for future updates ^^):
1. Go to CodeCanyon.net and sign in
2. Navigate to https://www.codecanyon.net/downloads
3. Click the stars, as shown in this picture:

Thank you very much!
Get WebViewGold for Android
Get WebViewGold for macOS